Showing posts with label mongodb. Show all posts

Friday, October 10, 2014

Storage Concepts in Docker: Persistent Storage

This is the second of three posts on storage management in Docker:


This is a side trip on my way to creating a containerized Pulp content mirroring service using Docker and Kuberentes.  The storage portion is important (and confusing) enough to warrant special attention.

Persistent Storage

In the previous post I talked about the mechanisms that Docker offers for sharing storage between containers.  This kind of storage is limited to containers on the same host and it does not survive after the last connected container is destroyed.

If you're running a long-lived service like a database or a file repository you're going to need storage which exists outside the container space and has a life span longer than the container which uses it.
The Dockerfile VOLUME directive is the mechanism to define where external storage will be mounted inside a container.

NOTE: I'm only discussing single host local storage.  The issues around network storage are still wide open and beyond the scope of a single post.

Container Views and Context

Containers work by providing two different views of the resources on the host.  Outside the container, the OS can see everything, but the processes inside are fooled into seeing only what the container writer wants them to see.  The problem is not just what they see though, but how they see it.

There are a number of resources which define the view of the OS.  The most significant ones for file storage are the user and group databases (in /etc/passwd and /etc/group).  The OS uses numeric UID and GID values to identify users and decide how to apply permissions.  These numeric values are mapped to names using the passwd and group files.  The host and containers each have their own copies of these files and the entries in these files will almost certainly differ between the host and the container.  The ownership and permissions on the external file tree must be set to match the expectations of the processes which will run in the container.

SELinux also controls access to file resources.  The SELinux labels on the file tree on the host must be set so that system policy will allow the processes inside the container to operate on them as needed.

In this post most of my effort will be spent looking at the view from inside and adjusting the settings on the file tree outside to allow the container processes to do their work.

Dockerfile VOLUME directive Redux

As noted in the previous post, the VOLUME directive defines a boundary in the filesystem within a container.  That boundary can be used as a handle to export a portion of the container file tree.  It can also be used to mark a place to mount an external filesystem for import to the container.


When used with the Docker CLI --volumes-from option it is possible to create containers that share storage from one container to any number of others.  The mount points defined in the VOLUME directives are mapped one-to-one from the source container to the destinations.

Importing Storage: The --volume CLI option

When starting a Docker container I can cause Docker to map any external path to an internal path using the --volume (or -v) option.  This option takes two paths separated by a colon (:).  The first path is the host file or directory to be imported into the container.  The second is the mount point within the container.

docker run --volume <host path>:<container path> ...

Example: MongoDB persistent data

Say I want to run a database on my host, but I don't want to have to install the DB software into the system. Docker makes it possible for me to run my database in a container and not have to worry about which version the OS has installed. However, I do want the data to persist if I shut the container down and restart it, whether for maintenance or to upgrade the container.

The Dockerfile for my MongoDB container looks like this:


  • Lines 1 and 2 are the boilerplate you've seen to define the base image and the maintainer information.
  • Line 7 installs the MongoDB server package
  • Lines 9 - 11 create the directory for the database storage and ensures that it will not be pruned by placing a hidden file named .keep inside.  They also set the permissions for that directory in the context of the container view to allow the mongodb user to write the directory.
  • Line 15 specifies the location of the imported volume.
  • Line 17 opens the firewall for inbound connections to the MongoDB
  • Lines 19 and 20 set the user that will run the primary process and the location where it will start.
  • Lines 22 and 23 define the binary to execute when the container starts and the default arguments

To run a shell in the container, use the --entrypoint option.  Arguments to the docker run command will be passed directly to the mongod process, overriding the defaults.

What works?


I know that this image works when I just use the default internal Docker storage. I know that file ownership and permissions will be an issue, so the first thing to do is to look inside a working container and see what the ownership and permissions look like.

docker run -it --name mongodb --entrypoint /bin/sh markllama/mongodb

sh-4.2$ id
uid=184(mongodb) gid=998(mongodb) groups=998(mongodb)

sh-4.2$ ls -ldZ /var/lib/mongodb 
drwxr-xr-x. mongodb mongodb system_u:object_r:docker_var_lib_t:s0 /var/lib/mongodb

Now I know the UID and GID which the container process uses (UID = 184, GID = 998).  I'll have to make sure that this user/group can write to the host directory which I map into the container.

I know that the default permissions are 755 (rwx, r-x, r-x), which is fairly common.

I also see that the directory has a special SELinux label:  docker_var_lib_t. 

Together, the directory ownership/permissions and the SELinux policy could prevent access by the container process to the host files.  Both are going to require root access on the host to fix.

Interesting Note: When inside the container, attempts to determine the process SELinux context are met with a message indicating that SELinux is not enabled. Apparently, from the view point inside the container, it isn't.


Preparing the Host Directory

I could just go ahead and create a directory with the right ownership, permissions and label and attach it to my MongoDB container and say "Voila!".  What fun would that be? Instead I'm going to create the target directory and mount it into a container and try writing to it from inside.  When that fails I'll update the ownership, permissionad and label, (from outside) each time checking the view and capabilities (from inside) to see how it changes.

I am going to disable SELinux temporarily so I can isolate the file ownership/permissions from the SELinux labeling.

sudo setenforce 0
mkdir ~/mongodb
ls -ldZ ~/mongodb
drwxrwxr-x. mlamouri mlamouri unconfined_u:object_r:user_home_t:s0 /home/mlamouri/mongodb

I'm also going to create a file inside the directory (from the view of the host) so that I can verify (from the view in the container) that I've mounted the correct directory.

touch ~/mongodb/from_outside
ls -lZ ~/mongodb/from_outside 
-rw-rw-r--. mlamouri mlamouri unconfined_u:object_r:user_home_t:s0 /home/mlamouri/mongodb/from_outside

Note the default ownership and permissions on that file.

Now I'm ready to try mounting that into the mongodb container (knowing that write access will fail)

Starting the Container with a Volume Mounted

I want to be able to examine the runtime environment inside the container before I let it fly with a mongod process.  I'll set the entrypoint on the CLI to run a shell instead and use the -it options so it runs interactively and terminates when I exit the shell.

The external path to the volume is /home/mlamouri/mongodb and the internal path is /var/lib/mongodb.

docker run -it --name mongodb --volume ~/mongodb:/var/lib/mongodb --entrypoint /bin/sh markllama/mongodb

sh-4.2$ id
uid=184(mongodb) gid=998(mongodb) groups=998(mongodb)

sh-4.2$ pwd
/var/lib/mongodb

sh-4.2$ ls
from_outside

sh-4.2$ ls -ld /var/lib/mongodb
drwxrwxr-x. 2 15149 15149 4096 Oct  9 21:04 /var/lib/mongodb

sh-4.2$ touch from_inside
touch: cannot touch 'from_inside': Permission denied

As expected, From inside the container, I can't write the mounted volume. I can read it (with SELinux disabled) because I have te directory permissions open to the world for read and execute. Now I'll change the ownership of the directory from the outside.

Adjusting The Ownership

sudo chown 184:998 ~/mongodb
ls -ld ~/mongodb
drwxrwxr-x. 2 mongodb polkitd 4096 Oct  9 20:46 /home/bos/mlamouri/mongodb

It turns out I have the mongo-server package installed on my host and it has assigned the same UID to the monogodb user as the container has. However, the group for mongodb inside the container corresponds to the polkitd group on the host.

Now I can try writing a file there from the inside again.  From the (still running) container shell:

sh-4.2$ ls -l
total 0
-rw-rw-r--. 1 mongodb mongodb 0 Oct  9 20:46 from_outside

sh-4.2$ touch from_inside

sh-4.2$ ls -l
total 0
-rw-r--r--. 1 mongodb mongodb 0 Oct 10 01:55 from_inside
-rw-rw-r--. 1 mongodb mongodb 0 Oct  9 20:46 from_outside

sh-4.2$ ls -Z
-rw-r--r--. mongodb mongodb system_u:object_r:user_home_t:s0 from_inside
-rw-rw-r--. mongodb mongodb unconfined_u:object_r:user_home_t:s0 from_outside


Re-Enabling SELinux (and causing fails again)

There are two access control barriers for files.  The Linux file ownership and permissions are one. The second is SELinux and I have to turn it back on. This will break things again until I also set the SELinux label on the directory on the host.

sudo setenforce 1

Now when I try to read the directory inside the container or create a file, the request is rejected with permission denied.

sh-4.2$ ls 
ls: cannot open directory .: Permission denied
sh-4.2$ touch from_inside_with_selinux
touch: cannot touch 'from_inside_with_selinux': Permission denied

Just to refresh, here's the SELinux label for the directory as seen from the host:
ls -dZ mongodb
drwxrwxr-x. mongodb polkitd unconfined_u:object_r:user_home_t:s0 mongodb

SELinux Diversion: What's Happening?

In the end I'm just going to apply the SELinux label which I found on the volume directory when I used Docker internal storage.  I'm going to step aside for a second here though and look at how I can find out more about what SELinux is rejecting

When SELinux rejects a request it logs that request.  The logs go into /var/log/audit/audit.log.  These are definitely cryptic and can be daunting but they're not entirely inscrutable.

First I can use what I know to filter out things I don't care about.  I know I want AVC messages (AVC is an abbreviation for Access Vector Cache.  Yeah.  Not useful).  These messages are indicated by type=AVC in the logs.  Second, I know that I am concerned with attempts to access files labeled user_home_t. These two will help me narrow down the messages I care about.

These are very long lines so you may have to scroll right a bit to see the important parts.

sudo grep type=AVC /var/log/audit/audit.log  | grep user_home_t
type=AVC msg=audit(1412948687.224:8235): avc:  denied  { add_name } for  pid=11135 comm="touch" name="from_inside" scontext=system_u:system_r:svirt_lxc_net_t:s0:c687,c763 tcontext=unconfined_u:object_r:user_home_t:s0 tclass=dir permissive=1
type=AVC msg=audit(1412948687.224:8235): avc:  denied  { create } for  pid=11135 comm="touch" name="from_inside" scontext=system_u:system_r:svirt_lxc_net_t:s0:c687,c763 tcontext=system_u:object_r:user_home_t:s0 tclass=file permissive=1
type=AVC msg=audit(1412948876.731:8257): avc:  denied  { write } for  pid=12800 comm="touch" name="mongodb" dev="sda4" ino=7749584 scontext=system_u:system_r:svirt_lxc_net_t:s0:c687,c763 tcontext=unconfined_u:object_r:user_home_t:s0 tclass=dir permissive=0
type=AVC msg=audit(1412948898.965:8258): avc:  denied  { write } for  pid=11108 comm="sh" name=".bash_history" dev="sda4" ino=7751785 scontext=system_u:system_r:svirt_lxc_net_t:s0:c687,c763 tcontext=system_u:object_r:user_home_t:s0 tclass=file permissive=0
type=AVC msg=audit(1412948898.965:8259): avc:  denied  { append } for  pid=11108 comm="sh" name=".bash_history" dev="sda4" ino=7751785 scontext=system_u:system_r:svirt_lxc_net_t:s0:c687,c763 tcontext=system_u:object_r:user_home_t:s0 tclass=file permissive=0
type=AVC msg=audit(1412948898.965:8260): avc:  denied  { read } for  pid=11108 comm="sh" name=".bash_history" dev="sda4" ino=7751785 scontext=system_u:system_r:svirt_lxc_net_t:s0:c687,c763 tcontext=system_u:object_r:user_home_t:s0 tclass=file permissive=0
type=AVC msg=audit(1412949007.595:8289): avc:  denied  { read } for  pid=14158 comm="sh" name=".bash_history" dev="sda4" ino=7751785 scontext=system_u:system_r:svirt_lxc_net_t:s0:c184,c197 tcontext=system_u:object_r:user_home_t:s0 tclass=file permissive=0
type=AVC msg=audit(1412949674.712:8307): avc:  denied  { write } for  pid=14369 comm="touch" name="mongodb" dev="sda4" ino=7749584 scontext=system_u:system_r:svirt_lxc_net_t:s0:c184,c197 tcontext=unconfined_u:object_r:user_home_t:s0 tclass=dir permissive=0

I found something I hadn't really expected. Every time I try to type a command in the shell within the container, the shell tries to write to the .bash_history file. This Is only an issue when I'm testing the container with a shell. Remember in the Dockerfile I set the WORKDIR directive to the top of the MongoDB data directory. That means when I start the shell in the container, the current working directory is /var/log/mongodb. Which is the directory I'm trying to import. This won't matter when I'm running the daemon properly as there won't be any shell.

The important thing this shows me is the SELinux context of the shell process within the container: system_u:system_r:svirt_lxc_net_t:s0 . (note that I dropped off the MVC context, the "cc87,c763" on the end). That is the process which is being denied access to the working directory.

Given that list of AVCs I can feed them to audit2allow and get a big-hammer policy change to stop the AVCs.


sudo grep type=AVC /var/log/audit/audit.log  | grep user_home_t| audit2allow


#============= svirt_lxc_net_t ==============
allow svirt_lxc_net_t user_home_t:dir { write remove_name add_name };
allow svirt_lxc_net_t user_home_t:file { write read create unlink open append };

This is a nice summary of what is happening and what fails. You could use this output to create a policy module which would allow this activity. DON'T DO IT. It's tempting to use audit2allow to just open things up when SELinux prevents things.  Without understanding what your changing and why you risk creating holes you didn't mean to.

Instead I'm going to proceed by assigning a label to the directory tree which indicates what I mean to use it for (content for Docker containers).  That is, by labeling the directory to allow Docker to mount and write it, it becomes evident to someone looking at it later what I meant to do.


Labeling the MongoDB directory for use by Docker

The processes running within Docker appear to have the SELinux context system_u:system_r:svirt_lxc_net_t. From the example using the Docker internal storage for /var/lib/mongodb I know that the directory is labled system_u:object_r:docker_var_lib_t:s0. If I apply that label to my working directory, the processes inside the container should be able to write to the directory and its children.

The SELinux tool for updating object (file) labels is chcon (for change context). It works much like chown or chmod. Because I'm changing security labels that I don't own, I need to use sudo to make the change.

sudo chcon -R system_u:object_r:docker_var_lib_t:s0 ~/mongodb

ls -dZ mongodb/
drwxrwxr-x. mongodb polkitd system_u:object_r:docker_var_lib_t:s0 mongodb/

ls -Z mongodb/
-rw-r--r--. mongodb polkitd system_u:object_r:docker_var_lib_t:s0 from_inside
-rw-rw-r--. mongodb polkitd system_u:object_r:docker_var_lib_t:s0 from_outside

getenforce
Enforcing

Now the directory and all its contents have the correct ownership, permissions and SElinux label. SELinux is enforcing. I can try writing from inside the container again.

sh-4.2$ touch from_inside_with_selinux
sh-4.2$ ls -l
total 0
-rw-r--r--. 1 mongodb mongodb 0 Oct 10 13:44 from_inside
-rw-r--r--. 1 mongodb mongodb 0 Oct 10 15:54 from_inside_with_selinux
-rw-rw-r--. 1 mongodb mongodb 0 Oct  9 20:46 from_outside

That's it. Time to try running mongod inside the container.

Running the Mongodb Container

First I shut down and remove my existing mongod container. Then I can start one up for real. I Switch from interactive (-it) to daemon (-d) mode and remove the --entrypoint argument.

sh-4.2$ exit
exit

docker rm mongodb
mongodb

docker run -d --name mongodb --volume ~/mongodb:/var/lib/mongodb markllama/mongodb
9e203806b4f07962202da7e0b870cd567883297748d9fe149948061ff0fa83f0

I should now have a running mongodb container

docker ps
CONTAINER ID        IMAGE                      COMMAND                CREATED             STATUS              PORTS               NAMES
9e203806b4f0       markllama/mongodb:latest   "/usr/bin/mongod --c   34 seconds ago      Up 33 seconds       27017/tcp           mongodb 


I can check the container logs to see if the process is running and indicates a good startup.

docker logs mongodb
note: noprealloc may hurt performance in many applications
Fri Oct 10 16:01:25.560 [initandlisten] MongoDB starting : pid=1 port=27017 dbpath=/var/lib/mongodb 64-bit host=9e203806b4f0
Fri Oct 10 16:01:25.562 [initandlisten] 
Fri Oct 10 16:01:25.562 [initandlisten] ** WARNING: You are running on a NUMA machine.
Fri Oct 10 16:01:25.562 [initandlisten] **          We suggest launching mongod like this to avoid performance problems:
Fri Oct 10 16:01:25.562 [initandlisten] **              numactl --interleave=all mongod [other options]
Fri Oct 10 16:01:25.562 [initandlisten] 
Fri Oct 10 16:01:25.562 [initandlisten] db version v2.4.6
Fri Oct 10 16:01:25.562 [initandlisten] git version: nogitversion
Fri Oct 10 16:01:25.562 [initandlisten] build info: Linux buildvm-12.phx2.fedoraproject.org 3.10.9-200.fc19.x86_64 #1 SMP Wed Aug 21 19:27:58 UTC 2013 x86_64 BOOST_LIB_VERSION=1_54
Fri Oct 10 16:01:25.563 [initandlisten] allocator: tcmalloc
Fri Oct 10 16:01:25.563 [initandlisten] options: { config: "/etc/mongodb.conf", dbpath: "/var/lib/mongodb", nohttpinterface: "true", noprealloc: "true", quiet: true, smallfiles: "true" }
Fri Oct 10 16:01:25.636 [initandlisten] journal dir=/var/lib/mongodb/journal
Fri Oct 10 16:01:25.636 [initandlisten] recover : no journal files present, no recovery needed
Fri Oct 10 16:01:27.469 [initandlisten] preallocateIsFaster=true 27.58
Fri Oct 10 16:01:29.329 [initandlisten] preallocateIsFaster=true 28.04

It looks like the daemon is running.

I can use docker inspect to find the assigned IP address for the container.  With that I can connect the mongo client to the service and test database access.

docker inspect --format '{{.NetworkSettings.IPAddress}}' mongodb
172.17.0.110

echo show dbs | mongo 172.17.0.110
MongoDB shell version: 2.4.6
connecting to: 172.17.0.110/test
local 0.03125GB
bye


I know the database is running and answering queries.  The last check is to look inside the directory I created for the database.  It should have the test files I'd created as well as the database and journal files which mongod will create on startup.

ls -lZ ~mongodb
-rw-r--r--. mongodb polkitd system_u:object_r:docker_var_lib_t:s0 from_inside
-rw-r--r--. mongodb polkitd system_u:object_r:docker_var_lib_t:s0 from_inside_with_selinux
-rw-rw-r--. mongodb polkitd system_u:object_r:docker_var_lib_t:s0 from_outside
drwxr-xr-x. mongodb polkitd system_u:object_r:docker_var_lib_t:s0 journal
-rw-------. mongodb polkitd system_u:object_r:docker_var_lib_t:s0 local.0
-rw-------. mongodb polkitd system_u:object_r:docker_var_lib_t:s0 local.ns
-rwxr-xr-x. mongodb polkitd system_u:object_r:docker_var_lib_t:s0 mongod.lock
drwxr-xr-x. mongodb polkitd system_u:object_r:docker_var_lib_t:s0 _tmp

There they are.

Summary

It took a little work to get a Docker container running a system service using persistent host storage for the database files.

I had to get the container running without extra storage first and examine the container to see what it expected.  The file ownership, permissions and the SELinux context all affect the ability to write files.

Tweaking for Storage


On the host I had to create a directory with the right characteristics.  The UID and GID on the host may not match those inside the container.  If the container service creates a user and group they will almost certainly not exist on a generic Docker container host.

The Docker service uses a special set of SELinux contexts and labels to run.  Docker runs as root and it does lots of potentially dangerous things.  The SELinux policies for Docker are designed to prevent contained processes from escaping, at least through the resources SELinux can control.

Setting the directory ownership and the SELinux context require root access.  This isn't a really big deal as Docker also requires root (or at least membership in the docker group) but its another wart.  It does mean that the ideal of running service containers in user space is an illusion.  Once the directory is set up and running it will require root access to remove it as well.  It's probably best not to place it in a user home directory as I did.

Scaling up: Multiple Hosts and Network Storage?


It is possible to run Docker service containers with persistent external storage from the host.  This won't scale up to multiple hosts.  Kubernetes has no way of making the required changes to the host.  It might be possible to use network filesystems like NFS, Gluster or Ceph so long as the user accounts are made consistent.

The other possibility for shared storage is cloud storage.  I'll talk about that some in the next post, though it's not ready for Docker and Kubernetes yet.

Pending Features: User Namespaces (SELinux Namespaces?)


The user mapping may be resolved by a pending feature addition to Linux namespaces and Docker: User namespaces.  This would allow a UID inside a container to be mapped to a different UID on the host.  The same would be true for GIDs.  This would allow me to run a container which uses the mongodb UID inside the container but is able to access files owned by my UID on the host.  I don't have a timeline for this feature and the developers still raise their eyebrows in alarm when I ask about it, but it is work in progress.

A feature which does not exist to my knowledge is SELinux namespaces.  This is the idea that an SELinux label inside a container might be mapped to a different label outside.  This would allow the docker_var_lib_dir_t label inside to be mapped to user_home_t outside.  I suspect this would break lots of things and open up nasty holes so I don't expect it soon.

Next Up: Network (Cloud) Storage

Next up is some discussion (but not any demonstration at all) of the state of network storage 

References

Friday, September 26, 2014

Docker: Building and using a base image for Pulp services in Kubernetes

My stated goal in this series of posts is to create a working containerized Pulp service running in a Kubernetes cluster. After, what is it, 5 posts, I'm finally actually ready to do something with pulp itself.

The Pulp service proper is made up of a single Celery beat process, a single resource manager process, and some number of pulp worker processes. These together do the work of Pulp, mirroring and managing the content that is Pulp's payload. The service also requires at least one Apache HTTP server to deliver the payload but that comes later.

All of the Pulp processes are actually built on Celery.  They all require the the same set of packages and much of the same configuration information.  They all need use the MongoDB and the QPID services.  The worker processes all need access to some shared storage, but the beat and resource manager do not.

To build the Docker images for these different containers, rather than duplicating the common parts, the best practice is to put those parts into a base image and then add one last layer to create each of the variations.

In this post I'll demonstrate creating a shared base image for Pulp services and then I'll create the first image that will consume the base to create the Pulp beat service.

The real trick is to figure out what the common parts are. Some are easy though so I'll start there.

Creating a Base Image


For those of you who are coders, a base image is a little like an abstract class.  It defines some important characteristics that are meant to be re-used, but it leaves others to be resolved later.  The Docker community already provides a set of base images like the Fedora:20 image which have been hand-crafted to provide a minimal OS.  Docker makes it easy to use the same mechanism for building our own images.

The list below enumerates the things that all of the Pulp service images will share.  When I create the final images I'll add the final tweaks.  Some of these will essentially be stubs to be used later.

  • Pulp Repo file
    Pulp is not yet standard in the RHEL, CentOS or Fedora distributions
  • Pulp Server software
  • Communications Software (MongoDB and QPID client libraries)
  • Configuration tools: Augeas

There is also some configuration scripting that will be required by all the pulp service containers:

  • A script to apply the customization/configuration for the execution environment
  • A test script to ensure that the database is available before starting the celery services
  • A test script to ensure that the message service is available
Given that start, here's what I get for the Dockerfile


Lines 1 and 2 should be familiar already.  There are no new directives here but a couple of things need explaining.


  • Line 1: The base image
  • Line 2: Contact information
  • Line 4: A usage comment
    Pulp uses syslog.  For a process inside a container to write to syslog you either have to have a syslogd running or you have to have write access to the host's /dev/log file.  I'll show this gets done when
    I create a real app image from this base and run it.
  • Line 6: Create a yum repo for the Pulp package content.
    You can add files using a URL for the source.
  • Lines 9-12: Install the Pulp packages, QPID client software and Augeas to help configuration.
  • Lines 15-17: COMMENTED: Install and connect the Docker content plugin
    This is commented out at the moment.  It hasn't been packaged yet and there are some issues with dependency resolution. I left it here to remind me to put it back when the problems are resolved.
  • Line 20: Add an Augeas lens definition to manage the Pulp server.conf file
    Augeas is suitet for managing config values, when a lens exists.  More detail below
  • Line 23: Add a script to execute the configuration
    This will be used by the derived images, but it works the same for all of them
  • Line 27: Add a script which can test for access to the MongoDB
    Pulp will just blindly try to connect, but will just hang if the DB is unavailable.  This script allows me to decide to wait or quit if the database isn't ready. If I quit, Kubernetes will re-spawn a new container to try again.

The Pulp Repo


The Pulp server software is not yet in the standard Fedora or EPEL repositories. The packages are available from the contributed repositories on the Fedora project.  The repo file is also there, accessible through a URL.

The docker RUN directive can take a URL as well as a local relative file path.  

Line 4 pulls the Pulp repo file down and places it so that it can be used in the next step.

Pulp Packages (dependencies and tools)


The Pulp software is easiest installed as a YUM group.  I use a Dockerfile RUN directive to install the Pulp packages into the base image. This will install most of the packages needed for the service, but there are a couple of additional packages that aren't part of the package group.

Pulp can serve different types of repository mirrors.  These are controlled by content plugins.  I add the RPM plugin, python-pulp-rpm-common.  I also add a couple of Python QPID libraries. However you can't run both groupinstall and the normal package install command in the same invocation so the additional Python QPID libaries are installed in a second command.

I also want to install Augeas. This is a tool that enables configuration editing using a structured API or CLI command.

Augeas Lens for Pulp INI files


Augeas is an attempt to wrangle the flat file databases that make up the foundation of most *NIX application configuration. It offers a way to access individual key/value pairs within well known configuration files without resorting to tools like sed or perl and regular expressions.  With augeas each key/value pair is assigned a path and can be queried and updated using that path.  It offers both API and CLI interfaces though it's not nearly as commonly used as it should be.

The down side of Augeas is that it doesn't include a description (lens in Augeas terminology) for Pulp config files.  Pulp is too new. The upside is that the Pulp config files are fairly standard INI format, and it's easy to adapt the stock IniFile lens for Pulp.

I won't include the lens text inline here, but I put it in a gist if you want to look at it.

The ADD directive on line 20 of the Dockerfile places the lens file in the Augeas library where it will be found automatically.

Pulp Server Configuration Script


All of the containers that use this base image will need to set a few configuration values for Pulp. These reside in /etc/pulp/server.conf which is an INI formatted text file.  These settings indicate the identity of the pulp service itself and how the pulp processes communicate with the database and message bus.

If you are starting a Docker container by hand you could either pass these values in as environment variables using the
-e (--env) option or by accepting additional positional arguments through the CMD. You'd have to establish the MongoDB and QPID services then get their IP addresses from Docker and feed the values into the Pulp server containers.

Since Kubernetes is controlling the database and messaging pods and has the Service objects defined, it knows how to tell the Pulp containers where to find these services.  It sets a few environment variables for every new container that starts after the service object is created.  A new container can use these values to reach the external services it needs.

Line 23 of the Dockerfile adds a short shell script which can accept the values from the environment variables that Kubernetes provides and configure them into the Pulp configuration.

The script gathers the set of values it needs from the variables (or sets reasonable defaults) and then, using augtool (The CLI tool for Augeas) it updates the values in the pulp.conf file.

This is the snippet from the beginning of the configure_pulp_server.sh script which sets the environment variables.

# Take settings from Kubernetes service environment unless they are explicitly
# provided
PULP_SERVER_CONF=${PULP_SERVER_CONF:=/etc/pulp/server.conf}
export PULP_SERVER_CONF

PULP_SERVER_NAME=${PULP_SERVER_NAME:=pulp.example.com}
export PULP_SERVER_NAME

SERVICE_HOST=${SERVICE_HOST:=127.0.0.1}
export SERVICE_HOST

DB_SERVICE_HOST=${DB_SERVICE_HOST:=${SERVICE_HOST}}
DB_SERVICE_PORT=${DB_SERVICE_PORT:=27017}
export DB_SERVICE_HOST DB_SERVICE_PORT

MSG_SERVICE_HOST=${MSG_SERVICE_HOST:=${SERVICE_HOST}}
MSG_SERVICE_PORT=${MSG_SERVICE_PORT:=5672}
MSG_SERVICE_USER=${MSG_SERVICE_USER:=guest}
export MSG_SERVICE_HOST MSG_SERVICE_PORT MSG_SERVICE_NAME

These are the values that the rest of the script will set into /etc/pulp/server.conf

UPDATE: As of the middle of October 2014 the SERVICE_HOST variable has been removed. Now each service gets its own IP address, so the generic SERVICE_HOST variable no longer makes sense.  Each service variable must be provided explicitly when testing. Also, for testing the master host will provide a proxy to the service.  However, as of this update the mechanism isn't working yet. I'll update this post when is working properly.  If you are building from git source you can use a commit prior to 10/14/2014 and you can still use SERVICE_HOST test against the minions.

Container Startup and Remote Service Availability


When the Pulp service starts up it will attempt to connect to a MongoDB and to a QPID message broker.  If the database isn't ready, the Pulp service may just hang.

Using Kubernetes it's best not to assume that the containers will arrive in any particular order.  If the database service is unavailable, the pulp containers should just die.  Kubernetes will notice and attempt to restart them periodically.  When the database service is available the next client container will connect successfully and... not. die.

I have added a check script to the base container which can be used to test the availability (and the correct access information) for the MongoDB.  It also uses the environment variables provided by Kubernetes when the container starts.

This script merely returns a shell true (return value: 0) if the database is available and false (return value: 1) if it fails to connect.  This allows the startup script for the actual pulp service containers to check before attempting to start the pulp process and to cleanly report an error if the database is unavailable before exiting.

I haven't included a script to test the QPID connectivity.  So far I haven't seen a pulp service fail to start because the QPID service was unavailable when the client container starts.

Scripts are not executed in the base image


The scripts listed above are provided in the base image, but the the base image has no ENTRYPOINT or CMD directives.  It is not meant to be run on its own.

Each of the Pulp service images that uses this base will need to have a run script which will call these common scripts to set up the container environment before invoking the Pulp service processes. That's next.

Using a Base Image: The Pulp-Beat Component


The Pulp service is based on Celery. Celery is a framework for creating distributed task-based services. You extend the Celery framework to add the specific tasks that your application needs.

The task management is controlled by a "beat" process. Each Celery based service has to have exactly one beat server which is derived from the Celery scheduler class.

The beat server is a convenient place to do some of the service setup. Since there can only be one beat server and because it must be created first, I can use the beat service container startup to initialize the database.

The Docker development best-practices encourage image composition by layering. Creating a new layer means creating a new build space with a Dockerfile and any files that will be pulled in when the image is built.

In the case of the pulp-base image all of the content is there. The customizations for the pulp-beat service are just the run script which configures and initializes the the service before starting. The Dockerfile is trivially simple:


The real meat is in the run script, though even that is pretty anemic

The main section starts at line 44 and it's really just four steps.  Two are defined in the base image scripts and two more are defined here.

  1. Apply the configuration customizations from the environment
    These include setting the PULP_SERVER_NAME and the access parameters for the MongoDB and QPID services
  2. Verify that the MongoDB is up and accessable
    With Kubernetes you can't be dependent on ordering of the pod startups.  This check allows some time for the DB to start and become available.  Kubernetes will restart the beat pod if this fails but the checks here prevent some thrashing.
  3. Initialize the MongoDB
    This should only happen once.  Within a pulp service the beat server is a singleton.  I put the initialization step here so that it won't be confused later.
  4. Execute the master process
    This is a celery beat process customized with the Pulp master object
Even though the script line for each operation is fairly trivial I still put them into their own functions. This makes it easier for a reader to understand the logical progression and intent before going back to the function and examining the details.  It also makes it easier to comment out a single function for testing and debugging.

Testing the Beat Image (stand-alone)


Since Kubernetes currently gives so little real access debug information for the container startup process I'm going to test the Pulp beat container first as a regular Docker container.  I have my Kubernetes cluster running in Vagrant and I know the IP addresses of the MongoDB and QPID services.

The other reason to test in plain Docker is that I want to manually verify the code which picks up and uses the configuration environment variables.  There are four variables that will be required and two others that will likely default.
  • PULP_SERVER_NAME
  • SERVICE_HOST
  • DB_SERVICE_HOST
  • MSG_SERVICE_HOST
The defaulted ones will be
  • DB_SERVICE_PORT
  • MSG_SERVICE_PORT
DB_SERVICE_HOST and MSG_SERVICE_HOST can be provided directly or can pick up the value of SERVICE_HOST.  I want to test both paths.

To test this I'm going to be running the Kubernetes Vagrant cluster on Virtualbox to provide the MongoDB and QPID servers.  Then I'll run the Pulp beat server in Docker on the host. I know how to tell the beat server how to reach the services in the Kubernetes cluster (on 10.245.2.{2-4]}).

I'm going to assume that both the pulp-base and pulp-beat images are already built. I'm also going to start the container the first time using /bin/sh so I can manually start the run script and observe what it does.

docker run -d --name pulp-beat -v /dev/log:/dev/log \
>   -e PULP_SERVER_NAME=pulp.example.com \
>   -e SERVICE_HOST=10.245.2.2 markllama/pulp-beat
f16a6f2278e20e0b039cb665bc5f55de39b13a1045f00e25cdab5219652f1d80

This starts the container as a daemon and mounts /dev/log so that syslog will work. It also sets the PULP_SERVER_NAME and SERVICE_HOST variables.

docker logs pulp-beat
+ '[' '!' -x /configure_pulp_server.sh ']'
+ . /configure_pulp_server.sh
++ set -x
++ PULP_SERVER_CONF=/etc/pulp/server.conf
++ export PULP_SERVER_CONF
++ PULP_SERVER_NAME=pulp.example.com
++ export PULP_SERVER_NAME
++ SERVICE_HOST=10.245.2.2
++ export SERVICE_HOST
++ DB_SERVICE_HOST=10.245.2.2
++ DB_SERVICE_PORT=27017
++ export DB_SERVICE_HOST DB_SERVICE_PORT
++ MSG_SERVICE_HOST=10.245.2.2
++ MSG_SERVICE_PORT=5672
++ MSG_SERVICE_USER=guest
++ export MSG_SERVICE_HOST MSG_SERVICE_PORT MSG_SERVICE_NAME
++ check_config_target
++ '[' '!' -f /etc/pulp/server.conf ']'
++ configure_server_name
++ augtool -s set '/files/etc/pulp/server.conf/target[. = '\''server'\'']/server_name' pulp.example.com
Saved 1 file(s)
++ configure_database
++ augtool -s set '/files/etc/pulp/server.conf/target[. = '\''database'\'']/seeds' 10.245.2.2:27017
Saved 1 file(s)
++ configure_messaging
++ augtool -s set '/files/etc/pulp/server.conf/target[. = '\''messaging'\'']/url' tcp://10.245.2.2:5672
Saved 1 file(s)
++ augtool -s set '/files/etc/pulp/server.conf/target[. = '\''tasks'\'']/broker_url' qpid://guest@10.245.2.2:5672
Saved 1 file(s)
+ '[' '!' -x /test_db_available.py ']'
+ wait_for_database
+ DB_TEST_TRIES=12
+ DB_TEST_POLLRATE=5
+ TRY=0
+ '[' 0 -lt 12 ']'
+ /test_db_available.py
Testing connection to MongoDB on 10.245.2.2, 27017
+ '[' 0 -ge 12 ']'
+ initialize_database
+ runuser apache -s /bin/bash /bin/bash -c /usr/bin/pulp-manage-db
Loading content types.
Content types loaded.
Ensuring the admin role and user are in place.
Admin role and user are in place.
Beginning database migrations.
Applying pulp.server.db.migrations version 1
Migration to pulp.server.db.migrations version 1 complete.
...
Applying pulp_rpm.plugins.migrations version 16
Migration to pulp_rpm.plugins.migrations version 16 complete.
Database migrations complete.
+ run_celerybeat
+ exec runuser apache -s /bin/bash -c '/usr/bin/celery beat --workdir=/var/lib/pulp/celery --scheduler=pulp.server.async.scheduler.Scheduler -f /var/log/pulp/celerybeat.log -l INFO'

This shows why I set the -x at the beginning of the run script.  It causes the shell to emit each line as it is executed. You can see the environment variables as they are set.  Then they are used to configure the pulp server.conf values. The database is checked and then initialized. Finally it executes the celery beat process which replaces the shell and continues executing.

When this script runs it should have several side effects that I can check. As noted, it creates and initializes the pulp database. It also connects to the QPID server and creates several queues. I can check them in the same way I did when I created the MongoDB and QPID images in the first place.

The database has been initialized

echo show dbs | mongo 10.245.2.2
MongoDB shell version: 2.4.6
connecting to: 10.245.2.2/test
local 0.03125GB
pulp_database 0.03125GB
bye

And the celery beat service has added a few queues to the QPID service

qpid-config queues -b guest@10.245.2.4
Queue Name                                     Attributes
======================================================================
0b78268e-256f-4832-bbcc-50c7777a8908:1.0       auto-del excl 
411cc98f-eed3-45f9-b455-8d2e5d333262:0.0       auto-del excl 
aaf61614-919e-49ea-843f-d83420e9232f:1.0       auto-del excl 
celeryev.de500902-4c88-4d5c-90f4-1b4db366613d  auto-del --limit-policy=ring --argument passive=False --argument exclusive=False --argument arguments={}

But what if I do it wrong?

You can see that the output from a correct startup is pretty lengthy.  When I'm happy that the image is stable I'll remove the shell -x setting (and make it either an argument or environment switch for later).  There are several other paths to test.


  1. Fail to provide Environment Variables
    1. PULP_SERVER_NAME
    2. SERVICE_HOST
    3. DB_SERVICE_HOST
    4. MSG_SERVICE_HOST
  2. Fail to import /dev/log volume
Each of these will have slightly different failure modes.  I suggest you try each of them and observe how it fails.  Think of others, I'm sure I've missed some.

For the purposes of this post I'm going to treat these as exercises for the reader and move on.

Testing the Beat Image (Kubernetes)


Now things get interesting.  I have to craft a Kubernetes pod description that creates the pulp-beat container, gives it access to logging and connects it to the database and messaging services.

Defining the Pulp Beat pod


Because of the way I crafted the base image and run scripts, this isn't actually as difficult or as complicated as you might think.  It turns out that the only environment variable I have to actually pass in is the PULP_SERVER_NAME.  The rest of the environment values are going to be provided by the kubelet as defined by the Kubernetes service objects (and served by the MongoDB and QPID containers behind them).


The only really significant thing here is the volume imports.

Pulp uses the python logging mechanism and that in turn by default requires the syslog service. On Fedora 20, syslog is no longer a separate process.  It's been absorbed into the systemd suite of low level services and is known now as journald.  (cat flamewars/systemd/{pro,con} >/dev/null).

For me this means that for Pulp to run properly it needs the ability to write syslog messages.  In Fedora 20 this amounts to being able to write to a special file /dev/log.  This file isn't available in containers without some special magic.  For Docker that magic is -v /dev/log:/dev/log. This imports the host's /dev/log into the container at the same location.  For Kubernetes this is a little bit more involved.

The Kubernetes pod construct has some interesting side-effects.  The purpose of pods is to allow the creation of sets of containers that share resources.  The JSON reflects this in how the shared resources are declared.

In the pod spec, lines 14-20 are inside the container hash for the container named pulp-beat.  They indicate that a volume named "devlog" (line 15) will be mounted read/write (line 16) on /dev/log inside the container (line 17).

Note that this section does not define the named volume or indicate where it will come from. That's defined at the pod level not the container.

Now look at lines 20-23. these are at the pod level (the list of containers has been closed on line 19). The volumes array contains a set of volume definitions. I only define one, named "devlog" (line 21) and indicate that it comes from the host and that the source path is /dev/log.

All that to replace the docker argument -v /dev/log:/dev/log.

Right now this seems like a lot of work for a trivial action. Later this distinction will become very important.  The final pod for Pulp will be made up of at least two containers.  The pod will import two different storage locations from the host and both containers will mount them.

One last time for clarity: the volumes list is at the pod level.  It defines a set of external resources that will be made available to the containers in the pod.  The volumeMounts list is at the container level.  It maps entries from the volumes section in the pod to mount points inside the container using the value of the name as the connecting handle.


Starting the Pulp Beat Pod


Starting the pulp beat pod is just like starting the MongoDB and QPID pods was. At this point it does require that the Service objects have been created and that the service containers are running, so if you're following along and haven't done that, go do it. Since I'd run my pulp beat container manually and it had modified the mongodb, I also removed the pulp_database before proceeding.

echo 'db.dropDatabase()' | mongo 10.245.2.2/pulp_database
MongoDB shell version: 2.4.6
connecting to: 10.245.2.2/pulp_database
{ "dropped" : "pulp_database", "ok" : 1 }
bye
echo show dbs | mongo 10.245.2.2
MongoDB shell version: 2.4.6
connecting to: 10.245.2.2/test
local 0.03125GB
bye

To start the pulp beat pod we go back to kubecfg (remember, I aliased kubecfg=~/kubernetes/cluster/kubecfg.sh).

kubecfg -c pods/pulp-beat.json create pods
ID                  Image(s)              Host                Labels              Status
----------          ----------            ----------          ----------          ----------
pulp-beat           markllama/pulp-beat   /                   name=pulp-beat      Waiting

kubecfg get pods/pulp-beat
ID                  Image(s)              Host                    Labels              Status
----------          ----------            ----------              ----------          ----------
pulp-beat           markllama/pulp-beat   10.245.2.2/10.245.2.2   name=pulp-beat      Waiting

Now I know that the pod has been assigned to 10.245.2.2 (minion-1) I can log in there directly and examine the docker container.

vagrant ssh minion-1
Last login: Fri Dec 20 18:02:34 2013 from 10.0.2.2
sudo docker ps | grep pulp-beat
2515129f2c7e        markllama/pulp-beat:latest   "/run.sh"              54 seconds ago      Up 53 seconds                                k8s--pulp_-_beat.a6ba93e9--pulp_-_beat.etcd--d2a60369_-_458d_-_11e4_-_b682_-_0800279696e1--0b799f3d   
sudo docker logs 2515129f2c7e
+ '[' '!' -x /configure_pulp_server.sh ']'
+ . /configure_pulp_server.sh
++ set -x
++ PULP_SERVER_CONF=/etc/pulp/server.conf
++ export PULP_SERVER_CONF
++ PULP_SERVER_NAME=pulp.example.com
++ export PULP_SERVER_NAME
++ SERVICE_HOST=10.245.2.2
++ export SERVICE_HOST
++ DB_SERVICE_HOST=10.245.2.2
++ DB_SERVICE_PORT=27017
++ export DB_SERVICE_HOST DB_SERVICE_PORT
++ MSG_SERVICE_HOST=10.245.2.2
++ MSG_SERVICE_PORT=5672
++ MSG_SERVICE_USER=guest
++ export MSG_SERVICE_HOST MSG_SERVICE_PORT MSG_SERVICE_NAME
++ check_config_target
++ '[' '!' -f /etc/pulp/server.conf ']'
++ configure_server_name
++ augtool -s set '/files/etc/pulp/server.conf/target[. = '\''server'\'']/server_name' pulp.example.com
Saved 1 file(s)
++ configure_database
++ augtool -s set '/files/etc/pulp/server.conf/target[. = '\''database'\'']/seeds' 10.245.2.2:27017
Saved 1 file(s)
++ configure_messaging
++ augtool -s set '/files/etc/pulp/server.conf/target[. = '\''messaging'\'']/url' tcp://10.245.2.2:5672
Saved 1 file(s)
++ augtool -s set '/files/etc/pulp/server.conf/target[. = '\''tasks'\'']/broker_url' qpid://guest@10.245.2.2:5672
Saved 1 file(s)
+ '[' '!' -x /test_db_available.py ']'
+ wait_for_database
+ DB_TEST_TRIES=12
+ DB_TEST_POLLRATE=5
+ TRY=0
+ '[' 0 -lt 12 ']'
+ /test_db_available.py
Testing connection to MongoDB on 10.245.2.2, 27017
+ '[' 0 -ge 12 ']'
+ initialize_database
+ runuser apache -s /bin/bash /bin/bash -c /usr/bin/pulp-manage-db
Loading content types.
Content types loaded.
Ensuring the admin role and user are in place.
Admin role and user are in place.
Beginning database migrations.
Applying pulp.server.db.migrations version 1
Migration to pulp.server.db.migrations version 1 complete.
...
Applying pulp_rpm.plugins.migrations version 16
Migration to pulp_rpm.plugins.migrations version 16 complete.
Database migrations complete.
+ run_celerybeat
+ exec runuser apache -s /bin/bash -c '/usr/bin/celery beat --workdir=/var/lib/pulp/celery --scheduler=pulp.server.async.scheduler.Scheduler -f /var/log/pulp/celerybeat.log -l INFO'

If this is the first time running the image it may take a while for Kubernetes/Docker to pull it from the Docker hub. There may be a delay as the kubernetes pause container does the pull.

I can now run the same tests I did earlier on the MongoDB and QPID services to reassure myself that the pulp beat service is connected.

echo show dbs | mongo 10.245.2.2
MongoDB shell version: 2.4.6
connecting to: 10.245.2.2/test
local 0.03125GB
pulp_database 0.03125GB
bye

qpid-config queues -b guest@10.245.2.4
Queue Name                                     Attributes
======================================================================
613f4b89-e63e-4230-9620-e932f5a777e5:0.0       auto-del excl 
c990ea7b-3d7f-4603-80e5-176ebc649ff1:1.0       auto-del excl 
celeryev.ffbc537b-1161-4049-b425-723487135fc2  auto-del --limit-policy=ring --argument passive=False --argument exclusive=False --argument arguments={}
e0155372-12ee-4c9a-9c4d-8f4863601b3a:1.0       auto-del excl 

After all that thought and planning the end result is actually kinda boring.  Just the way I like it.

What's next?


The pulp-beat service is just the first real pulp component.  It runs in isolation from the other components, communicating only through the messaging and database.  There is another component like that, the pulp-resource-manager.  This is another Celery process and the it is created, started and tested just like the pulp-beat service.  I'm going to do one much-shorter post on that for completeness before tackling the next level of complexity.

The two remaining different components are the content pods, which require shared storage and which will have two cooperating containers running inside the pod.  One will manage the content mirroring and the other will serve the content out to clients.

I think before that though I will tackle the Pulp Admin service.  This is a public facing REST service which accepts pulp admin commands to create and manage the content repositories.

Both of these will require the establishment of encryption, which means placing x509 certificates within the containers.  These are the upcoming challenges.


References

  • Docker - Containerized applications
  • Kubernetes - Orchestration for creating containerized services
  • MongoDB - A Non-relational database
  • QPID - an AMQP messaging service
  • Pulp - An enterprise OS content mirroring system
  • Celery - A Distributed Task Queue Framework
  • Augeas - Structured queries and updates to (largely) unstructured configurations
  • INI Files - A simple format for simple configurations

Thursday, September 4, 2014

Kubernetes: Simple Containers and Services

From previous posts I now have a MongoDB image and another which runs a QPID AMQP broker.  I intend for these to be used by the Pulp service components.

What I'm going to do this time is to create the subsidiary services that I'll need for the Pulp service within a Kubernetes cluster.

UPDATE 12/16/2014: recently the kubecfg command has been deprecated and replaced with kubectl. I've updated this post to reflect the CLI call and output from kubectl.

Pre-Launch


A Pulp service stores it's persistent data in the database.  The service components, a Celery Beat server and a number of Celery workers, as well as one or more Apache web server daemons all communicate using the AMQP message broker.  They store and retrieve data from the database.

In a traditional bare-bare metal or VM based installation all of these services would likely be run on the same host.  If they are distributed, then the IP addresses and credentials of the support services would have to be configured into Pulp servers manually or using some form of configuration management. Using containers the components can be isolated but the task of tracking them and configuring the consumer processes remains.

Using just Docker, the first impulse of an implementer would be similar, to place all of the containers on the same host.  This would simplify the management of the connectivity between the parts, but it also defeats some of the benefit of containerized applications: portability and non-locality. This isn't a failing of Docker. It is the result of conscious decisions to limit the scope of what Docker attempts to do, avoiding feature creep and bloat.  And this is where a tool like Kubernetes comes in.

As mentioned elsewhere, Kubernetes is a service which is designed to bind together a cluster of container hosts, which can be regular hosts running the etcd and kubelet daemons or they can be specialized images like Atomic or CoreOS.  They can be private or public services such as Google Cloud

For Pulp, I need to place a MongoDB and a QPID container within a Kubernetes cluster and create the infrastructure so that clients can find it and connect to it.  For each of these I need to create a Kubernetes Service and a Pod (group of related containers).

Kicking the Tires


It's probably a good thing to explore a little bit before diving in so that I can see what to expect from Kubernetes in general.  I also need to verify that I have a working environment before I start trying to bang on it.

Preparation


If you're following along, at this point I'm going to assume that you have access to a running Kubernetes cluster.  I'm going to be using the Vagrant test cluster as defined in the github repository and described in the Vagrant version of the Getting Started Guides.

I'm also going to assume that you've built the kubernetes binaries.  I'm using the shell wrappers in the cluster sub-directory, especially cluster/kubectl.sh.   If you try that and you haven't built the binaries you'll get a message that looks like this:

cluster/kubectl.sh 
It looks as if you don't have a compiled kubectl binary.

If you are running from a clone of the git repo, please run
'./build/run.sh hack/build-cross.sh'. Note that this requires having
Docker installed.

If you are running from a binary release tarball, something is wrong. 
Look at http://kubernetes.io/ for information on how to contact the 
development team for help.

If you see that, do as it says. If that fails, you probably haven't installed the golang package.


For convenience I alias the kubectl.sh wrapper so that I don't need the full path.

alias kubectl=~/kubernetes/cluster/kubectl.sh

Like most CLI commands now if you invoke it with no arguments it prints usage.

kubectl --help 2>1 | more
Usage of kubectl:

Usage: 
  kubectl [flags]
  kubectl [command]

Available Commands: 
  version                                             Print version of client and server
  proxy                                               Run a proxy to the Kubernetes API server
  get [(-o|--output=)json|yaml|...] <resource> [<id>] Display one or many resources
  describe <resource> <id>                            Show details of a specific resource
  create -f filename                                  Create a resource by filename or stdin
  createall [-d directory] [-f filename]              Create all resources specified in a directory, filename or stdin
  update -f filename                                  Update a resource by filename or stdin
  delete ([-f filename] | (<resource> <id>))          Delete a resource by filename, stdin or resource and id

The full usage output can be found in the CLI documentation in the Kubernetes Github repository.

kubectl has one oddity that makes a lot of sense once you understand why it's there. The command is meant to produce output which is consumable by machines using UNIX pipes. The output is structured data formatted using JSON or YAML. To avoid strange errors in the parsers, the only output to STDOUT is structured data. This means that all of the human readable output goes to STDERR. This isn't just the error output though. This includes the help output. So if you want to run the help and usage output through a pager app like more(1) or less(1), you have to first redirect STDERR to STDOUT as I did above.

Exploring the CLI control objects


You can see in the REST API line the possible operations: get, list, create, delete, update . That line also shows the objects that the API can manage: minions, pods, replicationControllers, servers.

Minions


A minion is a host that can accept containers.  It runs an etcd and a kubelet daemon in addition to the Docker daemon.For our purposes a minion is where containers can go.

I can list the minions in my cluster like this:

kubectl get minions
NAME                LABELS
10.245.2.4          <none>
10.245.2.2          <none>
10.245.2.3          <none>

The only valid operation on minions using the REST protocol are the list and get actions.  The get response isn't very interesting.

Until I add some of the other objects this is the most interesting query.  It indicates that there are three minions connected and ready to accept containers.

Pods


A pod is the Kubernetes object which describes a set of one or more containers to be run on the same minion.  While the point of a cluster is to allow containers to run anywhere within the cluster, there are times when a set of containers must run together on the same host. Perhaps they share some external filesystem or some other resource.  See the golang specification for the Pod struct.

kubectl get pods
NAME                IMAGE(S)            HOST                    LABELS              STATUS

See? not very interesting.

Replication Controllers


I'm going to defer talking about replication controllers in detail for now.  It's enough to note their existence and purpose.

Replication controllers are the tool to create HA or load balancing systems. Using a replication controller you can tell Kubernetes to create multiple running containers for a given image.  Kubernetes will ensure that if one container fails or stops that a new container will be spawned to replace it.

I can list the replication controllers in the same way as minions or pods, but there's nothing to see yet.

Services


I think the term service is an unfortunate but probably unavoidable terminology overload.

In Kubernetes, a service defines a TCP or UDP port reservation.  It provides a way for applications running in containers to connect to each other without requiring that each one be configured with the end-point IP addresses. This both allows for abstracted configuration and for mobility and load balancing of the providing containers.

When I define a Kubernetes service, the service providers (the MongoDB and QPID containers) will be labeled to receive traffic and the service consumers (the Pulp components) will be given the access information in the environment so that they can reach the providers. More about that later.

I can list the services in the same way as I would minions or pods. And it turns out that creating a couple of Kubernetes services is the first step I need to take to prepare the Pulp support service containers.

Creating a Kubernetes Service Object


In a cloud cluster one of the most important considerations is being able to find things.  The whole point of the cloud is to promote non-locality.  I don't care where things are, but I still have to be able to find them somehow.

A Kubernetes Service object is a handle that allows my MongoDB and QPID clients find the servers without them having to know where they really are. It defines a port to listen on and a way for clients to indicate that they want to accept the traffic that comes in. Kubernetes arranges for the traffic to be forwarded to the servers.

Kubernetes both accepts and produces structured data formats for input and reporting.  The two currently supported formats are JSON and YAML.  The Service structure is relatively simple but it has elements which are shared by all of the top level data structures. Kubernetes doesn't yet have any tooling to make the creation of an object description easier than hand-crafting a snipped of JSON or YAML.  Each of the structures is documented in the godoc for Kubernetes. For now that's all you get.

There are a couple of provided examples and these will have to do for now. The guestbook example demonstrates using ReplicationServers and master/slave implementation using Redis.  The second shows how to perform a live update of the pods which make up an active service within a Kubernetes cluster. These are actually a bit more advanced than I'm ready for and don't give the detailed break-down of the moving parts that I mean to do.

This is a complete description of the service. Lines 5-8 define the actual content.
  • Line 2 indicates that this is a Service object.
  • Line 3 indicates the object schema version.
    v1beta1 is current
    (note: my use of the term 'schema' is a loose one)
  • Line 4 identifies the Service object.
    This must be unique within the set of services
  • Line 5 is the TCP port number that will be listening
  • Line 6 is for testing.  It tells the proxy on the minion with that IP to listen for inbound connections.
    I'll also use the publicIPs value to expose the HTTP and HTTPS services for Pulp
  • Lines 7-9 set the Selector
    The selector is used to associate this Service object with containers that will accept the inbound traffic.
    This will match with one of the label items assigned to the containers.

When a new service is created Kubernetes establishes a listener on an available IP address (one of the minions addresses).  While the service object exists any new containers will start with a new set of environment variables which provide access information.  The value of the selector (converted to upper case) is used as the prefix for these environment variables so that containers can be designed to pick them up and use them for configuration.

For now I just need to establish the service so that when I create the DB and QPID containers they have something to be bound to.

The QPID service is identical to the MongoDB service, replacing the port (5672) and the selector (msg)

Querying a Service Object


I've just created a Service object. I wonder what Kubernetes thinks of it? I can list the services as seen above. I can also get the object information using kubectl.

kubectl get services db
NAME                LABELS              SELECTOR            IP                  PORT
db                                name=db             10.0.41.48          27017


That's nice. I know the important information now.  But what does it look like really.


kubectl get --output=json services db
{
    "kind": "Service",
    "id": "db",
    "uid": "c040da3d-8536-11e4-a18b-0800279696e1",
    "creationTimestamp": "2014-12-16T15:18:12Z",
    "selfLink": "/api/v1beta1/services/db?namespace=default",
    "resourceVersion": 13,
    "apiVersion": "v1beta1",
    "namespace": "default",
    "port": 27017,
    "protocol": "TCP",
    "selector": {
        "name": "db"
    },
    "publicIPs": [
        "10.245.2.2"
    ],
    "containerPort": 0,
    "portalIP": "10.0.41.48"
}


Clearly Kubernetes has filled out some of the object fields.  Note the --output=json flag for structured data.

I'll be using this method to query information about the other elements as I go along.

Describing a Container (Pod) in Kubernetes


We've seen how to run a container on a Docker host.  With Kubernetes we have to create and submit a description of the container with all of the required variables defined.

Kubernetes has an additional abstraction called a pod.  While Kubernetes is designed to allow the operator to ignore the location of containers within the cluster, there are times when a set of containers needs to be co-located on the same host.  A pod is Kubernetes' way of grouping containers when needed.  When starting a single container it will still be referred to as a member of a pod.


Here's the description of a pod containing the MongoDB service image I created earlier.


This is actually a set of nested structures, maps and arrays.


  • Lines 1-21 define a Pod.
  • Lines 2-4 are elements of an inline JSONBase structure
  • Lines 5-7 are a map (hash) of strings assigned to the Pod struct element named Labels.
  • Lines 8-20 define a PodState named DesiredState.
    The only required element is the ContainerManifest, named Manifest in the PodState.
  • A Podstate has a required Version and ID, though it is not a subclass of JSONBase.
      It also has a list of Containers and an optional list of Volumes
  • Lines 12-18 define the set of containers (only one in this case) that will reside in the pod.
    A Container has a name and an image path (in this case to the previously defined mongodb image).
  • Lines 15-17 are a set of Port specifications.
      These indicate that something inside the container will be listening on these ports.


You can see how learning the total schema means fishing through each of these structure definitions in the documentation.  If you work at it you will get to know them.  To be fair they are really meant to be generated and consumed by machines rather than humans.  Kubernetes is still the business end of the service. Pretty dashboards will be provided later.  The only visibility I really need is for development and diagnostics. There are gaps here too, but finding them is what experiments like this are about.

A note on Names and IDs


There are several places where there is a key named "name" or "id". I could give them all the same value, but I'm going to deliberately vary them so I can expose which ones are used for what purpose. Names can be arbitrary strings. I believe that IDs are restricted somewhat (no hyphens).

Creating the first Pod


Now I can get back to business.

Once I have the Pod definition expressed in JSON I can submit that to kubectl for processing.


kubectl create -f pods/mongodb.json 
pulpdb


TADA! I now have a MongoDB running in Kubernetes.

But how do I know?


Now that I actually have a pod, I should be able to query the Kubernetes service about it and get more than an empty answer.

kubectl get pods pulpdb
NAME                IMAGE(S)            HOST                    LABELS              STATUS
pulpdb              markllama/mongodb   10.245.2.3/10.245.2.3   name=db             Running


Familiar and Boring. But I can get more from kubectl by asking for the raw JSON return from the query.

{
    "kind": "Pod",
    "id": "pulpdb",
    "uid": "4bac8381-8537-11e4-a18b-0800279696e1",
    "creationTimestamp": "2014-12-16T15:22:06Z",
    "selfLink": "/api/v1beta1/pods/pulpdb?namespace=default",
    "resourceVersion": 22,
    "apiVersion": "v1beta1",
    "namespace": "default",
    "labels": {
        "name": "db"
    },
    "desiredState": {
        "manifest": {
            "version": "v1beta2",
            "id": "",
            "volumes": [
                {
                    "name": "devlog",
                    "source": {
                        "hostDir": {
                            "path": "/dev/log"
                        },
...
            "pulp-db": {
                "state": {
                    "running": {
                        "startedAt": "2014-12-16T15:27:04Z"
                    }
                },
                "restartCount": 0,
                "image": "markllama/mongodb",
                "containerID": "docker://8f21d45e49b18b37b98ea7556346095261699bc
3664b52813a533edccee55a63"
            }
        }
    }
}


It's really long. So I'm not going to include it inline. Instead I put it into a gist.

If you fish through it you'll find the same elements I used to create the pod, and lots, lots more.  The structure now contains both a desiredState and a currentState sub-structure, with very different contents.

Now a lot of this is just noise to us, but lines 59-72 are of particular interest.  These show the effects of the Service object that was created previously.  These are the environment variables and network ports declared. These are the values that a client container will use to connect to this service container.

Testing the MongoDB service


If you've read my previous blog post on creating a MongoDB Docker image you'll be familiar with the process I used to verify the basic operation of the service.

In that case I was running the container using Docker on my laptop.  I knew exactly where the container was running and I had direct access to the Docker CLI so that I could ask Docker about my new container.
I'd opened up the MongoDB port and told Docker to bind it to a random port on the host and I could connect directly to that port.

In a Kubernetes cluster there's no way to know a priori where the MongoDB container will end up. You have to ask Kubernetes where it is.  Further you don't have direct access to the Docker CLI.

This is where that publicIPs key in the mongodb-service.json file comes in.  I set the public IP value of the db service to an external IP address of one of the Kubernetes minions: 10.245.2.2.  This causes the proxy on that minion to accept inbound connections and forward them to the db service pods where ever they are.

The minion host is accessible from my desktop so I can test the connectivity directly.

echo "show dbs" | mongo 10.245.2.2
MongoDB shell version: 2.4.6
connecting to: 10.245.2.4/test
local 0.03125GB
bye

And now for QPID?


As with the Service object, creating and testing the QPID container within Kubernetes requires the same process.  Create a JSON file which describes the QPID service and another for the pod.  Submit them and test as before.

Summary


Now I have two running network services inside the Kubernetes cluster. This consists of a Kubernetes Service object and a Kubernetes Pod which is running the image I'd created for each service application.

I can prove to myself that the application services are running and accessible, though for some of the detailed tests I have to go under the covers of Kuberntes still.

I have the information I need to craft images for the other Pulp services so that they can consume the database and messenger services.

Next Up


In the next post I mean to create the first Pulp service image, the Celery Beat server.  There are elements that all of the remaining images will have in common, so I'm going to first build a base image and then apply the last layer to differentiate the beat server from the Pulp resource manager and the pulp workers.

References


Saturday, August 30, 2014

Docker: A simple service container example with MongoDB

In my previous post I said I was going to build, over time a Pulp repository using a set of containerized service components and host it in a Kubernetes cluster.

A complete Pulp service


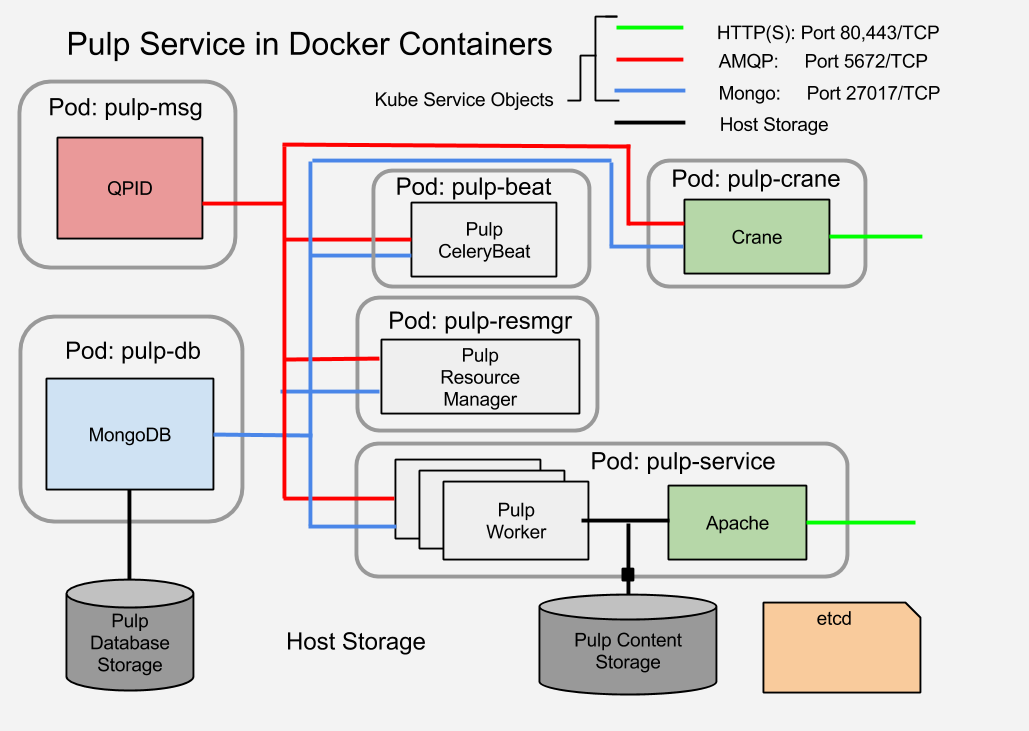
The Pulp service is composed of a number of sub-services:

  • A MongoDB database
  • A QPID AMQP message broker
  • A number of Celery processes
    • 1 Celery Beat process
    • 1 Pulp Resource Manager (Celery worker) process
    • >1 Pulp worker (Celery worker) process
  • >1 Apache HTTPD - serves mirrored content to clients
  • >1 Crane service - Docker plugin for Pulp

This diagram illustrates the components and connectivity of a Pulp service as it will be composed in Kubernetes using Docker containers.


Diagram of Pulp service component structure
Pulp Service Component Structure


The simplest images will be those for the QPID and MongoDB services.  I'm going to show how to create the MongoDB image first.

There are several things I will not be addressing in this simple example:

  1. HA and replication
    In production the MongoDB would be replicated
    In production the QPID AMQP service would have a mesh of brokers
  2. Communications Security
    In production the links between components to the MongoDB and the QPID message broker would be encrypted and authenticated.

    Key management is actually a real problem with Docker at the moment and will require its own set of discussions.

A Docker container for MongoDB


This post essentially duplicates the instructions for creating a MongoDB image which are provided  on the Docker documentation site. I'm going to walk through them here for several reasons.  First is for completeness and for practice on the basics of creating a simple image.  Second, the Docker example uses Ubuntu for the base image.  I am going to use Fedora.  In later posts I'm going to be doing some work with Yum repos and RPM installation.  Finally I'm going to make some notes which are relevant to the suitability of a container for use in a Kubernetes cluster.

Work Environment


I'm working on Fedora 20 with the docker-io package installed and the docker service enabled and running.  I've also added my username to the docker group in /etc/group so I don't need to use sudo to issue docker commands. If your work environment differs you'll probably have to adapt some.

Defining the Container: Dockerfile

New docker images are defined in a Dockerfile. Capitalization matters in the file name. The Dockerfile must reside in a directory of its own. Any auxiliary files that the Dockerfile may reference will reside in the same directory.

The syntax for a Dockerfile is documented on the Docker web site.

This is the Dockerfile for the MongDB image in Fedora 20:


That's really all it takes to define a new container image.  The first two lines are the only ones that are mandatory for all Dockerfiles.  The rest form the description of the new container.

Dockerfile: FROM

Line 1 indicates the base image to begin with. It refers to an existing image on the official public Docker registry.  This image is offered and maintained by the Fedora team.  I specify the Fedora 20 version.  If I had left the version tag off, the Dockerfile would use the latest tagged image available.

Dockerfile: MAINTAINER

Line 2 gives contact information for the maintainer of the image definition.

Diversion:

Lines 4 and 5 are an unofficial comment. It's a fragment of JSON which contains some information about how the image is meant to be used.

Dockerfile: RUN

Line 7 is where the real fun begins. The RUN directive indicates that what follows is a command to be executed in the context of the base image.  It will make changes or additions which will be captured and used to create a new layer.  In fact, every directive from here on out creates a new layer.  When the image is run, the layers are composed to form the final contents of the container before executing any commands within the container.

The shell command which is the value of the RUN directive must be treated by the shell as a single line.  If the command is too long to fit in an 80 character line then shell escapes (\<cr>) and conjunctions (';' or '&&' or '||') are used to indicate line continuation just as if you were writing into a shell on the CLI.

This particular line installs the mongodb-server package and then cleans up the YUM cache. This last is required because any differences in the file tree from the begin state will be included in the next image layer.  Cleaning up after YUM prevents including the cached RPMs and metadata from bloating the layer and the image.

Line 10 is another RUN statement.  This one prepares the directory where the MongoDB storage will reside. Ordinarily this would be created on a host when the MongoDB package is installed with a little more during the startup process for the daemon. They're here explicitly because I'm going to punch a hole in the container so that I can mount the data storage area from host.  The mount process can overwrite some of the directory settings.  Setting them explicitly here ensures that the directory is present and the permissions are correct for mounting the external storage.

Dockefile: ADD

Line 14 adds a file to the container.  In this case it's a slightly tweaked mongodb.conf file.  It adds a couple of switches which the Ubuntu example from the Docker documentation applies using CLI arguments to the docker run invocation.  The ADD directive takes the input file from the directory containing the Dockerfile and will overwrite the destination file inside the container.


Lines 16-22 don't add new content but rather describe the run-time environment for the contents of the container.

Dockerfile: VOLUME

Line 16 officially declares that the directory /var/lib/mongodb will be used as a mountpoint for external storage.

Dockerfile: EXPOSE

Line 18 declares that TCP port 21017 will be exposed.  This will allow connections from outside the container to access the mongodb inside.

Dockerfile: USER

Line 20 declares that the first command executed will be run as the mongodb user.

Dockerfile: WORKDIR

Line 22 declares that the command will will run in /var/lib/mongodb, the home directory for the mongodb user.

Dockerfile: CMD

The last line of the Dockerfile traditionally describes the default command to be executed when the container starts.

Line 24 uses the CMD directive.  The arguments are an array of strings which make up the program to be invoked by default on container start.


Building the Docker Image


With the Dockerfile and the mongodb.conf template in the image directory (in my case, the directory is images/mongodb) I'm ready to build the image. The transcript for the build process is pretty long. This one I include in its entirety so you can see all of the activity that results from the Dockerfile directives.


docker build -t markllama/mongodb images/mongodb
Sending build context to Docker daemon 4.096 kB
Sending build context to Docker daemon 
Step 0 : FROM fedora:20
Pulling repository fedora
88b42ffd1f7c: Download complete 
511136ea3c5a: Download complete 
c69cab00d6ef: Download complete 
 ---> 88b42ffd1f7c
Step 1 : MAINTAINER Mark Lamourine 
 ---> Running in 38db2e5fffbb
 ---> fc120ab67c77
Removing intermediate container 38db2e5fffbb
Step 2 : RUN  yum install -y mongodb-server &&      yum clean all
 ---> Running in 42e55f18d490
Resolving Dependencies
--> Running transaction check
---> Package mongodb-server.x86_64 0:2.4.6-1.fc20 will be installed
--> Processing Dependency: v8 for package: mongodb-server-2.4.6-1.fc20.x86_64
...
Installed:
  mongodb-server.x86_64 0:2.4.6-1.fc20                                          
...

Complete!
Cleaning repos: fedora updates
Cleaning up everything
 ---> 8924655bac6e
Removing intermediate container 42e55f18d490
Step 3 : RUN  mkdir -p /var/lib/mongodb &&      touch /var/lib/mongodb/.keep &&      chown -R mongodb:mongodb /var/lib/mongodb
 ---> Running in 88f5f059c3ff
 ---> f8e4eaed6105
Removing intermediate container 88f5f059c3ff
Step 4 : ADD mongodb.conf /etc/mongodb.conf
 ---> eb358bbbaf75
Removing intermediate container 090e1e36f7f6
Step 5 : VOLUME [ "/var/lib/mongodb" ]
 ---> Running in deb3367ff8cd
 ---> f91654280383
Removing intermediate container deb3367ff8cd
Step 6 : EXPOSE 27017
 ---> Running in 0c1d97e7aa12
 ---> 46157892e3fe
Removing intermediate container 0c1d97e7aa12
Step 7 : USER mongodb
 ---> Running in 70575d2a7504
 ---> 54dca617b94c
Removing intermediate container 70575d2a7504
Step 8 : WORKDIR /var/lib/mongodb
 ---> Running in 91759055c498
 ---> 0214a3fbcafc
Removing intermediate container 91759055c498
Step 9 : CMD [ "/usr/bin/mongod", "--quiet", "--config", "/etc/mongodb.conf", "run"]
 ---> Running in 6b48f1489a3e
 ---> 13d97f81beb4
Removing intermediate container 6b48f1489a3e
Successfully built 13d97f81beb4

You can see how each directive in the Dockerfile corresponds to a build step, and you can see the activity that each directive generates.

When docker processes a Dockerfile what it really does first is to put the base image in a container and run it but execute a command in that container based on the first Docker file directive.  Each directive causes some change to the contents of the container.

A Docker container is actually composed of a set of file trees that are layered using a read-only union filesystem with a read/write layer on the top.  Any changes go into the top layer.  When you unmount the underying layers, what remains in the read/write layer are the changes caused by the first directive. When building a new image the changes for each directive are archived into a tarball and checksummed to produce the new layer and the layer's ID.

This process is repeated for each directive, accumulating new layers until all of the directives have been processed.  The intermediate containers are deleted, the new layer files are saved and tagged. The end result is a new image (a set of new layers).

Running the Mongo Container


This simplest test is to for the new container is to try running it and observing what happens.

docker run --name mongodb1 --detach --publish-all  markllama/mongodb
a90b275d00d451fde4edd9bc99798a4487815e38c8efbe51bfde505c17d920ab

This invocation indicates that docker should run the image named markllama/mongodb. When it does, it should detach (run as a daemon) and make all of the network ports exposed by the container available to the host. (that's the --publish-all).  It will name the newly created container mongodb1 so that you can distinguish it from other instances of the same image. It also allows you to refer to the container by name rather than needing the ID hash all the time. If you don't provide a name, docker will assign one from some randomly selected words.

The response is a hash which is the full ID of the new running container. Most times you'll be able to get away with a shorter version of the hash (as presented by docker ps. See below) or by the container name.

Examining the Running Container(s)


So the container is running. There's a MongoDB waiting for for a connection. Or is there? How can I tell and how can I figure out how to connect to it?

Docker offers a number of commands to view various aspects of the running containers.

Listing the Running Containers.


To list the running containers use docker ps. 


docker ps
CONTAINER ID        IMAGE                      COMMAND                CREATED             STATUS              PORTS                      NAMES
a90b275d00d4        markllama/mongodb:latest   /usr/bin/mongod --qu   5 mins  ago         Up 5 min            0.0.0.0:49155->27017/tcp   mongodb1

This line will likely wrap unless you have a wide screen.

In this case there is only one running container. Each line is a summary report on a single container. The important elements for now are the name, id and the ports summary. This last tells me that I should be able to connect from the host to the container MongoDB using localhost:49155 which is forward to the container's exposed port 27017

What did it do on startup?


A running container has one special process which is sort of like the init process on a host. That's the process indicated by the CMD or ENTRYPOINT directive in the Dockerfile.

When the container starts, the STDOUT of the initial process is connected to the the docker service. I can retrieve the output by requesting the logs.

For Docker commands which apply to single containers the final argument is either the ID or name of a container. Since I named the mongodb container I can use the name to access it.

docker logs mongodb1
Thu Aug 28 20:38:08.496 [initandlisten] MongoDB starting : pid=1 port=27017 dbpath=/var/lib/mongodb 64-bit host=a90b275d00d4
Thu Aug 28 20:38:08.498 [initandlisten] db version v2.4.6
Thu Aug 28 20:38:08.498 [initandlisten] git version: nogitversion
Thu Aug 28 20:38:08.498 [initandlisten] build info: Linux buildvm-12.phx2.fedoraproject.org 3.10.9-200.fc19.x86_64 #1 SMP Wed Aug 21 19:27:58 UTC 2013 x86_64 BOOST_LIB_VERSION=1_54
Thu Aug 28 20:38:08.498 [initandlisten] allocator: tcmalloc
Thu Aug 28 20:38:08.498 [initandlisten] options: { command: [ "run" ], config: "/etc/mongodb.conf", dbpath: "/var/lib/mongodb", nohttpinterface: "true", noprealloc: "true", quiet: true, smallfiles: "true" }
Thu Aug 28 20:38:08.532 [initandlisten] journal dir=/var/lib/mongodb/journal
Thu Aug 28 20:38:08.532 [initandlisten] recover : no journal files present, no recovery needed
Thu Aug 28 20:38:10.325 [initandlisten] preallocateIsFaster=true 26.96
Thu Aug 28 20:38:12.149 [initandlisten] preallocateIsFaster=true 27.5
Thu Aug 28 20:38:14.977 [initandlisten] preallocateIsFaster=true 27.58
Thu Aug 28 20:38:14.977 [initandlisten] preallocateIsFaster check took 6.444 secs
Thu Aug 28 20:38:14.977 [initandlisten] preallocating a journal file /var/lib/mongodb/journal/prealloc.0
Thu Aug 28 20:38:16.165 [initandlisten] preallocating a journal file /var/lib/mongodb/journal/prealloc.1
Thu Aug 28 20:38:17.306 [initandlisten] preallocating a journal file /var/lib/mongodb/journal/prealloc.2
Thu Aug 28 20:38:18.603 [FileAllocator] allocating new datafile /var/lib/mongodb/local.ns, filling with zeroes...
Thu Aug 28 20:38:18.603 [FileAllocator] creating directory /var/lib/mongodb/_tmp
Thu Aug 28 20:38:18.629 [FileAllocator] done allocating datafile /var/lib/mongodb/local.ns, size: 16MB,  took 0.008 secs
Thu Aug 28 20:38:18.629 [FileAllocator] allocating new datafile /var/lib/mongodb/local.0, filling with zeroes...
Thu Aug 28 20:38:18.637 [FileAllocator] done allocating datafile /var/lib/mongodb/local.0, size: 16MB,  took 0.007 secs
Thu Aug 28 20:38:18.640 [initandlisten] waiting for connections on port 27017

This is just what I'd expect for a running mongod.

Just the Port Information please?


If I know the name of the container or its ID I can request the port information explicitly.  This is useful when the output must be parsed, perhaps by a program that will create another container needing to connect to the database.

docker port mongodb1 27017
0.0.0.0:49155

But is it working?


Docker thinks there's something running. I have enough information now to try connecting to the database itself. From the host I can try connecting to the database itself.

The ports information indicates that the container port 27017 is forward to the host "all interfaces"  port 49155.  If the host firewall allows connections in on that port the database could be used (or attacked) from outside.


echo "show dbs" | mongo localhost:49155
MongoDB shell version: 2.4.6
connecting to: localhost:49155/test
local 0.03125GB
bye

What next?


At this point I have verified that I have a running MongoDB accessible from the host (or outside if I allow).

There's lots more that you can do and query about the containers using the docker CLI command, but there's no need to detail it all here.  You can learn more from the Docker documentation web site

Before I start on the Pulp service proper I also need a QPID service container. This is very similar to the MongoDB container so I won't go into detail.

Since the point of the exercise is to run Pulp in Docker with Kubernetes, the next step will be to run the MongoDB and QPID containers using Kubernetes.