Thursday, September 4, 2014

Kubernetes: Simple Containers and Services

From previous posts I now have a MongoDB image and another which runs a QPID AMQP broker.  I intend for these to be used by the Pulp service components.

What I'm going to do this time is to create the subsidiary services that I'll need for the Pulp service within a Kubernetes cluster.

UPDATE 12/16/2014: recently the kubecfg command has been deprecated and replaced with kubectl. I've updated this post to reflect the CLI call and output from kubectl.

Pre-Launch


A Pulp service stores it's persistent data in the database.  The service components, a Celery Beat server and a number of Celery workers, as well as one or more Apache web server daemons all communicate using the AMQP message broker.  They store and retrieve data from the database.

In a traditional bare-bare metal or VM based installation all of these services would likely be run on the same host.  If they are distributed, then the IP addresses and credentials of the support services would have to be configured into Pulp servers manually or using some form of configuration management. Using containers the components can be isolated but the task of tracking them and configuring the consumer processes remains.

Using just Docker, the first impulse of an implementer would be similar, to place all of the containers on the same host.  This would simplify the management of the connectivity between the parts, but it also defeats some of the benefit of containerized applications: portability and non-locality. This isn't a failing of Docker. It is the result of conscious decisions to limit the scope of what Docker attempts to do, avoiding feature creep and bloat.  And this is where a tool like Kubernetes comes in.

As mentioned elsewhere, Kubernetes is a service which is designed to bind together a cluster of container hosts, which can be regular hosts running the etcd and kubelet daemons or they can be specialized images like Atomic or CoreOS.  They can be private or public services such as Google Cloud

For Pulp, I need to place a MongoDB and a QPID container within a Kubernetes cluster and create the infrastructure so that clients can find it and connect to it.  For each of these I need to create a Kubernetes Service and a Pod (group of related containers).

Kicking the Tires


It's probably a good thing to explore a little bit before diving in so that I can see what to expect from Kubernetes in general.  I also need to verify that I have a working environment before I start trying to bang on it.

Preparation


If you're following along, at this point I'm going to assume that you have access to a running Kubernetes cluster.  I'm going to be using the Vagrant test cluster as defined in the github repository and described in the Vagrant version of the Getting Started Guides.

I'm also going to assume that you've built the kubernetes binaries.  I'm using the shell wrappers in the cluster sub-directory, especially cluster/kubectl.sh.   If you try that and you haven't built the binaries you'll get a message that looks like this:

cluster/kubectl.sh 
It looks as if you don't have a compiled kubectl binary.

If you are running from a clone of the git repo, please run
'./build/run.sh hack/build-cross.sh'. Note that this requires having
Docker installed.

If you are running from a binary release tarball, something is wrong. 
Look at http://kubernetes.io/ for information on how to contact the 
development team for help.

If you see that, do as it says. If that fails, you probably haven't installed the golang package.


For convenience I alias the kubectl.sh wrapper so that I don't need the full path.

alias kubectl=~/kubernetes/cluster/kubectl.sh

Like most CLI commands now if you invoke it with no arguments it prints usage.

kubectl --help 2>1 | more
Usage of kubectl:

Usage: 
  kubectl [flags]
  kubectl [command]

Available Commands: 
  version                                             Print version of client and server
  proxy                                               Run a proxy to the Kubernetes API server
  get [(-o|--output=)json|yaml|...] <resource> [<id>] Display one or many resources
  describe <resource> <id>                            Show details of a specific resource
  create -f filename                                  Create a resource by filename or stdin
  createall [-d directory] [-f filename]              Create all resources specified in a directory, filename or stdin
  update -f filename                                  Update a resource by filename or stdin
  delete ([-f filename] | (<resource> <id>))          Delete a resource by filename, stdin or resource and id

The full usage output can be found in the CLI documentation in the Kubernetes Github repository.

kubectl has one oddity that makes a lot of sense once you understand why it's there. The command is meant to produce output which is consumable by machines using UNIX pipes. The output is structured data formatted using JSON or YAML. To avoid strange errors in the parsers, the only output to STDOUT is structured data. This means that all of the human readable output goes to STDERR. This isn't just the error output though. This includes the help output. So if you want to run the help and usage output through a pager app like more(1) or less(1), you have to first redirect STDERR to STDOUT as I did above.

Exploring the CLI control objects


You can see in the REST API line the possible operations: get, list, create, delete, update . That line also shows the objects that the API can manage: minions, pods, replicationControllers, servers.

Minions


A minion is a host that can accept containers.  It runs an etcd and a kubelet daemon in addition to the Docker daemon.For our purposes a minion is where containers can go.

I can list the minions in my cluster like this:

kubectl get minions
NAME                LABELS
10.245.2.4          <none>
10.245.2.2          <none>
10.245.2.3          <none>

The only valid operation on minions using the REST protocol are the list and get actions.  The get response isn't very interesting.

Until I add some of the other objects this is the most interesting query.  It indicates that there are three minions connected and ready to accept containers.

Pods


A pod is the Kubernetes object which describes a set of one or more containers to be run on the same minion.  While the point of a cluster is to allow containers to run anywhere within the cluster, there are times when a set of containers must run together on the same host. Perhaps they share some external filesystem or some other resource.  See the golang specification for the Pod struct.

kubectl get pods
NAME                IMAGE(S)            HOST                    LABELS              STATUS

See? not very interesting.

Replication Controllers


I'm going to defer talking about replication controllers in detail for now.  It's enough to note their existence and purpose.

Replication controllers are the tool to create HA or load balancing systems. Using a replication controller you can tell Kubernetes to create multiple running containers for a given image.  Kubernetes will ensure that if one container fails or stops that a new container will be spawned to replace it.

I can list the replication controllers in the same way as minions or pods, but there's nothing to see yet.

Services


I think the term service is an unfortunate but probably unavoidable terminology overload.

In Kubernetes, a service defines a TCP or UDP port reservation.  It provides a way for applications running in containers to connect to each other without requiring that each one be configured with the end-point IP addresses. This both allows for abstracted configuration and for mobility and load balancing of the providing containers.

When I define a Kubernetes service, the service providers (the MongoDB and QPID containers) will be labeled to receive traffic and the service consumers (the Pulp components) will be given the access information in the environment so that they can reach the providers. More about that later.

I can list the services in the same way as I would minions or pods. And it turns out that creating a couple of Kubernetes services is the first step I need to take to prepare the Pulp support service containers.

Creating a Kubernetes Service Object


In a cloud cluster one of the most important considerations is being able to find things.  The whole point of the cloud is to promote non-locality.  I don't care where things are, but I still have to be able to find them somehow.

A Kubernetes Service object is a handle that allows my MongoDB and QPID clients find the servers without them having to know where they really are. It defines a port to listen on and a way for clients to indicate that they want to accept the traffic that comes in. Kubernetes arranges for the traffic to be forwarded to the servers.

Kubernetes both accepts and produces structured data formats for input and reporting.  The two currently supported formats are JSON and YAML.  The Service structure is relatively simple but it has elements which are shared by all of the top level data structures. Kubernetes doesn't yet have any tooling to make the creation of an object description easier than hand-crafting a snipped of JSON or YAML.  Each of the structures is documented in the godoc for Kubernetes. For now that's all you get.

There are a couple of provided examples and these will have to do for now. The guestbook example demonstrates using ReplicationServers and master/slave implementation using Redis.  The second shows how to perform a live update of the pods which make up an active service within a Kubernetes cluster. These are actually a bit more advanced than I'm ready for and don't give the detailed break-down of the moving parts that I mean to do.

This is a complete description of the service. Lines 5-8 define the actual content.
  • Line 2 indicates that this is a Service object.
  • Line 3 indicates the object schema version.
    v1beta1 is current
    (note: my use of the term 'schema' is a loose one)
  • Line 4 identifies the Service object.
    This must be unique within the set of services
  • Line 5 is the TCP port number that will be listening
  • Line 6 is for testing.  It tells the proxy on the minion with that IP to listen for inbound connections.
    I'll also use the publicIPs value to expose the HTTP and HTTPS services for Pulp
  • Lines 7-9 set the Selector
    The selector is used to associate this Service object with containers that will accept the inbound traffic.
    This will match with one of the label items assigned to the containers.

When a new service is created Kubernetes establishes a listener on an available IP address (one of the minions addresses).  While the service object exists any new containers will start with a new set of environment variables which provide access information.  The value of the selector (converted to upper case) is used as the prefix for these environment variables so that containers can be designed to pick them up and use them for configuration.

For now I just need to establish the service so that when I create the DB and QPID containers they have something to be bound to.

The QPID service is identical to the MongoDB service, replacing the port (5672) and the selector (msg)

Querying a Service Object


I've just created a Service object. I wonder what Kubernetes thinks of it? I can list the services as seen above. I can also get the object information using kubectl.

kubectl get services db
NAME                LABELS              SELECTOR            IP                  PORT
db                                name=db             10.0.41.48          27017


That's nice. I know the important information now.  But what does it look like really.


kubectl get --output=json services db
{
    "kind": "Service",
    "id": "db",
    "uid": "c040da3d-8536-11e4-a18b-0800279696e1",
    "creationTimestamp": "2014-12-16T15:18:12Z",
    "selfLink": "/api/v1beta1/services/db?namespace=default",
    "resourceVersion": 13,
    "apiVersion": "v1beta1",
    "namespace": "default",
    "port": 27017,
    "protocol": "TCP",
    "selector": {
        "name": "db"
    },
    "publicIPs": [
        "10.245.2.2"
    ],
    "containerPort": 0,
    "portalIP": "10.0.41.48"
}


Clearly Kubernetes has filled out some of the object fields.  Note the --output=json flag for structured data.

I'll be using this method to query information about the other elements as I go along.

Describing a Container (Pod) in Kubernetes


We've seen how to run a container on a Docker host.  With Kubernetes we have to create and submit a description of the container with all of the required variables defined.

Kubernetes has an additional abstraction called a pod.  While Kubernetes is designed to allow the operator to ignore the location of containers within the cluster, there are times when a set of containers needs to be co-located on the same host.  A pod is Kubernetes' way of grouping containers when needed.  When starting a single container it will still be referred to as a member of a pod.


Here's the description of a pod containing the MongoDB service image I created earlier.


This is actually a set of nested structures, maps and arrays.


  • Lines 1-21 define a Pod.
  • Lines 2-4 are elements of an inline JSONBase structure
  • Lines 5-7 are a map (hash) of strings assigned to the Pod struct element named Labels.
  • Lines 8-20 define a PodState named DesiredState.
    The only required element is the ContainerManifest, named Manifest in the PodState.
  • A Podstate has a required Version and ID, though it is not a subclass of JSONBase.
      It also has a list of Containers and an optional list of Volumes
  • Lines 12-18 define the set of containers (only one in this case) that will reside in the pod.
    A Container has a name and an image path (in this case to the previously defined mongodb image).
  • Lines 15-17 are a set of Port specifications.
      These indicate that something inside the container will be listening on these ports.


You can see how learning the total schema means fishing through each of these structure definitions in the documentation.  If you work at it you will get to know them.  To be fair they are really meant to be generated and consumed by machines rather than humans.  Kubernetes is still the business end of the service. Pretty dashboards will be provided later.  The only visibility I really need is for development and diagnostics. There are gaps here too, but finding them is what experiments like this are about.

A note on Names and IDs


There are several places where there is a key named "name" or "id". I could give them all the same value, but I'm going to deliberately vary them so I can expose which ones are used for what purpose. Names can be arbitrary strings. I believe that IDs are restricted somewhat (no hyphens).

Creating the first Pod


Now I can get back to business.

Once I have the Pod definition expressed in JSON I can submit that to kubectl for processing.


kubectl create -f pods/mongodb.json 
pulpdb


TADA! I now have a MongoDB running in Kubernetes.

But how do I know?


Now that I actually have a pod, I should be able to query the Kubernetes service about it and get more than an empty answer.

kubectl get pods pulpdb
NAME                IMAGE(S)            HOST                    LABELS              STATUS
pulpdb              markllama/mongodb   10.245.2.3/10.245.2.3   name=db             Running


Familiar and Boring. But I can get more from kubectl by asking for the raw JSON return from the query.

{
    "kind": "Pod",
    "id": "pulpdb",
    "uid": "4bac8381-8537-11e4-a18b-0800279696e1",
    "creationTimestamp": "2014-12-16T15:22:06Z",
    "selfLink": "/api/v1beta1/pods/pulpdb?namespace=default",
    "resourceVersion": 22,
    "apiVersion": "v1beta1",
    "namespace": "default",
    "labels": {
        "name": "db"
    },
    "desiredState": {
        "manifest": {
            "version": "v1beta2",
            "id": "",
            "volumes": [
                {
                    "name": "devlog",
                    "source": {
                        "hostDir": {
                            "path": "/dev/log"
                        },
...
            "pulp-db": {
                "state": {
                    "running": {
                        "startedAt": "2014-12-16T15:27:04Z"
                    }
                },
                "restartCount": 0,
                "image": "markllama/mongodb",
                "containerID": "docker://8f21d45e49b18b37b98ea7556346095261699bc
3664b52813a533edccee55a63"
            }
        }
    }
}


It's really long. So I'm not going to include it inline. Instead I put it into a gist.

If you fish through it you'll find the same elements I used to create the pod, and lots, lots more.  The structure now contains both a desiredState and a currentState sub-structure, with very different contents.

Now a lot of this is just noise to us, but lines 59-72 are of particular interest.  These show the effects of the Service object that was created previously.  These are the environment variables and network ports declared. These are the values that a client container will use to connect to this service container.

Testing the MongoDB service


If you've read my previous blog post on creating a MongoDB Docker image you'll be familiar with the process I used to verify the basic operation of the service.

In that case I was running the container using Docker on my laptop.  I knew exactly where the container was running and I had direct access to the Docker CLI so that I could ask Docker about my new container.
I'd opened up the MongoDB port and told Docker to bind it to a random port on the host and I could connect directly to that port.

In a Kubernetes cluster there's no way to know a priori where the MongoDB container will end up. You have to ask Kubernetes where it is.  Further you don't have direct access to the Docker CLI.

This is where that publicIPs key in the mongodb-service.json file comes in.  I set the public IP value of the db service to an external IP address of one of the Kubernetes minions: 10.245.2.2.  This causes the proxy on that minion to accept inbound connections and forward them to the db service pods where ever they are.

The minion host is accessible from my desktop so I can test the connectivity directly.

echo "show dbs" | mongo 10.245.2.2
MongoDB shell version: 2.4.6
connecting to: 10.245.2.4/test
local 0.03125GB
bye

And now for QPID?


As with the Service object, creating and testing the QPID container within Kubernetes requires the same process.  Create a JSON file which describes the QPID service and another for the pod.  Submit them and test as before.

Summary


Now I have two running network services inside the Kubernetes cluster. This consists of a Kubernetes Service object and a Kubernetes Pod which is running the image I'd created for each service application.

I can prove to myself that the application services are running and accessible, though for some of the detailed tests I have to go under the covers of Kuberntes still.

I have the information I need to craft images for the other Pulp services so that they can consume the database and messenger services.

Next Up


In the next post I mean to create the first Pulp service image, the Celery Beat server.  There are elements that all of the remaining images will have in common, so I'm going to first build a base image and then apply the last layer to differentiate the beat server from the Pulp resource manager and the pulp workers.

References


Monday, September 1, 2014

Docker: A QPID Message Broker Container

OK I lied. I realized I can't just move on to working with Pulp in Kubernetes without building the other sub-service Pulp needs.

This one is merely going to be an exposition of the QPID container and it's actually simpler than the MongoDB container, so this will be a short one. A QPID service is even simpler than a MongoDB because (so long as you don't care about store-and-forward messages) you don't need persistent storage.

Like the MongoDB container, I need to define the package set that will be installed on top of the base image. I also need to declare a TCP port for the QPID service. Finally I need to define the primary process that will be started when the container starts.  This will be an invocation of the QPID service daemon.

QPID Dockerfile


Here's the Dockerfile for QPID on Fedora 20.


Let's walk through the Dockerfile directives quickly.

Line 1: FROM - Just as in the MongoDB image,  I'm using the stock Fedora 20 image as the base

Line 2: MAINTAINER - Indicate who to contact with problems (AND THANKS!)

Yeah, that's me.

Line 7: RUN - Install the QPID packages

I think there are several QPID servers.  I'm using the one written in C++, hence the package names: qpid-cpp-server and qpidd-cpp-server-store.  

Line 10: ADD - Create a location for the daemon to run.  If you specify a file to add but there is no matching file in the build context directory, then Docker will create the target in the container as an empty directory.

I'm creating /.qpidd for the daemon to run in.

Line 12: WORKDIR - Set the location where the initial process will run.  Here is where I tell Docker to run the daemon in the directory I created with the previous ADD directive.

Line 14: EXPOSE - QPID uses port 5672/TCP.  This line opens the firewall for that port and causes Docker to bind it to a host port.

Line 16: ENTRYPOINT - This indicates the binary or script that will be called when the container runs.

The ENTRYPOINT and CMD directives are used to craft the invocation of the primary process of the container.

Explaining ENTRYPOINT and CMD


I got some help for this from a Stackoverflow article: What is the difference between CMD and ENTRYPOINT

When I docker container is run, a single process is started inside the container.  This process may spawn others, but it remains as the anchor process for all of the others.

The invocation of the container primary process is created by combining the values of the ENTRYPOINT and CMD directives.  The ENTRYPOINT, if it is set, becomes the path of the binary to be executed.  The value of the CMD directive is used as the arguments to the primary process.

There are two twists on this.

If no ENTRYPOINT is provided, then the CMD directive is run using /bin/sh -c.
Also if the docker run command has any positional arguments following the regular docker arguments, these will replace the CMD value.

By setting the ENTRYPOINT to the QPID command, then the arguments to the daemon can be passed directly on the docker run line.

If an image has an ENTRYPOINT directive then it can be overridden with the --entrypoint option to docker run.

Building the Image


docker build -t markllama/qpid images/qpid
Sending build context to Docker daemon  2.56 kB
Sending build context to Docker daemon 
Step 0 : FROM fedora:20
 ---> 88b42ffd1f7c
Step 1 : MAINTAINER Mark Lamourine 
 ---> Using cache
 ---> 95516239225e
Step 2 : RUN yum install -y qpid-cpp-server qpid-cpp-server-store python-qpid-qmf python-qpid &&      yum clean all
 ---> Running in 7fc6b6ed2128
Resolving Dependencies
--> Running transaction check
---> Package python-qpid.noarch 0:0.26-2.fc20 will be installed
--> Processing Dependency: python-qpid-common = 0.26-2.fc20 for package: python-qpid-0.26-2.fc20.noarch
---> Package python-qpid-qmf.x86_64 0:0.26-2.fc20 will be installed
--> Processing Dependency: qpid-qmf(x86-64) = 0.26-2.fc20 for package: python-qpid-qmf-0.26-2.fc20.x86_64
--> Processing Dependency: libqmf2.so.1()(64bit) for package: python-qpid-qmf-0.26-2.fc20.x86_64
---> Package qpid-cpp-server.x86_64 0:0.26-11.fc20 will be installed
--> Processing Dependency: qpid(client)(x86-64) = 0.26 for package: qpid-cpp-server-0.26-11.fc20.x86_64
--> Processing Dependency: qpid-proton-c(x86-64) >= 0.5 for package: qpid-cpp-server-0.26-11.fc20.x86_64
...                                     
  python-qpid-common.noarch 0:0.26-2.fc20                                       
  qpid-cpp-client.x86_64 0:0.26-11.fc20                                         
  qpid-proton-c.x86_64 0:0.7-3.fc20                                             
  qpid-qmf.x86_64 0:0.26-2.fc20                                                 

Complete!
Cleaning repos: fedora updates
Cleaning up everything
 ---> d7e61654fb92
Removing intermediate container 7fc6b6ed2128
Step 3 : ADD . /.qpidd
 ---> 10c44a5719a5
Removing intermediate container a8a37c5986a5
Step 4 : WORKDIR /.qpidd
 ---> Running in 2833da1629d9
 ---> 1963a2551db8
Removing intermediate container 2833da1629d9
Step 5 : EXPOSE 5672
 ---> Running in d0d92a1e58ad
 ---> 425ba5994308
Removing intermediate container d0d92a1e58ad
Step 6 : ENTRYPOINT ["/usr/bin/qpidd", "-t", "--auth=no"]
 ---> Running in e678dc1a4b66
 ---> ae30e626e215
Removing intermediate container e678dc1a4b66
Successfully built ae30e626e215

Verifying the Image


With respect to docker, verifying the image is the same as it was for the MongoDB image.

docker run -d --name qpid1 --publish-all markllama/mongodb
1b513bee6d8d5d4328059a059f9520c469ff405228b88370b91bb85ef659b708


Process information


docker ps
CONTAINER ID        IMAGE                      COMMAND                CREATED             STATUS              PORTS                      NAMES
1b513bee6d8d        markllama/qpid:latest      /usr/sbin/qpidd -t -   7 seconds ago       Up 5 seconds        0.0.0.0:49157->5672/tcp    qpid1  

Docker logs


docker logs qpid1
2014-09-01 23:32:34 [Model] trace Mgmt create memory. id:amqp-broker
2014-09-01 23:32:34 [Broker] info Management enabled
2014-09-01 23:32:34 [Management] info ManagementAgent generated broker ID: dc7d2
473-58e4-4eea-a21b-46105345054e
...
2014-09-01 23:32:34 [Management] debug ManagementAgent added class org.apache.qp
id.broker:queueThresholdExceeded
2014-09-01 23:32:34 [Model] trace Mgmt create system. id:cfaf5a0f-1291-41e5-b0c0
-e5eb07c77c1e
2014-09-01 23:32:34 [Model] trace Mgmt create broker. id:amqp-broker
2014-09-01 23:32:34 [Model] trace Mgmt create vhost. id:org.apache.qpid.broker:b
roker:amqp-broker,/
2014-09-01 23:32:34 [Security] notice SSL plugin not enabled, you must set --ssl
-cert-db to enable it.
2014-09-01 23:32:34 [Broker] info Loaded protocol AMQP 1.0
2014-09-01 23:32:35 [Store] notice Journal "TplStore": Created
2014-09-01 23:32:35 [Store] notice Store module initialized; store-dir=//.qpidd
2014-09-01 23:32:35 [Store] info > Default files per journal: 8
2014-09-01 23:32:35 [Store] info > Default journal file size: 24 (wpgs)
2014-09-01 23:32:35 [Store] info > Default write cache page size: 32 (KiB)
2014-09-01 23:32:35 [Store] info > Default number of write cache pages: 32
2014-09-01 23:32:35 [Store] info > TPL files per journal: 8
2014-09-01 23:32:35 [Store] info > TPL journal file size: 24 (wpgs)
2014-09-01 23:32:35 [Store] info > TPL write cache page size: 4 (KiB)
2014-09-01 23:32:35 [Store] info > TPL number of write cache pages: 64
2014-09-01 23:32:35 [Model] trace Mgmt create exchange. id:
...
2014-09-01 23:32:36 [Model] trace Mgmt create exchange. id:qmf.default.direct
2014-09-01 23:32:36 [Broker] notice SASL disabled: No Authentication Performed
2014-09-01 23:32:36 [Security] info Policy file not specified. ACL Disabled, no 
ACL checking being done!
2014-09-01 23:32:36 [Security] trace Initialising SSL plugin
2014-09-01 23:32:36 [Network] info Listening to: 0.0.0.0:5672
2014-09-01 23:32:36 [Network] info Listening to: [::]:5672
2014-09-01 23:32:36 [Network] notice Listening on TCP/TCP6 port 5672
2014-09-01 23:32:36 [Store] info Enabling management instrumentation for the sto
re.
...
2014-09-01 23:32:36 [Model] trace Mgmt create store. id:org.apache.qpid.broker:b
roker:amqp-broker
2014-09-01 23:32:36 [Management] debug Management object (V1) added: org.apache.
qpid.legacystore:store:org.apache.qpid.broker:broker:amqp-broker
2014-09-01 23:32:36 [Broker] notice Broker running

The QPID logs will continue accumulating. With the default debug level it reports a lot of connection information.

Connectivity


To test connectivity to the QPID services I use the qpid-config command from the qpid-utils package on Fedora. Install that package to get the command.


qpid-config queues -b guest@127.0.0.1:49157
Queue Name                                Attributes
=================================================================
7783123e-9589-4814-8b7b-b976a576c853:0.0  auto-del excl 


This command lists the queues present on the broker.  It connects using the guest account and specifies the localhost IPv4 address and the port indicated by the output of the docker ps or docker ports commands.

This is a very simple connectivity test.  The single queue is the default for an unused AMQP server.  Once the Pulp components connect they will create additional queues.

Running A Shell in an image with an ENTRYPOINT


Using an ENTRYPOINT directive has a couple of effects that you want to be aware of.

On the plus side you can add arguments to the entrypoint binary just by adding them after the image name on the invocation.

One gotcha is that you can't just put /bin/sh after the image to get a shell as you otherwise would. It is very common and convenient to examine an image by running it with a shell, overriding the CMD. Docker provides the --entrypoint option to allow overriding when necessary.

docker run -it --entrypoint /bin/sh markllama/qpid 
sh-4.2# pwd
/.qpidd
sh-4.2# ls
Dockerfile
sh-4.2# exit
exit

Now I have images for both of the secondary services that Pulp needs.

Time to start playing with Kubernetes a bit.

References:


Saturday, August 30, 2014

Docker: A simple service container example with MongoDB

In my previous post I said I was going to build, over time a Pulp repository using a set of containerized service components and host it in a Kubernetes cluster.

A complete Pulp service


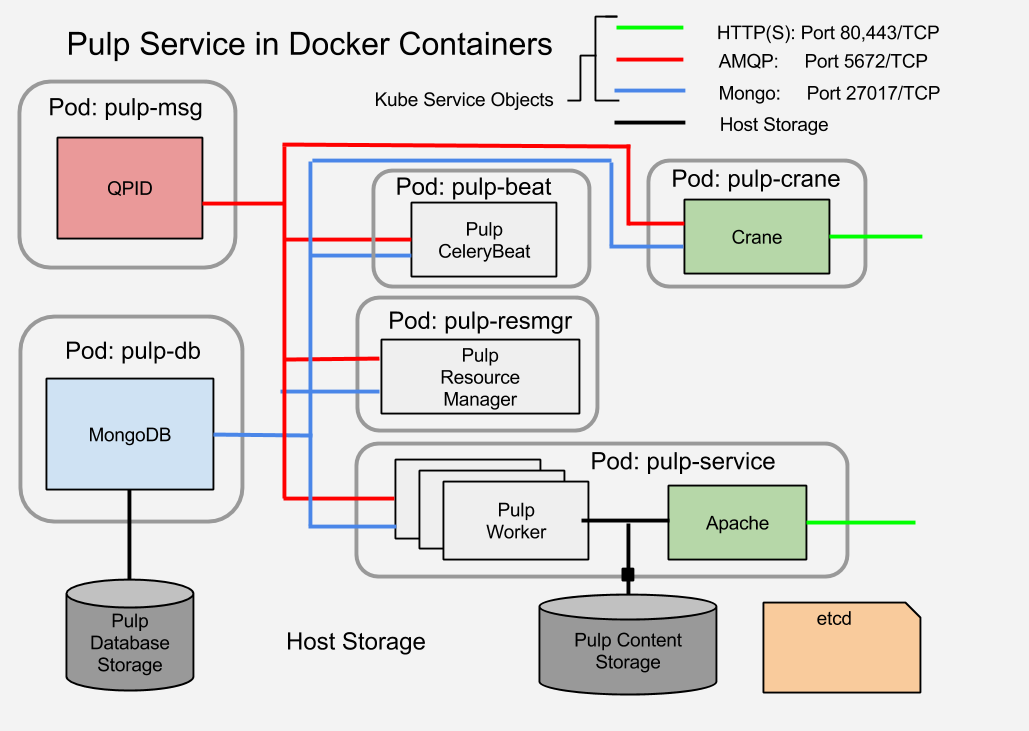
The Pulp service is composed of a number of sub-services:

  • A MongoDB database
  • A QPID AMQP message broker
  • A number of Celery processes
    • 1 Celery Beat process
    • 1 Pulp Resource Manager (Celery worker) process
    • >1 Pulp worker (Celery worker) process
  • >1 Apache HTTPD - serves mirrored content to clients
  • >1 Crane service - Docker plugin for Pulp

This diagram illustrates the components and connectivity of a Pulp service as it will be composed in Kubernetes using Docker containers.


Diagram of Pulp service component structure
Pulp Service Component Structure


The simplest images will be those for the QPID and MongoDB services.  I'm going to show how to create the MongoDB image first.

There are several things I will not be addressing in this simple example:

  1. HA and replication
    In production the MongoDB would be replicated
    In production the QPID AMQP service would have a mesh of brokers
  2. Communications Security
    In production the links between components to the MongoDB and the QPID message broker would be encrypted and authenticated.

    Key management is actually a real problem with Docker at the moment and will require its own set of discussions.

A Docker container for MongoDB


This post essentially duplicates the instructions for creating a MongoDB image which are provided  on the Docker documentation site. I'm going to walk through them here for several reasons.  First is for completeness and for practice on the basics of creating a simple image.  Second, the Docker example uses Ubuntu for the base image.  I am going to use Fedora.  In later posts I'm going to be doing some work with Yum repos and RPM installation.  Finally I'm going to make some notes which are relevant to the suitability of a container for use in a Kubernetes cluster.

Work Environment


I'm working on Fedora 20 with the docker-io package installed and the docker service enabled and running.  I've also added my username to the docker group in /etc/group so I don't need to use sudo to issue docker commands. If your work environment differs you'll probably have to adapt some.

Defining the Container: Dockerfile

New docker images are defined in a Dockerfile. Capitalization matters in the file name. The Dockerfile must reside in a directory of its own. Any auxiliary files that the Dockerfile may reference will reside in the same directory.

The syntax for a Dockerfile is documented on the Docker web site.

This is the Dockerfile for the MongDB image in Fedora 20:


That's really all it takes to define a new container image.  The first two lines are the only ones that are mandatory for all Dockerfiles.  The rest form the description of the new container.

Dockerfile: FROM

Line 1 indicates the base image to begin with. It refers to an existing image on the official public Docker registry.  This image is offered and maintained by the Fedora team.  I specify the Fedora 20 version.  If I had left the version tag off, the Dockerfile would use the latest tagged image available.

Dockerfile: MAINTAINER

Line 2 gives contact information for the maintainer of the image definition.

Diversion:

Lines 4 and 5 are an unofficial comment. It's a fragment of JSON which contains some information about how the image is meant to be used.

Dockerfile: RUN

Line 7 is where the real fun begins. The RUN directive indicates that what follows is a command to be executed in the context of the base image.  It will make changes or additions which will be captured and used to create a new layer.  In fact, every directive from here on out creates a new layer.  When the image is run, the layers are composed to form the final contents of the container before executing any commands within the container.

The shell command which is the value of the RUN directive must be treated by the shell as a single line.  If the command is too long to fit in an 80 character line then shell escapes (\<cr>) and conjunctions (';' or '&&' or '||') are used to indicate line continuation just as if you were writing into a shell on the CLI.

This particular line installs the mongodb-server package and then cleans up the YUM cache. This last is required because any differences in the file tree from the begin state will be included in the next image layer.  Cleaning up after YUM prevents including the cached RPMs and metadata from bloating the layer and the image.

Line 10 is another RUN statement.  This one prepares the directory where the MongoDB storage will reside. Ordinarily this would be created on a host when the MongoDB package is installed with a little more during the startup process for the daemon. They're here explicitly because I'm going to punch a hole in the container so that I can mount the data storage area from host.  The mount process can overwrite some of the directory settings.  Setting them explicitly here ensures that the directory is present and the permissions are correct for mounting the external storage.

Dockefile: ADD

Line 14 adds a file to the container.  In this case it's a slightly tweaked mongodb.conf file.  It adds a couple of switches which the Ubuntu example from the Docker documentation applies using CLI arguments to the docker run invocation.  The ADD directive takes the input file from the directory containing the Dockerfile and will overwrite the destination file inside the container.


Lines 16-22 don't add new content but rather describe the run-time environment for the contents of the container.

Dockerfile: VOLUME

Line 16 officially declares that the directory /var/lib/mongodb will be used as a mountpoint for external storage.

Dockerfile: EXPOSE

Line 18 declares that TCP port 21017 will be exposed.  This will allow connections from outside the container to access the mongodb inside.

Dockerfile: USER

Line 20 declares that the first command executed will be run as the mongodb user.

Dockerfile: WORKDIR

Line 22 declares that the command will will run in /var/lib/mongodb, the home directory for the mongodb user.

Dockerfile: CMD

The last line of the Dockerfile traditionally describes the default command to be executed when the container starts.

Line 24 uses the CMD directive.  The arguments are an array of strings which make up the program to be invoked by default on container start.


Building the Docker Image


With the Dockerfile and the mongodb.conf template in the image directory (in my case, the directory is images/mongodb) I'm ready to build the image. The transcript for the build process is pretty long. This one I include in its entirety so you can see all of the activity that results from the Dockerfile directives.


docker build -t markllama/mongodb images/mongodb
Sending build context to Docker daemon 4.096 kB
Sending build context to Docker daemon 
Step 0 : FROM fedora:20
Pulling repository fedora
88b42ffd1f7c: Download complete 
511136ea3c5a: Download complete 
c69cab00d6ef: Download complete 
 ---> 88b42ffd1f7c
Step 1 : MAINTAINER Mark Lamourine 
 ---> Running in 38db2e5fffbb
 ---> fc120ab67c77
Removing intermediate container 38db2e5fffbb
Step 2 : RUN  yum install -y mongodb-server &&      yum clean all
 ---> Running in 42e55f18d490
Resolving Dependencies
--> Running transaction check
---> Package mongodb-server.x86_64 0:2.4.6-1.fc20 will be installed
--> Processing Dependency: v8 for package: mongodb-server-2.4.6-1.fc20.x86_64
...
Installed:
  mongodb-server.x86_64 0:2.4.6-1.fc20                                          
...

Complete!
Cleaning repos: fedora updates
Cleaning up everything
 ---> 8924655bac6e
Removing intermediate container 42e55f18d490
Step 3 : RUN  mkdir -p /var/lib/mongodb &&      touch /var/lib/mongodb/.keep &&      chown -R mongodb:mongodb /var/lib/mongodb
 ---> Running in 88f5f059c3ff
 ---> f8e4eaed6105
Removing intermediate container 88f5f059c3ff
Step 4 : ADD mongodb.conf /etc/mongodb.conf
 ---> eb358bbbaf75
Removing intermediate container 090e1e36f7f6
Step 5 : VOLUME [ "/var/lib/mongodb" ]
 ---> Running in deb3367ff8cd
 ---> f91654280383
Removing intermediate container deb3367ff8cd
Step 6 : EXPOSE 27017
 ---> Running in 0c1d97e7aa12
 ---> 46157892e3fe
Removing intermediate container 0c1d97e7aa12
Step 7 : USER mongodb
 ---> Running in 70575d2a7504
 ---> 54dca617b94c
Removing intermediate container 70575d2a7504
Step 8 : WORKDIR /var/lib/mongodb
 ---> Running in 91759055c498
 ---> 0214a3fbcafc
Removing intermediate container 91759055c498
Step 9 : CMD [ "/usr/bin/mongod", "--quiet", "--config", "/etc/mongodb.conf", "run"]
 ---> Running in 6b48f1489a3e
 ---> 13d97f81beb4
Removing intermediate container 6b48f1489a3e
Successfully built 13d97f81beb4

You can see how each directive in the Dockerfile corresponds to a build step, and you can see the activity that each directive generates.

When docker processes a Dockerfile what it really does first is to put the base image in a container and run it but execute a command in that container based on the first Docker file directive.  Each directive causes some change to the contents of the container.

A Docker container is actually composed of a set of file trees that are layered using a read-only union filesystem with a read/write layer on the top.  Any changes go into the top layer.  When you unmount the underying layers, what remains in the read/write layer are the changes caused by the first directive. When building a new image the changes for each directive are archived into a tarball and checksummed to produce the new layer and the layer's ID.

This process is repeated for each directive, accumulating new layers until all of the directives have been processed.  The intermediate containers are deleted, the new layer files are saved and tagged. The end result is a new image (a set of new layers).

Running the Mongo Container


This simplest test is to for the new container is to try running it and observing what happens.

docker run --name mongodb1 --detach --publish-all  markllama/mongodb
a90b275d00d451fde4edd9bc99798a4487815e38c8efbe51bfde505c17d920ab

This invocation indicates that docker should run the image named markllama/mongodb. When it does, it should detach (run as a daemon) and make all of the network ports exposed by the container available to the host. (that's the --publish-all).  It will name the newly created container mongodb1 so that you can distinguish it from other instances of the same image. It also allows you to refer to the container by name rather than needing the ID hash all the time. If you don't provide a name, docker will assign one from some randomly selected words.

The response is a hash which is the full ID of the new running container. Most times you'll be able to get away with a shorter version of the hash (as presented by docker ps. See below) or by the container name.

Examining the Running Container(s)


So the container is running. There's a MongoDB waiting for for a connection. Or is there? How can I tell and how can I figure out how to connect to it?

Docker offers a number of commands to view various aspects of the running containers.

Listing the Running Containers.


To list the running containers use docker ps


docker ps
CONTAINER ID        IMAGE                      COMMAND                CREATED             STATUS              PORTS                      NAMES
a90b275d00d4        markllama/mongodb:latest   /usr/bin/mongod --qu   5 mins  ago         Up 5 min            0.0.0.0:49155->27017/tcp   mongodb1

This line will likely wrap unless you have a wide screen.

In this case there is only one running container. Each line is a summary report on a single container. The important elements for now are the name, id and the ports summary. This last tells me that I should be able to connect from the host to the container MongoDB using localhost:49155 which is forward to the container's exposed port 27017

What did it do on startup?


A running container has one special process which is sort of like the init process on a host. That's the process indicated by the CMD or ENTRYPOINT directive in the Dockerfile.

When the container starts, the STDOUT of the initial process is connected to the the docker service. I can retrieve the output by requesting the logs.

For Docker commands which apply to single containers the final argument is either the ID or name of a container. Since I named the mongodb container I can use the name to access it.

docker logs mongodb1
Thu Aug 28 20:38:08.496 [initandlisten] MongoDB starting : pid=1 port=27017 dbpath=/var/lib/mongodb 64-bit host=a90b275d00d4
Thu Aug 28 20:38:08.498 [initandlisten] db version v2.4.6
Thu Aug 28 20:38:08.498 [initandlisten] git version: nogitversion
Thu Aug 28 20:38:08.498 [initandlisten] build info: Linux buildvm-12.phx2.fedoraproject.org 3.10.9-200.fc19.x86_64 #1 SMP Wed Aug 21 19:27:58 UTC 2013 x86_64 BOOST_LIB_VERSION=1_54
Thu Aug 28 20:38:08.498 [initandlisten] allocator: tcmalloc
Thu Aug 28 20:38:08.498 [initandlisten] options: { command: [ "run" ], config: "/etc/mongodb.conf", dbpath: "/var/lib/mongodb", nohttpinterface: "true", noprealloc: "true", quiet: true, smallfiles: "true" }
Thu Aug 28 20:38:08.532 [initandlisten] journal dir=/var/lib/mongodb/journal
Thu Aug 28 20:38:08.532 [initandlisten] recover : no journal files present, no recovery needed
Thu Aug 28 20:38:10.325 [initandlisten] preallocateIsFaster=true 26.96
Thu Aug 28 20:38:12.149 [initandlisten] preallocateIsFaster=true 27.5
Thu Aug 28 20:38:14.977 [initandlisten] preallocateIsFaster=true 27.58
Thu Aug 28 20:38:14.977 [initandlisten] preallocateIsFaster check took 6.444 secs
Thu Aug 28 20:38:14.977 [initandlisten] preallocating a journal file /var/lib/mongodb/journal/prealloc.0
Thu Aug 28 20:38:16.165 [initandlisten] preallocating a journal file /var/lib/mongodb/journal/prealloc.1
Thu Aug 28 20:38:17.306 [initandlisten] preallocating a journal file /var/lib/mongodb/journal/prealloc.2
Thu Aug 28 20:38:18.603 [FileAllocator] allocating new datafile /var/lib/mongodb/local.ns, filling with zeroes...
Thu Aug 28 20:38:18.603 [FileAllocator] creating directory /var/lib/mongodb/_tmp
Thu Aug 28 20:38:18.629 [FileAllocator] done allocating datafile /var/lib/mongodb/local.ns, size: 16MB,  took 0.008 secs
Thu Aug 28 20:38:18.629 [FileAllocator] allocating new datafile /var/lib/mongodb/local.0, filling with zeroes...
Thu Aug 28 20:38:18.637 [FileAllocator] done allocating datafile /var/lib/mongodb/local.0, size: 16MB,  took 0.007 secs
Thu Aug 28 20:38:18.640 [initandlisten] waiting for connections on port 27017

This is just what I'd expect for a running mongod.

Just the Port Information please?


If I know the name of the container or its ID I can request the port information explicitly.  This is useful when the output must be parsed, perhaps by a program that will create another container needing to connect to the database.

docker port mongodb1 27017
0.0.0.0:49155

But is it working?


Docker thinks there's something running. I have enough information now to try connecting to the database itself. From the host I can try connecting to the database itself.

The ports information indicates that the container port 27017 is forward to the host "all interfaces"  port 49155.  If the host firewall allows connections in on that port the database could be used (or attacked) from outside.


echo "show dbs" | mongo localhost:49155
MongoDB shell version: 2.4.6
connecting to: localhost:49155/test
local 0.03125GB
bye

What next?


At this point I have verified that I have a running MongoDB accessible from the host (or outside if I allow).

There's lots more that you can do and query about the containers using the docker CLI command, but there's no need to detail it all here.  You can learn more from the Docker documentation web site

Before I start on the Pulp service proper I also need a QPID service container. This is very similar to the MongoDB container so I won't go into detail.

Since the point of the exercise is to run Pulp in Docker with Kubernetes, the next step will be to run the MongoDB and QPID containers using Kubernetes.

Wednesday, August 27, 2014

Intro to Containerized Applications: Docker and Kubernetes

Application Virtualization

In a world where a Hot New Thing In Tech is manufactured by marketing departments on demand for every annual trade show in every year there's something that is is stirring up interest all by itself (though it has it's own share of marketing help) The idea of application containers in general and Docker specifically has become a big deal in the software development industry in the last year.

I'm generally pretty skeptical of the hype that surrounds emerging tech and concepts (see DevOps) but I think Docker has the potential to be "disruptive" in the business sense of causing people to have to re-think how they do things in light of new (not yet well understood) possibilities.

In the next few posts (which I hope to have in rapid succession now) I plan to go into some more detail about how to create Docker  containers which are suitable for composition into a working service within a Kubernetes cluster.  The application I'm going to use is Pulp, a software repository mirror with life-cycle management capabilities.  It's not really the ideal candidate because of some of the TBD work remaining in Docker and Kubernetes, but it is a fairly simple service that uses a database, a messaging service and shared storage.  Each of these brings out capabilities and challanges intrinsic in building containerized services.

TL;DR.

Let me say at the outset that this is a long more philosophical than technical post. I'm going to get to the guts of these tools in all their gooey glory but I want to set myself some context before I start. If you want to get right to tearing open the toys, you can go straight to the sites for Docker and Kubernetes:


The Obligatory History Lesson


For 15 years, since the introduction of VMWare Workstation in 1999 [1], the primary mover of cloud computing has been the virtual machine. Once the idea was out there a number of other hardware virtualization methods were created: Xen, and KVM for Linux and Microsoft Hyper-V on Windows. Some of this software virtualization of hardware caused some problems on the real hardware so in 2006 both Intel and AMD introduced processors with special features to improve the performance and behavior of virtual machines running on their real machines. [2]

All of these technologies have similar characteristics. They also have similar benefits and gotchas.

The computer which runs all of the virtual machines (henceforth: VMs) is known as the host. Each of the VM instances is known as a guest. The guests each use one or more (generally very large) files in the host disk space which contains the entire filesystem of the guest. While each guest is running they typically consume a single (again,very large) process on the host.Various methods are used to grant the guest VMs access to the public network both for traffic out of and into the VM. The VM process simulates and entire computer so that for most reasonable purposes it looks and behaves as if it's a real computer.

This is very different from what has become known as multi-tenant computing. This is the traditional model in which each computer has accounts and users can log into their account and share (and compete for) the disk space and CPU resources. They also often have access to the shared security information. The root account is special and it's a truism among sysadmins that if you can log into a computer you can gain root access if you try hard enough.

Sysadmins have to work very hard in multi-tenant computing environments to prevent both malicious and accidental conflicts between their users' processes and resource use. If, instead of an account on the host, you give each user a whole VM, the VM provides a nice (?) clean (?) boundary (?) between each user and the sensitive host OS.

Because VMs are just programs, it is also possible to automate the creation and management of user machines. This is what has made possible modern commercial cloud services. Without virtualization, on-demand public cloud computing would be unworkable.

There are a number of down-sides to using VMs to manage user computing. Because each VM is a separate computer, each one must have an OS installed and then applications installed and configured. This can be mitigated somewhat by creating and using disk images. This is the equivalent of the ancient practice of creating a "gold disk" and cloning it to create new machines. Still each VM must be treated as a complete OS requiring all of the monitoring and maintenance by a qualified system administrator that a bare-metal host needs. It also contains the entire filesystem of a bare-metal server and requires comparable memory from its host.

Docker


For the buzzword savvy Docker is a software containerization mechanism. Explaining what that means takes a bit of doing. It also totally misses the point, because the enabling technology is totally unimportant. What matters is what it allows us to do. But first, for the tech weenies among you....

Docker Tech: Cgroups, Namespaces and Containers


Ordinary Linux processes have a largely unobstructed view of the resources available from the operating system. They can view the entire file system (subject to user and group access control). They have access to memory and to the network interfaces. They also have access to at least some information about the other processes running on the host.

Docker takes advantage of cgroups and kernel namespaces to manipulate the view that a process has of its surroundings. A container is a view of the filesystem and operating system which is a carefully crafted subset of what an ordinary process would see. Processes in a container can be made almost totally unaware of the other processes running on the host. The container presents a limited file system tree which can entirely replace what the process would see if it were not in a container. In some ways this is like a traditional chroot environment but the depth of the control is much more profound.

So far, this does look a lot like Solaris Containers[3], but that's just the tech, there's more.

The Docker Ecosystem


The real significant contribution of Docker is the way in which containers and their contents are defined and then distributed.

It would take a Sysadmin Superman to manually create the content and environmental settings to duplicate what Docker does with a few CLI commands. I know some people who could do it, but frankly it probably wouldn't be worth the time spent even for them. Even I don't really want to get that far into the mechanics (though I could be convinced if there's interest). What you can do with it though is pretty impressive.

Note: Other people describe better than I could how to install Docker and prepare it for use. Go there, do that, come back.

Hint: on Fedora 20+ you can add your use to the "docker" line in /etc/group and avoid a lot of calls to sudo when running the docker command.

To run a Docker container you just need to know the name of the image and any arguments you want to pass to the process inside. The simplest images to run are the ubuntu and fedora images:


docker run fedora /bin/echo "Hello World"
Unable to find image 'fedora' locally
Pulling repository fedora
88b42ffd1f7c: Download complete
511136ea3c5a: Download complete
c69cab00d6ef: Download complete
Hello World


Now honestly, short of a Java app that's probably the heaviest weight "Hello World" you've ever done. What happened was, your local docker system looked for a container image named "fedora" and didn't find one. So it went to the official Docker registry at docker.io and looked for one there. It found it, downloaded it and then started the container and ran the shell command inside, returning the STDOUT to your console.

Now look at those three lines following the "Pulling repository" output from the docker run command.

A docker "image" is a fiction. Nearly all images are composed of a number of layers. The base layer or base image usually provides the minimal OS filesystem content, libraries and such. Then layers are added for application packages or configuration information. Each layer is stored as a tarball with the contents and a little bit of metadata which indicates, among other things, the list of layers below it.. Each layer is given an ID based on a hash of the tarball so that each can be uniquely identified. When an "image" is stored on the Docker registry, it is given a name and possibly a label so that it can be retrieved on demand.

In this case Docker downloaded three image layers and then composed them to make the fedora image and then ran the container and executed /bin/echo inside it.

You can view the containers that are or have been run on your system with docker ps.


docker ps -l
CONTAINER ID IMAGE          COMMAND             CREATED        STATUS                     PORTS  NAMES
612bc60ede7a fedora:20     /bin/echo 'hello wor 7 minutes ago  Exited (0) 7 minutes ago          naughty_pike


You output will very likely be wrapped around unless you have a very wide terminal screen open. The -l switch tells docker only to print information about the last container created.

You can also run a shell inside the container so you can poke around. The -it switches indicate that the container will be run interactively and that it should be terminated when the primary process exits.


docker run -it fedora /bin/sh
sh-4.2# ls
bin etc lib lost+found mnt proc run srv tmp var
dev home lib64 media    opt root sbin sys usr
sh-4.2# ps -ef
 PID TTY     TIME     CMD
   1 ?       00:00:00 sh
   8 ?       00:00:00 ps
sh-4.2# df -k
Filesystem 1K-blocks   Used     Available Use% Mounted on
/dev/mapper/docker-8:4-2758071-97e6230110ded813bff36c0a9a397d74d89af18718ea897712a43312f8a56805 10190136 429260 9220204 5% \
tmpfs      24725556    0         24725556   0% /dev
shm        65536       0            65536   0% /dev/shm
/dev/sda4  132492664   21656752 104082428  18% /etc/hosts
tmpfs      24725556    0         24725556   0% /proc/kcore
sh-4.2# exit


That's three simple commands inside the container. The file system at / seems to be fairly ordinary for a complete (though minimal) operating system. It shows that there appear to be only two processes running in the container, though, and the mounted filesystems are a much smaller set than you would expect.

Now that you have this base image, you can use it to create new images by adding layers of your own.  You can also register with docker.io so that you can push the resulting images back out and make them available for others to use.

These are the two aspects of Docker that make it truly significant.

From Software Packaging to Application Packaging


Another historic diversion. Think about this: how do we get software?

Tarballs to RPMs (and Debs)


Back in the old days we used to pass around software using FTP and tarballs. We built it ourselves with a compiler.compressgzipconfigure and make made it lots faster but not easier. At least for me, Solaris introduced software packages, bundles of pre-compiled software which included dependency information so that you could just ask for LaTeX and you'd get all of the stuff you needed for it to work without having to either rebuild it or chase down all the broken loose ends.

Now, many people have problems with package management systems.  Some people have favorites or pets, but I can tell you from first hand experience, I don't care which one I have, but I don't want not to have one. (yes, I hear you Gentoo, no thanks)

For a long time software binary packages were the only way to deliver software to an OS. You still had to install and configure the OS. If you could craft the perfect configuration and you had the right disks you could clone your working OS onto a new disk and have a perfect copy. Then you had to tweak the host and network configurations, but that was much less trouble than a complete re-install.

Automated OS Installation


Network boot mechanisms like PXE and software installation tools, Jumpstart, Kickstart/Anaconda, AutoYAST and others made the Golden Image go away.  They let you define the system configuration and then would automate the installation and configuration process for you*.  You no longer had to worry about cloning and you didn't have to do a bunch of archaeology on your golden disk when it was out of date and you needed to make a new one. All of your choices were encapsulated in your OS config files.  You could read them, tweak them and run it again.

* yes, I didn't mention Configuration Management, but that's really an extension of the boot/install process in this case, not a fundamentally different thing.

In either case though, if you wanted to run two applications on the same host, the possibility existed that they would collide or interfere with each other in some way.  Each application also presented a potential security risk to the others.  If you crack the host using one app you could fairly surely gain access to everything else on the host.  Even inadvertent interactions could cause problems that would be difficult to diagnose and harder to mitigate.


Virtual Disks and the Rebirth of the Clones


With the advent of virtual machines,  the clone was back, but now it was called a disk image. You could just copy the disk image to a host and boot it in a VM.  If you want more you make copies and tweak them after boot time.

So now we had two different delivery mechanisms: Packages for software to be installed (either on bare metal or in a VM) and disk images for completed installations to be run in a VM. That is: unconfigured application software or fully configured operating systems.

You can isolate applications on one host by placing them into different VMs. But this means you have to configure not one, but three operating systems to build an application that requires two services.  That's three ways to get reliability and security wrong.  Three distinct moving parts that require a qualified sysadmin to manage them and at least two things which the Developer/Operators will need to access to make the services work.

Docker offers something new.  It offers the possibility of distributing just the application. *

* Yeah, there's more overhead than that, but nearly a complete VM and layers can be shared.

Containerization: Application Level Software Delivery


Docker offers the possibility of delivering software in units somewhere between the binary package and the disk image. Docker containers have isolation characteristics similar to apps running in VMs without the overhead of a complete running kernel in memory and without all of the auxiliary services that a complete OS requires.

Docker also offers the capability for developers of reasonable skill to create and customize the application images and then to compose them into complex services which can then be run on a single host, or distributed across many.

The docker registry presents a well-known central location for developers to push their images and name them so that consumers can find them, download them and use them without additional interaction. Because the application has been tested in the container, the developer can be sure that she's identified all of the configuration information that might need to be passed in and out.  She can explicitly document that, removing many opportunities for misconfiguration or adverse interactions between services on the same host.

It's the dawning of a new day.

If only it were that easy.

Here There Be Dragons


When a new day dawns on an unfamiliar landscape it slowly reveals a new vista to the eye. If you're in a high place you might see far off, but nearer things could be hidden under the canopy of trees or behind a fold in the land, so that when you actually step down and begin exploring you encounter surprises.

When ever a new technology appears people tend to try to use it the same way they're used to using their older tools. It generally takes a while to figure out the best way to use a new tool and to come to terms with its differentness.  There's often a lot of exploring and a fair number of false starts and retraced steps before the real best uses settle out.

Docker does have some youthful shortcomings.

Docker is marvelously good at pulling images from a specific repository (known to the world as the Docker.io Registry) and running them on a specific host to which you are logged on.  It's also good at pushing new images to the docker registry.  These are both very localized point-to-point transactions.

Docker has no awareness of anything other than the host it is running on and the docker registry.  It's not aware of other docker hosts nearby.  It's not aware of alternate registries.  It's not even aware of the resources in containers on the same host that container's might want to share.

The only way to manage a specific container is to log onto its host and run the docker command to examine and manipulate it.

The first thing anyone wants to do when they create a container of any kind is to punch holes in it.  What good is a container where you can't reach the contents?  Sometimes people want to see in.  Other times people want to insert things that weren't there in the first place. And they want to connect pipes between the containers, and from the containers to the outside world.

Docker does have ways of exposing specific network ports from a container to the host or to the host's external network interfaces.

It can import a part of the host filesystem into a container.  It also has ways to share storage between two containers on the same host.  What it doesn't have is a way to identify and use storage which can be shared between hosts.  If you want to have a cluster of docker hosts where the containers can share storage, this is a problem.

It also doesn't have a means to get secret information from... well anywhere... safely from its hidey hole into the container.  Since it's trivial for anyone to push an image to the public registry, it's really important not to put secret information into any image, even one that's going to be pushed to a private registry.

As noted, Docker does what it does really well.  The developers have been very careful not to try to over reach, and I agree with most of their decisions.  The issues I listed above are not flaws in Docker, they are mostly tasks that are outside Docker's scope.  This keeps the Docker development drive focused on the problems they are trying to solve so they can do it well.

To use Docker on anything but a small scale you need something else.  Something that is aware of clusters of container hosts, the resources available to each host and how to bind those resources to new containers regardless of which host ends up holding the container.  Something that is capable of describing complex multi-container applications which can be spread across the hosts in a cluster and yet be properly and securely connected. 

Read on.

Kubernetes


Who might want to run vast numbers of containerized applications spread over multiple enormous host clusters without regard to network topology or physical geography? Who else? Google.

Kubernetes is Google's response to the problem of managing Docker containers on a scale larger than a couple of manually configured hosts.  It, like Docker is a young project and there are an awful lot of TBDs, but there's a working core and a lot of active development.  Google and the other partners that have joined the Kubernetes effort have very strong motivation to make this work.

Kubernetes is made up of two service processes that run on each Docker host (in addition to the dockerd). The etcd binds the hosts into a cluster and distributes the configuration information.  The kubelet daemon is the active agent on each container host which responds to requests to create, monitor and destroy containers.  In Kubernetes parlance, a container host is known as a minion.

The etcd service is taken from CoreOS which is an attempt at application level software packaging and system management that predates Docker.  CoreOS seems to be adopting Docker as its container format. 

There is one other service process, the Kubernetes app-service which acts as the head node for the cluster. The app-service accepts commands from users and forwards them to the minions as needed. Any host running the Kubernetes app-server process is known as a master.

Clients communicate with the masters using the kubecfg command.

A little more terminology is in order.

As noted, container hosts are known as minions.  Sometimes several containers must be run on the same minion so that they can share local resources.  Kubernetes introduces the concept of a pod of containers to represent a set of containers that must run on the same host.  You can't access individual containers within a pod at the moment (there are lots more caveats like this.  It is a REALLY young project). 

Installing Kubernetes is a bit more intense than Docker.  Both Docker and Kubernetes are written in Go. Docker is mature enough that it is available as binary packages for both RPM and DEB packaged Linux distributions.  (see your local package manager for docker-io and it's dependencies.)

The simplest way to get Kubernetes right now is to run it in VirtualBox VMs managed by Vagrant. I recommend the Kubernetes Getting Started Guide for Vagrant . There's a bit of assembly required.

Hint: once it's built, I create an alias to the cluster/kubecfg.sh so I don't have to put it in my path or type it out every time.

I'm not going to show very much about Kubernetes yet.  It doesn't really make sense to run any interactive containers like the "Hello World" or the Fedora 20 shell using Kubernetes. It's really for running persistent services.  I'll get into it deeply in a coming post.  For now I'll just walk through the Vagrant startup and simple queries of the test cluster.


$ vagrant up
Bringing machine 'master' up with 'virtualbox' provider...
Bringing machine 'minion-1' up with 'virtualbox' provider...
Bringing machine 'minion-2' up with 'virtualbox' provider...
Bringing machine 'minion-3' up with 'virtualbox' provider...

==> master: Importing base box 'fedora20'...
...
master:
==> master: Summary
==> master: -------------
==> master: Succeeded: 44
==> master: Failed:     0
==> master: -------------
==> master: Total:     44
==> master:
==> minion-1: Importing base box 'fedora20'...
Progress: 90%
...
==> minion-3: Complete!
==> minion-3: * INFO: Running install_fedora_stable_post()
==> minion-3: disabled
==> minion-3: ln -s '/usr/lib/systemd/system/salt-minion.service' '/etc/systemd/system/multi-user.target.wants/salt-minion.service'
==> minion-3: INFO: Running install_fedora_check_services()
==> minion-3: INFO: Running install_fedora_restart_daemons()
==> minion-3: * INFO: Salt installed!

At this point there are only three interesting commands.  They show the set of minions in the cluster, the running pods and the services that are defined.  The last two aren't very interesting because there aren't any pods or services.

$ cluster/kubecfg.sh list minions
minions
----------
10.245.2.2
10.245.2.3
10.245.2.4

$ cluster/kubecfg.sh list pods

Name                Image(s)            Host                Labels

----------          ----------          ----------          ----------


$ cluster/kubecfg.sh list services

Name                Labels              Selector            Port

----------          ----------          ----------          ----------


We know about minions and pods.  In Kubernetes a service is actually a port proxy for a TCP port.  This allows kubernetes to place service containers arbitrarily while still allowing other containers to connect to them by a well known IP address and port.  Containers that wish to accept traffic for that port will use the selector value to indicate that. They service will then forward traffic to those containers.

Right now Kubernetes accepts requests and prints reports in structured data formats, JSON or YAML. To create a new pod or service, you describe the new object using one of these data formats and then submit the description with a "create" command.

Summary

I think software containers in general and Docker in particular have a very significant future.  I'm not a big bandwagon person but I think this one is going to matter.

Docker's going to need some more work itself and it's going to need a lot of infrastructure around it to make it suitable for the enterprise and for public cloud use.  Kubernetes is one piece that will make using Docker on a large scale possible.


See you soon.

References


Monday, August 18, 2014

Hey! I'm Back (and the Cloud is Bigger than Ever)

After a few months trying to do Businessy things that I don't think I'm very good at it looks like I could be back in the software dev/sysadmin space again for a while.

You'll notice a name change on the blog: It's no longer just about OpenShift.  Red Hat is getting into a number of related and extremely innovative and promising projects and trying to make them work together. I'm working to assist on a number of these projects where an extra hand is needed and I get to learn all kinds of cool stuff in the process.

The projects all revolve around one form of "virtualization" or another and all of the efforts are on taking these tools and using them to create enterprise class services.

OpenStack


OpenStack is essentially Amazon Web Services(r) for on-premise use.  To put it another way, it's an attempt to mechanize all of the functions of all of the groups in a typical enterprise IT department: networking, data center host management, OS and application provisioning, storage management, database services, user management and policies and more.

Merely replacing all of the people in an organization that do these things would be boring (and counterproductive). What OpenStack really offers is the ability to push control of the resources closer to the real user, offering self-service access to things which used to require coordination between experts and representatives from a number of different groups with the expected long lead times.  The ops people can focus on making sure there are sufficient resources to work, and the users, the developers and the applications admins can just take what they need (subject to policy) to do their work.

Now that's nice for the end user.  They get a snazzy dashboard and near-instant response to requests.  But the life of the sysadmin hasn't really changed, just the parts they run.  The sysadmin still has to create, monitor and support multiple complex services on real hardware. She also can't easily delegate the parts to the old traditional silos.  The sysadmin can't be just concerned with hardware and OS and NIC configuration.  The whole network fabric (storage too) all has to be understood by everyone on the design, deployment and operations team(s).  Message to sysadmins: Don't worry one bit about job security, so long as you keep learning like crazy.

Docker


Docker (and more generally "containerization") is the current hot growth topic.

Many people are now familiar with Virtual Machines.  A virtual machine is a process running on a host machine which simulates another (possibly totally different) computer.  The virtual machine software simulates a whole computer right down to mimicking hardware responses.  From inside the virtual machine it looks like you have a complete real computer at your disposal.

The downside is that VMs require the installation and management of a complete operating system withing the virtual machine.  VMs allow isolation but have a lot of heft to them.  The host machine has to be powerful enough to contain whole other computers (sometimes many of them) while still doing it's own job.

Docker uses some newish ideas to offer a middle ground between traditional multi-tenent computing, where a number of unrelated (and possibly conflicting) services run as peers on a single computer and the total isolation (and duplication) that VMs require.

The enabling technology is known as cgroups and specifically kernel namespaces.  The names are unimportant really.  What namespaces do is to allow the host operating system to provide each process with a distinct carefully tuned view of the parts of the host that the process needs to do its job. The view is called a container and any processes which run in the container can interact with each other as normal.  However they are entirely unaware of any other processes running on the host.  In a sense containers act as blinders, protecting processes running on the same host from each other by preventing them from even seeing each other.

Docker is a container service which standardizes and manages the development, creation and deployment of the containers and their contents in a clear and unified way.  It provides a means to create a single-purpose container for, say, a database service and then allows the

Kubernetes


While Docker itself is cool, it really focuses on the environment on a single host and on individual images and containers.  Kubernetes is a project initiated at Google but adopted by a number of other software and service vendors.  Kubernetes aims to provide a way for application developers to define and then deploy complex applications composed of a number of Docker containers and potentially spread over a number of container hosts.

I think Kubernetes (or something like it) is going to have a really strong influence on the acceptance and use of containerized applications.  It's likely to be the face most application operations teams see on the apps they deploy.  It's going to be critical both for both the Dev and Ops elements because it's going to be critical to the design and deployment of complex applications.

As a sysadmin this is where my strongest interest is.  Docker and Atomic are parts, Kubernetes is the glue.

Project Atomic


And where do you put all those fancy complex applications you've created using Docker and defined using Kubernetes?  Project Atomic is a Red Hat project to create a hosting environment specifically for containerized applications. 

Rather than running (I mean: installing, configuring and maintaining) a general purpose computer running the Docker daemon and a Kubernetes agent and all of the other attendant internals, Project Atomic will provide a host definition tuned for use as a container host.   A general purpose OS installation often has a number of service components which aren't necessary and may even pose a hazard to the container services.  Project Atomic is building an OS image designed to do one thing: Run containers.

Atomic is itself a stripped down general purpose OS.  It can run on bare metal, or on OpenStack or even on public cloud services like AWS or Rackspace or Google Cloud.


Go(lang)

It's been a long time since I worked in a system level language.  Go (or golang to distinguish it from the venerable Chinese strategy board game) is a new environment created by a couple of the luminaries of early Unix,  Robert Griesemer, Rob Pike, and Ken Thompson at Google.  It aims to address some of the shortcomings of C in the age of distributed and concurrent programming, neither of which really existed when C was created.

Docker and several other significant new applications are written in Go and it's catching on with system level developers.  I quickly bumped up on my scripting language habits when I started getting into Go and I was reminded of why system languages are still important.  It's refreshing to know I can still think at that level.

I think Go is going to spread quickly in the next few years and I'm going to learn to work with it along with the common scripting environments.

Look Up: There's more than one kind of cloud.


In the past I've been focused on one product and one aspect of Cloud Computing.  Make no mistake, Cloud Computing is still in it's infancy and we're still learning what kind of thing it wants to grow up into.  The range of enterprise deployment models is getting bigger.  Applications can be delivered as traditional software, as VM images for personal or enterprise use (VirtualBox and Vagrant to OpenStack to AWS) and now as containers which sit somewhere in between.  Each has its own best uses and we're still exploring the boundaries.

So now I'm going to branch out too and look at each of these and look at all of them.  My focus is still going to be what's going on inside, the place where you can stick your hand in and lose fingers.  Lots of other people are talking about the glossy paint job and the snazzy electronic dashboard.  I'll leave that to them.

Tut Tut... it looks like rain....(but I like the rain)

References


Friday, January 17, 2014

Hanging up my creeper and closing up shop.

I dunno if I have any fans of these blog posts, but if I do, I want to let you know that there aren't likely to be any more here. I've recently been moved into another group and I won't be working directly with OpenShift anymore. Never fear, the rest of the team is working like crazy as they always have to bring you great stuff and there are some real cool things coming down the line. Feel free to ask questions about what's here. I can certainly answer those until they become stale because the software has moved on. It's been fun. - Mark