I'm at the OpenStack Summit this week in Barcelona. Beautiful place, but a conference center is a conference center.
My first session today was an introduction and discussion of Designate, the OpenStack DNS control module.
I've been working with OpenStack for VM instances and with OpenShift to run container services in the cloud. One major issues that always gets back burnered in discussions is DNS. I refer to this as publication, an unusual term but I think the best one to describe a critical aspect of IaaS and PaaS cloud services.
The point of these services is self-serve computing resources, most often services you can offer to others. If you have no way of telling others where to find your services... they cant. DNS is the way you tell people where to find your stuff.
Historically the DNS service has been managed by an IT "priesthood" who are rightfully protective. DNS is the first and most critical service on any modern network. It's largely invisible and it works so well that most sysadmins don't actually understand how it works. DNS is one of the last services to fall to the self-service mind-set of cloud computing and that's with good reason.
I was under the misconception that Designate would be solely a dynamic DNS service that would be used to publish new instances or containers within the service. I also thought perhaps it had its own front end to respond to queries. It quickly became clear that Designate is not very useful without those external front-line services.
Listening to the talk it became clear that the Designate developers also see this conservatism as a barrier to adoption. A significant portion of the talk was dedicated to creating roll-out plans that build confidence slowly, absorbing more and more of the wild barnyard of existing services.
Designate seems to be more of a control plane and database for DNS services than an actual front-line server responding to queries. You continue to run BIND or Active Directory/DNS or Infoblox to respond to queries, but the database is stored in the OpenStack service (with a back end DB?) and the database propagates to the caching or front end DNS services.
This leads to the idea of Designate eventually taking over control of all of the DNS services in an enterprise. It has the capability to define roles for users, allowing fine grained control of what actions user can take, while offering for the first time a true kiosk self-service IP naming mechanism.
I know how I plan to use Designate in my OpenShift and OpenStack service deployments. It appears I may still need to create backing DNS servers, but I'll at least get WebUI and API change management for the masses. I've used nsupdate to create dynamic DNS zones before, but it always seemed to scare other people off. With Designate I'm going to be able to deploy both my new services and containers within them and publish them with the short turn-around a cloud service demands.
Tuesday, October 25, 2016
Monday, October 20, 2014
Storage Concepts in Docker: Network and Cloud Storage.
This is the third and final post on storage in Docker. It's also going to be the most abstract, as most of it now is still wishful.
The previous two posts dealt with shared internal storage and persistent host storage in Docker. These two mechanisms allow you to share storage on a single host. While this has its uses, very quickly people find that they need more than local storage
With all of the forms of NAS (remember, I'm being slovenly) the host is involved in accessing and mounting the storage so that it appears to Docker as if it is normal host storage. This means that one of three conditions must be met on the host:
- Shared Storage
- Persistent (local) storage
- Network and Cloud Storage (this post)
Types of Storage in Containers
Lots of people are talking about storage in Docker containers. Not many are careful to qualify what they mean by that. Some of the conversation is getting confused because different people have different goals for storage in containers.
Docker Internal Storage
This is the simplest form of storage in Docker. Each container has its own space on the host. This is inside the container and it is temporary, being created when the container is instantiated and removed some time after the container is terminated. When two containers reside on the same host they can share this docker-internal storage.
Host Storage
Containers can be configured to use host storage. The space must be allocated and configured on the host so that the processes within the containers will have the necessary permissions to read and write to the host storage. Again, containers on the same host can share storage.
Network Storage
Or "Network Attached Storage" (NAS) in which I slovenly include Storage Area Networks (SAN).
I'm also including modern storage services like Gluster and Ceph. For container purposes these are the same thing: Storage which is not directly attached via the SCSI or SATA bus, but rather over an IP network but which, once mounted appears to the host as a block device.
If you are running your minions in an environment where you can configure NAS universally then you may be able to use network storage within your Kubernetes cluster.
Remember that Docker runs as root on each minion. You may find that there are issues related to differences in the user database between the containers, minions and storage. Until the cgroup user namespace work is finished and integrated with Docker, unifying UID/GID maps will be a problem that requires attention when building containers and deploying them.
Cloud Storage
Cloud storage is.. well not the other kinds. It's generally offered in a "storage as a service" model. Most people think of Amazon AWS storage (EBS and S3) but Google is growing its cloud storage and OpenStack offers the possibility of creating on-premise cloud storage services as well.
Cloud storage generally takes two forms. The first is good old-fashioned block storage. The other is newer and is known as object storage. They have different behaviors and use characteristics.
Cloud storage generally takes two forms. The first is good old-fashioned block storage. The other is newer and is known as object storage. They have different behaviors and use characteristics.
Block Storage
Once it is attached to a host, cloud block storage is indistinguishable from direct attached storage. You can use disk utilities to partition it and create filesystems. You can mount it so that the filesystem appears within the host file tree.
Block storage requires very low latency. This means that it is generally limited to relatively local networks. It works fine within the infrastructure of a cloud service such as AWS or OpenStack, but running block storage over wide area networks is often difficult and prone to failure.
Block storage is attached to the host and then the docker VOLUME mechanism is used to import the storage tree into one or more containers. If the storage is mounted automatically and uniformly on every minion (and that information is public) then it is possible to use block storage in clusters of container hosts.
Object Storage
Object storage is a relatively new idea. For files with a long life that do not change often and can be retrieved as a unit object storage is often a good They're also good to use as a repository configuration information which is too large or sensitive to be placed in an environment variable or CLI argument.
OpenStack Cinder, AWS S3 and Google Cloud Storage are examples of open source and commercial object stores.
OpenStack Cinder, AWS S3 and Google Cloud Storage are examples of open source and commercial object stores.
The usage characteristics of object storage make it so that latency is not the kind of issue that it is with block storage.
One other characteristic of object storage makes it really suited to use in containers. Object storage is usually accessed by retrieval over HTTP using a RESTful protocol. This means that the container host does not need to be involved in accessing the contents. So long as the container has the software and the access information for the storage processes within the container can retrieve it. All that is required is that the container is able to reach the storage service through the host network interface(s). This makes object storage a strong choice for container storage where ever the other characteristics are acceptable.
Storage and Kubernetes
Pretty much every application will need storage in some form. To build large scale containerized applications it will be essential for Kubernetes to make it possible for the containers to access and share persistent storage. The form that the storage takes will depend on the character of the application and the environment of the cluster.
With all of the forms of NAS (remember, I'm being slovenly) the host is involved in accessing and mounting the storage so that it appears to Docker as if it is normal host storage. This means that one of three conditions must be met on the host:
- All of the available storage is mounted on all minions before any containers start
- The host is configured to automount the storage on the first attempt to access a path
- This host is able to accept and act on mount requests from Kubernetes
This third also requires modifications to Kubernetes so that the user can specify the path to the required storage and provide any access/authentication information that will be required by the host.
For Cloud block storage the only option is #3 from above. Google has added a mechanism to mount Google Cloud Engine Persistent Disk volumes into Kubernetes clusters. The current mechanism (as of 20-Oct-2014) is hard coded. The developers understand that they will need a plugin mechanism to allow adding AWS EBS, OpenStack Cinder and others. I don't think work on any other cloud storage services has begun yet.
Object storage is the shining light. While it has limited use cases, those cases are really common and really important. Object storage access can be built into the image and the only thing the Kubernetes cluster must provide is network access to the object store service.
Summary
Generalized shared and cloud storage within Kubernetes clusters (or any cluster of container hosts) is, at this time, an unsolved problem. Everyone knows it is a top priority and everyone working on the idea of clustered container hosts is thinking about it and experimenting with solutions. I don't think it will be long before some solutions become available and I'm confident that there will be working solutions within the timeframe of *mumble*.
For Kubernetes, there is an open issue discussing persistent storage options and how to design them into the service, both on the back end and the front end (how does one tell Kubernetes how to access storage for containers?)
I'm going to be playing with a few of the possibilities because I'm going to need them. Until they are available, I can create a Pulp service in Kubernetes, but I can't make it persistent. Since the startup cost of creating an RPM mirror is huge, it's not much use except as a demonstrator until persistent storage is available.
References
- Network Attached Storage
- OpenStack Cloud Storage
- AWS Cloud Storage
- Google Cloud Storage
- Google Cloud Engine Persistent Disks - block storage
- Google Storage - object storage
Friday, October 10, 2014
Storage Concepts in Docker: Persistent Storage
This is the second of three posts on storage management in Docker:

docker run --volume <host path>:<container path> ...
I'm also going to create a file inside the directory (from the view of the host) so that I can verify (from the view in the container) that I've mounted the correct directory.
Note the default ownership and permissions on that file.
Now I'm ready to try mounting that into the mongodb container (knowing that write access will fail)
As expected, From inside the container, I can't write the mounted volume. I can read it (with SELinux disabled) because I have te directory permissions open to the world for read and execute. Now I'll change the ownership of the directory from the outside.
It turns out I have the mongo-server package installed on my host and it has assigned the same UID to the monogodb user as the container has. However, the group for mongodb inside the container corresponds to the polkitd group on the host.
Now I can try writing a file there from the inside again. From the (still running) container shell:
I found something I hadn't really expected. Every time I try to type a command in the shell within the container, the shell tries to write to the .bash_history file. This Is only an issue when I'm testing the container with a shell. Remember in the Dockerfile I set the WORKDIR directive to the top of the MongoDB data directory. That means when I start the shell in the container, the current working directory is /var/log/mongodb. Which is the directory I'm trying to import. This won't matter when I'm running the daemon properly as there won't be any shell.
The important thing this shows me is the SELinux context of the shell process within the container: system_u:system_r:svirt_lxc_net_t:s0 . (note that I dropped off the MVC context, the "cc87,c763" on the end). That is the process which is being denied access to the working directory.
Given that list of AVCs I can feed them to audit2allow and get a big-hammer policy change to stop the AVCs.
Now the directory and all its contents have the correct ownership, permissions and SElinux label. SELinux is enforcing. I can try writing from inside the container again.
That's it. Time to try running mongod inside the container.
I should now have a running mongodb container
I can check the container logs to see if the process is running and indicates a good startup.
It looks like the daemon is running.
I can use docker inspect to find the assigned IP address for the container. With that I can connect the mongo client to the service and test database access.
I know the database is running and answering queries. The last check is to look inside the directory I created for the database. It should have the test files I'd created as well as the database and journal files which mongod will create on startup.
There they are.
- Shared Storage and the VOLUME directive
- Persistent Storage: the --volume CLI option (this post)
- Storage in Kubernetes
This is a side trip on my way to creating a containerized Pulp content mirroring service using Docker and Kuberentes. The storage portion is important (and confusing) enough to warrant special attention.
Persistent Storage
In the previous post I talked about the mechanisms that Docker offers for sharing storage between containers. This kind of storage is limited to containers on the same host and it does not survive after the last connected container is destroyed.
If you're running a long-lived service like a database or a file repository you're going to need storage which exists outside the container space and has a life span longer than the container which uses it.
The Dockerfile VOLUME directive is the mechanism to define where external storage will be mounted inside a container.
NOTE: I'm only discussing single host local storage. The issues around network storage are still wide open and beyond the scope of a single post.
NOTE: I'm only discussing single host local storage. The issues around network storage are still wide open and beyond the scope of a single post.
Container Views and Context
Containers work by providing two different views of the resources on the host. Outside the container, the OS can see everything, but the processes inside are fooled into seeing only what the container writer wants them to see. The problem is not just what they see though, but how they see it.
There are a number of resources which define the view of the OS. The most significant ones for file storage are the user and group databases (in /etc/passwd and /etc/group). The OS uses numeric UID and GID values to identify users and decide how to apply permissions. These numeric values are mapped to names using the passwd and group files. The host and containers each have their own copies of these files and the entries in these files will almost certainly differ between the host and the container. The ownership and permissions on the external file tree must be set to match the expectations of the processes which will run in the container.
SELinux also controls access to file resources. The SELinux labels on the file tree on the host must be set so that system policy will allow the processes inside the container to operate on them as needed.
In this post most of my effort will be spent looking at the view from inside and adjusting the settings on the file tree outside to allow the container processes to do their work.
Dockerfile VOLUME directive Redux
As noted in the previous post, the VOLUME directive defines a boundary in the filesystem within a container. That boundary can be used as a handle to export a portion of the container file tree. It can also be used to mark a place to mount an external filesystem for import to the container.
When used with the Docker CLI --volumes-from option it is possible to create containers that share storage from one container to any number of others. The mount points defined in the VOLUME directives are mapped one-to-one from the source container to the destinations.
Importing Storage: The --volume CLI option
When starting a Docker container I can cause Docker to map any external path to an internal path using the --volume (or -v) option. This option takes two paths separated by a colon (:). The first path is the host file or directory to be imported into the container. The second is the mount point within the container.
docker run --volume <host path>:<container path> ...
Example: MongoDB persistent data
Say I want to run a database on my host, but I don't want to have to install the DB software into the system. Docker makes it possible for me to run my database in a container and not have to worry about which version the OS has installed. However, I do want the data to persist if I shut the container down and restart it, whether for maintenance or to upgrade the container.
The Dockerfile for my MongoDB container looks like this:
To run a shell in the container, use the --entrypoint option. Arguments to the docker run command will be passed directly to the mongod process, overriding the defaults.
Now I know the UID and GID which the container process uses (UID = 184, GID = 998). I'll have to make sure that this user/group can write to the host directory which I map into the container.
I know that the default permissions are 755 (rwx, r-x, r-x), which is fairly common.
I also see that the directory has a special SELinux label: docker_var_lib_t.
Together, the directory ownership/permissions and the SELinux policy could prevent access by the container process to the host files. Both are going to require root access on the host to fix.
Interesting Note: When inside the container, attempts to determine the process SELinux context are met with a message indicating that SELinux is not enabled. Apparently, from the view point inside the container, it isn't.
The Dockerfile for my MongoDB container looks like this:
- Lines 1 and 2 are the boilerplate you've seen to define the base image and the maintainer information.
- Line 7 installs the MongoDB server package
- Lines 9 - 11 create the directory for the database storage and ensures that it will not be pruned by placing a hidden file named .keep inside. They also set the permissions for that directory in the context of the container view to allow the mongodb user to write the directory.
- Line 15 specifies the location of the imported volume.
- Line 17 opens the firewall for inbound connections to the MongoDB
- Lines 19 and 20 set the user that will run the primary process and the location where it will start.
- Lines 22 and 23 define the binary to execute when the container starts and the default arguments
To run a shell in the container, use the --entrypoint option. Arguments to the docker run command will be passed directly to the mongod process, overriding the defaults.
What works?
I know that this image works when I just use the default internal Docker storage. I know that file ownership and permissions will be an issue, so the first thing to do is to look inside a working container and see what the ownership and permissions look like.
docker run -it --name mongodb --entrypoint /bin/sh markllama/mongodb

sh-4.2$ id
uid=184(mongodb) gid=998(mongodb) groups=998(mongodb)

sh-4.2$ ls -ldZ /var/lib/mongodb
drwxr-xr-x. mongodb mongodb system_u:object_r:docker_var_lib_t:s0 /var/lib/mongodb
I know that the default permissions are 755 (rwx, r-x, r-x), which is fairly common.
I also see that the directory has a special SELinux label: docker_var_lib_t.
Together, the directory ownership/permissions and the SELinux policy could prevent access by the container process to the host files. Both are going to require root access on the host to fix.
Interesting Note: When inside the container, attempts to determine the process SELinux context are met with a message indicating that SELinux is not enabled. Apparently, from the view point inside the container, it isn't.
Preparing the Host Directory
I could just go ahead and create a directory with the right ownership, permissions and label and attach it to my MongoDB container and say "Voila!". What fun would that be? Instead I'm going to create the target directory and mount it into a container and try writing to it from inside. When that fails I'll update the ownership, permissionad and label, (from outside) each time checking the view and capabilities (from inside) to see how it changes.
I am going to disable SELinux temporarily so I can isolate the file ownership/permissions from the SELinux labeling.
sudo setenforce 0
mkdir ~/mongodb
ls -ldZ ~/mongodb
drwxrwxr-x. mlamouri mlamouri unconfined_u:object_r:user_home_t:s0 /home/mlamouri/mongodb
I'm also going to create a file inside the directory (from the view of the host) so that I can verify (from the view in the container) that I've mounted the correct directory.
touch ~/mongodb/from_outside
ls -lZ ~/mongodb/from_outside
-rw-rw-r--. mlamouri mlamouri unconfined_u:object_r:user_home_t:s0 /home/mlamouri/mongodb/from_outside
Note the default ownership and permissions on that file.
Now I'm ready to try mounting that into the mongodb container (knowing that write access will fail)
Starting the Container with a Volume Mounted
I want to be able to examine the runtime environment inside the container before I let it fly with a mongod process. I'll set the entrypoint on the CLI to run a shell instead and use the -it options so it runs interactively and terminates when I exit the shell.
The external path to the volume is /home/mlamouri/mongodb and the internal path is /var/lib/mongodb.
docker run -it --name mongodb --volume ~/mongodb:/var/lib/mongodb --entrypoint /bin/sh markllama/mongodb

sh-4.2$ id
uid=184(mongodb) gid=998(mongodb) groups=998(mongodb)

sh-4.2$ pwd
/var/lib/mongodb

sh-4.2$ ls
from_outside

sh-4.2$ ls -ld /var/lib/mongodb
drwxrwxr-x. 2 15149 15149 4096 Oct  9 21:04 /var/lib/mongodb

sh-4.2$ touch from_inside
touch: cannot touch 'from_inside': Permission denied
As expected, From inside the container, I can't write the mounted volume. I can read it (with SELinux disabled) because I have te directory permissions open to the world for read and execute. Now I'll change the ownership of the directory from the outside.
Adjusting The Ownership
sudo chown 184:998 ~/mongodb
ls -ld ~/mongodb
drwxrwxr-x. 2 mongodb polkitd 4096 Oct  9 20:46 /home/bos/mlamouri/mongodb
It turns out I have the mongo-server package installed on my host and it has assigned the same UID to the monogodb user as the container has. However, the group for mongodb inside the container corresponds to the polkitd group on the host.
Now I can try writing a file there from the inside again. From the (still running) container shell:
sh-4.2$ ls -l
total 0
-rw-rw-r--. 1 mongodb mongodb 0 Oct  9 20:46 from_outside

sh-4.2$ touch from_inside

sh-4.2$ ls -l
total 0
-rw-r--r--. 1 mongodb mongodb 0 Oct 10 01:55 from_inside
-rw-rw-r--. 1 mongodb mongodb 0 Oct  9 20:46 from_outside

sh-4.2$ ls -Z
-rw-r--r--. mongodb mongodb system_u:object_r:user_home_t:s0 from_inside
-rw-rw-r--. mongodb mongodb unconfined_u:object_r:user_home_t:s0 from_outside
Re-Enabling SELinux (and causing fails again)
There are two access control barriers for files. The Linux file ownership and permissions are one. The second is SELinux and I have to turn it back on. This will break things again until I also set the SELinux label on the directory on the host.
Now when I try to read the directory inside the container or create a file, the request is rejected with permission denied.
sudo setenforce 1
Now when I try to read the directory inside the container or create a file, the request is rejected with permission denied.
sh-4.2$ ls
ls: cannot open directory .: Permission denied
sh-4.2$ touch from_inside_with_selinux
touch: cannot touch 'from_inside_with_selinux': Permission denied
Just to refresh, here's the SELinux label for the directory as seen from the host:
When SELinux rejects a request it logs that request. The logs go into /var/log/audit/audit.log. These are definitely cryptic and can be daunting but they're not entirely inscrutable.
First I can use what I know to filter out things I don't care about. I know I want AVC messages (AVC is an abbreviation for Access Vector Cache. Yeah. Not useful). These messages are indicated by type=AVC in the logs. Second, I know that I am concerned with attempts to access files labeled user_home_t. These two will help me narrow down the messages I care about.
These are very long lines so you may have to scroll right a bit to see the important parts.
ls -dZ mongodb
drwxrwxr-x. mongodb polkitd unconfined_u:object_r:user_home_t:s0 mongodb
SELinux Diversion: What's Happening?
In the end I'm just going to apply the SELinux label which I found on the volume directory when I used Docker internal storage. I'm going to step aside for a second here though and look at how I can find out more about what SELinux is rejecting
First I can use what I know to filter out things I don't care about. I know I want AVC messages (AVC is an abbreviation for Access Vector Cache. Yeah. Not useful). These messages are indicated by type=AVC in the logs. Second, I know that I am concerned with attempts to access files labeled user_home_t. These two will help me narrow down the messages I care about.
These are very long lines so you may have to scroll right a bit to see the important parts.
sudo grep type=AVC /var/log/audit/audit.log  | grep user_home_t
type=AVC msg=audit(1412948687.224:8235): avc:  denied  { add_name } for  pid=11135 comm="touch" name="from_inside" scontext=system_u:system_r:svirt_lxc_net_t:s0:c687,c763 tcontext=unconfined_u:object_r:user_home_t:s0 tclass=dir permissive=1
type=AVC msg=audit(1412948687.224:8235): avc:  denied  { create } for  pid=11135 comm="touch" name="from_inside" scontext=system_u:system_r:svirt_lxc_net_t:s0:c687,c763 tcontext=system_u:object_r:user_home_t:s0 tclass=file permissive=1
type=AVC msg=audit(1412948876.731:8257): avc:  denied  { write } for  pid=12800 comm="touch" name="mongodb" dev="sda4" ino=7749584 scontext=system_u:system_r:svirt_lxc_net_t:s0:c687,c763 tcontext=unconfined_u:object_r:user_home_t:s0 tclass=dir permissive=0
type=AVC msg=audit(1412948898.965:8258): avc:  denied  { write } for  pid=11108 comm="sh" name=".bash_history" dev="sda4" ino=7751785 scontext=system_u:system_r:svirt_lxc_net_t:s0:c687,c763 tcontext=system_u:object_r:user_home_t:s0 tclass=file permissive=0
type=AVC msg=audit(1412948898.965:8259): avc:  denied  { append } for  pid=11108 comm="sh" name=".bash_history" dev="sda4" ino=7751785 scontext=system_u:system_r:svirt_lxc_net_t:s0:c687,c763 tcontext=system_u:object_r:user_home_t:s0 tclass=file permissive=0
type=AVC msg=audit(1412948898.965:8260): avc:  denied  { read } for  pid=11108 comm="sh" name=".bash_history" dev="sda4" ino=7751785 scontext=system_u:system_r:svirt_lxc_net_t:s0:c687,c763 tcontext=system_u:object_r:user_home_t:s0 tclass=file permissive=0
type=AVC msg=audit(1412949007.595:8289): avc:  denied  { read } for  pid=14158 comm="sh" name=".bash_history" dev="sda4" ino=7751785 scontext=system_u:system_r:svirt_lxc_net_t:s0:c184,c197 tcontext=system_u:object_r:user_home_t:s0 tclass=file permissive=0
type=AVC msg=audit(1412949674.712:8307): avc:  denied  { write } for  pid=14369 comm="touch" name="mongodb" dev="sda4" ino=7749584 scontext=system_u:system_r:svirt_lxc_net_t:s0:c184,c197 tcontext=unconfined_u:object_r:user_home_t:s0 tclass=dir permissive=0
I found something I hadn't really expected. Every time I try to type a command in the shell within the container, the shell tries to write to the .bash_history file. This Is only an issue when I'm testing the container with a shell. Remember in the Dockerfile I set the WORKDIR directive to the top of the MongoDB data directory. That means when I start the shell in the container, the current working directory is /var/log/mongodb. Which is the directory I'm trying to import. This won't matter when I'm running the daemon properly as there won't be any shell.
The important thing this shows me is the SELinux context of the shell process within the container: system_u:system_r:svirt_lxc_net_t:s0 . (note that I dropped off the MVC context, the "cc87,c763" on the end). That is the process which is being denied access to the working directory.
Given that list of AVCs I can feed them to audit2allow and get a big-hammer policy change to stop the AVCs.
sudo grep type=AVC /var/log/audit/audit.log  | grep user_home_t| audit2allow


#============= svirt_lxc_net_t ==============
allow svirt_lxc_net_t user_home_t:dir { write remove_name add_name };
allow svirt_lxc_net_t user_home_t:file { write read create unlink open append };
This is a nice summary of what is happening and what fails. You could use this output to create a policy module which would allow this activity. DON'T DO IT. It's tempting to use audit2allow to just open things up when SELinux prevents things. Without understanding what your changing and why you risk creating holes you didn't mean to.
Instead I'm going to proceed by assigning a label to the directory tree which indicates what I mean to use it for (content for Docker containers). That is, by labeling the directory to allow Docker to mount and write it, it becomes evident to someone looking at it later what I meant to do.
Instead I'm going to proceed by assigning a label to the directory tree which indicates what I mean to use it for (content for Docker containers). That is, by labeling the directory to allow Docker to mount and write it, it becomes evident to someone looking at it later what I meant to do.
Labeling the MongoDB directory for use by Docker
The processes running within Docker appear to have the SELinux context system_u:system_r:svirt_lxc_net_t. From the example using the Docker internal storage for /var/lib/mongodb I know that the directory is labled system_u:object_r:docker_var_lib_t:s0. If I apply that label to my working directory, the processes inside the container should be able to write to the directory and its children.
The SELinux tool for updating object (file) labels is chcon (for change context). It works much like chown or chmod. Because I'm changing security labels that I don't own, I need to use sudo to make the change.
sudo chcon -R system_u:object_r:docker_var_lib_t:s0 ~/mongodb

ls -dZ mongodb/
drwxrwxr-x. mongodb polkitd system_u:object_r:docker_var_lib_t:s0 mongodb/

ls -Z mongodb/
-rw-r--r--. mongodb polkitd system_u:object_r:docker_var_lib_t:s0 from_inside
-rw-rw-r--. mongodb polkitd system_u:object_r:docker_var_lib_t:s0 from_outside

getenforce
Enforcing
Now the directory and all its contents have the correct ownership, permissions and SElinux label. SELinux is enforcing. I can try writing from inside the container again.
sh-4.2$ touch from_inside_with_selinux
sh-4.2$ ls -l
total 0
-rw-r--r--. 1 mongodb mongodb 0 Oct 10 13:44 from_inside
-rw-r--r--. 1 mongodb mongodb 0 Oct 10 15:54 from_inside_with_selinux
-rw-rw-r--. 1 mongodb mongodb 0 Oct  9 20:46 from_outside
That's it. Time to try running mongod inside the container.
Running the Mongodb Container
First I shut down and remove my existing mongod container. Then I can start one up for real. I Switch from interactive (-it) to daemon (-d) mode and remove the --entrypoint argument.
sh-4.2$ exit
exit

docker rm mongodb
mongodb

docker run -d --name mongodb --volume ~/mongodb:/var/lib/mongodb markllama/mongodb
9e203806b4f07962202da7e0b870cd567883297748d9fe149948061ff0fa83f0
I should now have a running mongodb container
docker ps
CONTAINER ID        IMAGE                      COMMAND                CREATED             STATUS              PORTS               NAMES
9e203806b4f0       markllama/mongodb:latest   "/usr/bin/mongod --c   34 seconds ago      Up 33 seconds       27017/tcp           mongodb
I can check the container logs to see if the process is running and indicates a good startup.
docker logs mongodb
note: noprealloc may hurt performance in many applications
Fri Oct 10 16:01:25.560 [initandlisten] MongoDB starting : pid=1 port=27017 dbpath=/var/lib/mongodb 64-bit host=9e203806b4f0
Fri Oct 10 16:01:25.562 [initandlisten]
Fri Oct 10 16:01:25.562 [initandlisten] ** WARNING: You are running on a NUMA machine.
Fri Oct 10 16:01:25.562 [initandlisten] **          We suggest launching mongod like this to avoid performance problems:
Fri Oct 10 16:01:25.562 [initandlisten] **              numactl --interleave=all mongod [other options]
Fri Oct 10 16:01:25.562 [initandlisten]
Fri Oct 10 16:01:25.562 [initandlisten] db version v2.4.6
Fri Oct 10 16:01:25.562 [initandlisten] git version: nogitversion
Fri Oct 10 16:01:25.562 [initandlisten] build info: Linux buildvm-12.phx2.fedoraproject.org 3.10.9-200.fc19.x86_64 #1 SMP Wed Aug 21 19:27:58 UTC 2013 x86_64 BOOST_LIB_VERSION=1_54
Fri Oct 10 16:01:25.563 [initandlisten] allocator: tcmalloc
Fri Oct 10 16:01:25.563 [initandlisten] options: { config: "/etc/mongodb.conf", dbpath: "/var/lib/mongodb", nohttpinterface: "true", noprealloc: "true", quiet: true, smallfiles: "true" }
Fri Oct 10 16:01:25.636 [initandlisten] journal dir=/var/lib/mongodb/journal
Fri Oct 10 16:01:25.636 [initandlisten] recover : no journal files present, no recovery needed
Fri Oct 10 16:01:27.469 [initandlisten] preallocateIsFaster=true 27.58
Fri Oct 10 16:01:29.329 [initandlisten] preallocateIsFaster=true 28.04
It looks like the daemon is running.
I can use docker inspect to find the assigned IP address for the container. With that I can connect the mongo client to the service and test database access.
docker inspect --format '{{.NetworkSettings.IPAddress}}' mongodb
172.17.0.110

echo show dbs | mongo 172.17.0.110
MongoDB shell version: 2.4.6
connecting to: 172.17.0.110/test
local 0.03125GB
bye
I know the database is running and answering queries. The last check is to look inside the directory I created for the database. It should have the test files I'd created as well as the database and journal files which mongod will create on startup.
ls -lZ ~mongodb
-rw-r--r--. mongodb polkitd system_u:object_r:docker_var_lib_t:s0 from_inside
-rw-r--r--. mongodb polkitd system_u:object_r:docker_var_lib_t:s0 from_inside_with_selinux
-rw-rw-r--. mongodb polkitd system_u:object_r:docker_var_lib_t:s0 from_outside
drwxr-xr-x. mongodb polkitd system_u:object_r:docker_var_lib_t:s0 journal
-rw-------. mongodb polkitd system_u:object_r:docker_var_lib_t:s0 local.0
-rw-------. mongodb polkitd system_u:object_r:docker_var_lib_t:s0 local.ns
-rwxr-xr-x. mongodb polkitd system_u:object_r:docker_var_lib_t:s0 mongod.lock
drwxr-xr-x. mongodb polkitd system_u:object_r:docker_var_lib_t:s0 _tmp
There they are.
Summary
It took a little work to get a Docker container running a system service using persistent host storage for the database files.
I had to get the container running without extra storage first and examine the container to see what it expected. The file ownership, permissions and the SELinux context all affect the ability to write files.
On the host I had to create a directory with the right characteristics. The UID and GID on the host may not match those inside the container. If the container service creates a user and group they will almost certainly not exist on a generic Docker container host.
The Docker service uses a special set of SELinux contexts and labels to run. Docker runs as root and it does lots of potentially dangerous things. The SELinux policies for Docker are designed to prevent contained processes from escaping, at least through the resources SELinux can control.
Setting the directory ownership and the SELinux context require root access. This isn't a really big deal as Docker also requires root (or at least membership in the docker group) but its another wart. It does mean that the ideal of running service containers in user space is an illusion. Once the directory is set up and running it will require root access to remove it as well. It's probably best not to place it in a user home directory as I did.
It is possible to run Docker service containers with persistent external storage from the host. This won't scale up to multiple hosts. Kubernetes has no way of making the required changes to the host. It might be possible to use network filesystems like NFS, Gluster or Ceph so long as the user accounts are made consistent.
The other possibility for shared storage is cloud storage. I'll talk about that some in the next post, though it's not ready for Docker and Kubernetes yet.
The user mapping may be resolved by a pending feature addition to Linux namespaces and Docker: User namespaces. This would allow a UID inside a container to be mapped to a different UID on the host. The same would be true for GIDs. This would allow me to run a container which uses the mongodb UID inside the container but is able to access files owned by my UID on the host. I don't have a timeline for this feature and the developers still raise their eyebrows in alarm when I ask about it, but it is work in progress.
A feature which does not exist to my knowledge is SELinux namespaces. This is the idea that an SELinux label inside a container might be mapped to a different label outside. This would allow the docker_var_lib_dir_t label inside to be mapped to user_home_t outside. I suspect this would break lots of things and open up nasty holes so I don't expect it soon.
I had to get the container running without extra storage first and examine the container to see what it expected. The file ownership, permissions and the SELinux context all affect the ability to write files.
Tweaking for Storage
On the host I had to create a directory with the right characteristics. The UID and GID on the host may not match those inside the container. If the container service creates a user and group they will almost certainly not exist on a generic Docker container host.
The Docker service uses a special set of SELinux contexts and labels to run. Docker runs as root and it does lots of potentially dangerous things. The SELinux policies for Docker are designed to prevent contained processes from escaping, at least through the resources SELinux can control.
Setting the directory ownership and the SELinux context require root access. This isn't a really big deal as Docker also requires root (or at least membership in the docker group) but its another wart. It does mean that the ideal of running service containers in user space is an illusion. Once the directory is set up and running it will require root access to remove it as well. It's probably best not to place it in a user home directory as I did.
Scaling up: Multiple Hosts and Network Storage?
It is possible to run Docker service containers with persistent external storage from the host. This won't scale up to multiple hosts. Kubernetes has no way of making the required changes to the host. It might be possible to use network filesystems like NFS, Gluster or Ceph so long as the user accounts are made consistent.
The other possibility for shared storage is cloud storage. I'll talk about that some in the next post, though it's not ready for Docker and Kubernetes yet.
Pending Features: User Namespaces (SELinux Namespaces?)
The user mapping may be resolved by a pending feature addition to Linux namespaces and Docker: User namespaces. This would allow a UID inside a container to be mapped to a different UID on the host. The same would be true for GIDs. This would allow me to run a container which uses the mongodb UID inside the container but is able to access files owned by my UID on the host. I don't have a timeline for this feature and the developers still raise their eyebrows in alarm when I ask about it, but it is work in progress.
A feature which does not exist to my knowledge is SELinux namespaces. This is the idea that an SELinux label inside a container might be mapped to a different label outside. This would allow the docker_var_lib_dir_t label inside to be mapped to user_home_t outside. I suspect this would break lots of things and open up nasty holes so I don't expect it soon.
Next Up: Network (Cloud) Storage
Next up is some discussion (but not any demonstration at all) of the state of network storageReferences
Tuesday, October 7, 2014
Storage Concepts in Docker: Shared Storage and the VOLUME directive
In the next few posts I'm going to take a break from the concrete work of creating images for Pulp in Docker. The next step in my project requires some work with storage and it's going to take a bit of time for exploration and then some careful planning. Note that when I get to moving them to Kubernetes I'll have to revisit some of this, as Kubernetes Pods place some constraints (and provide some capabilities) that Docker alone doesn't.
This is going to take at least three posts:
Another primary characteristic of Docker images (and containerized applications in general) is that they are 100% reproducible. This also makes them disposable. If it's trivial to make arbitrary numbers of copies of an image, then there's no problem throwing one away. You just make another.
When you're dealing with shared storage the life span of a container can be a problem too. If the two containers which share the storage both have the same life span then the storage can be "private", shared just between them. When either container dies, they both do and the storage can be reclaimed. If the contents of the storage has a life span longer than the containers, or if they container processes have different life spans then the storage needs to be persistent.
The purpose of the Pulp application is to act as a repository for long-term storage. The payload are files mirrored from remote repositories and offered locally. This can minimize long-haul network traffic and allow for network boundary security (controlled proxies) which might prohibit normal point-to-point connections between a local client and a remote content server.
Two processes work with the payload content directly. The Pulp worker process is responsible for scanning the remote repositories, detecting new content and initiating a sync to the local mirror. The Apache process publishes the local content out to the clients which are the customers for the Pulp service. It consumes the local mirror content that has been provided by the Pulp workers. These two processes must both have access to the same storage to do their jobs.
For demonstration purposes, shared storage is sufficient. The characteristics of shared storage in Docker and Kubernetes is complex enough to start without trying to solve the problem of persistence as well. In fact, persistent storage is still a largely an unsolved problem. This is because local persistent storage isn't very useful as soon as you try to run containers on different hosts. At that point you need a SAN/NAS or some other kind of network storage like OpenStack Cinder or AWS/EBS or Google Cloud Storage.
So, this post is about the care and feeding of shared storage in Docker applications.
The Dockerfile has a number of directives which specify ways to poke holes in containers. The VOLUME directive is used to indicate that a container wants to use external or shared storage.
These two containers have the same filesystems mounted on their declared volume mount points.
The content container will be created first. The content image uses the pulp-base as its parent so the file structure, ownership and permissions for the volume content will be initialized correctly. The worker and Apache containers will get their volumes from the content container.
This is going to take at least three posts:
- Shared Storage in Docker (this post)
- Persistent Storage in Docker
- Persistent Storage in Kubernetes
It could take a fourth post for Persistent Storage in Kubernetes, but that would be a fairly short post because the answer right now is "you really can't do that yet". People are working hard to figure out how to get persistent storage into a Kubernetes cluster, but it's not ready yet.
For now I'm going to take them one large bite at a time.
Storage in a Containerized World
The whole point of containers is that they don't leak. Nothing should escape or invade. The storage that is used by each container has a life span only as long as the container itself. Very quickly though one finds that truly closed containers aren't very useful. To make them do real work you have to punch some holes.
The most common holes are network ports, both inbound and out. A daemon in a container listens for connections and serves responses to queries. It may also initiate new outbound queries to gather information to do its job. Network connections are generally point-to-point and ephemeral. New connections are created and dropped all the time. If a connection fails during a transaction, no problem, just create a new connection and resend the message. Sometimes though, what you really need is something that lasts.
Sometimes a process doesn't just want to send messages to other processes. Sometimes it needs to create an artifact and put it someplace that another process can find and use it. In this case network connections aren't really appropriate for trading that information. It needs disk storage. Both processes need access to the same bit of storage. The storage must be shared.
The most common holes are network ports, both inbound and out. A daemon in a container listens for connections and serves responses to queries. It may also initiate new outbound queries to gather information to do its job. Network connections are generally point-to-point and ephemeral. New connections are created and dropped all the time. If a connection fails during a transaction, no problem, just create a new connection and resend the message. Sometimes though, what you really need is something that lasts.
Shared and Persistent Storage
Sometimes a process doesn't just want to send messages to other processes. Sometimes it needs to create an artifact and put it someplace that another process can find and use it. In this case network connections aren't really appropriate for trading that information. It needs disk storage. Both processes need access to the same bit of storage. The storage must be shared.
Another primary characteristic of Docker images (and containerized applications in general) is that they are 100% reproducible. This also makes them disposable. If it's trivial to make arbitrary numbers of copies of an image, then there's no problem throwing one away. You just make another.
When you're dealing with shared storage the life span of a container can be a problem too. If the two containers which share the storage both have the same life span then the storage can be "private", shared just between them. When either container dies, they both do and the storage can be reclaimed. If the contents of the storage has a life span longer than the containers, or if they container processes have different life spans then the storage needs to be persistent.
Pulp and Docker Storage
The purpose of the Pulp application is to act as a repository for long-term storage. The payload are files mirrored from remote repositories and offered locally. This can minimize long-haul network traffic and allow for network boundary security (controlled proxies) which might prohibit normal point-to-point connections between a local client and a remote content server.
Two processes work with the payload content directly. The Pulp worker process is responsible for scanning the remote repositories, detecting new content and initiating a sync to the local mirror. The Apache process publishes the local content out to the clients which are the customers for the Pulp service. It consumes the local mirror content that has been provided by the Pulp workers. These two processes must both have access to the same storage to do their jobs.
For demonstration purposes, shared storage is sufficient. The characteristics of shared storage in Docker and Kubernetes is complex enough to start without trying to solve the problem of persistence as well. In fact, persistent storage is still a largely an unsolved problem. This is because local persistent storage isn't very useful as soon as you try to run containers on different hosts. At that point you need a SAN/NAS or some other kind of network storage like OpenStack Cinder or AWS/EBS or Google Cloud Storage.
So, this post is about the care and feeding of shared storage in Docker applications.
Docker Image: the VOLUME directive
The Dockerfile has a number of directives which specify ways to poke holes in containers. The VOLUME directive is used to indicate that a container wants to use external or shared storage.
 |
| Dockerfile: VOLUME directive |
The diagram above shows the effect of a VOLUME directive when creating a new image. It indicates that this image has two mount points which can be attached to external (to the container) storage.
Here's the complete Dockerfile for the pulp-content image.
Here's where the window metaphor breaks down. The VOLUME directive indicates a node in a file path where an external filesystem may be mounted. It's a dividing line, inside and outside. What happens to the files in the image that would fall on the outside?
Docker places those files into their own filesystem as well. If the container is created without specifying an external volume to mount there, this default filesystem is mounted. The VOLUME directive defines a place where files can be imported or exported.
So what happens if you just start a container with that image, but don't specify an external mount?
That's what it looks like on the inside. But what's the view from outside? I can find out using docker inspect.
First I ask what the volume configuration is for the container. That result tells me that I didn't provide any mapping for the two volumes. Next I check what volumes are actually provided.
These are the volumes that are actually mounted on the container. I can see that /var/lib/pulp and /var/www have something mounted on them and that the volumes are actually stored in the host filesystem under /var/lib/docker/vfs/dir. Graphically, here's what that looks like:
So now I have a container running with some storage that is, in a sense "outside" the container. I need to mount that same storage into another container. This is where the Docker --volumes-from option picks up.
Here's the complete Dockerfile for the pulp-content image.
Here's where the window metaphor breaks down. The VOLUME directive indicates a node in a file path where an external filesystem may be mounted. It's a dividing line, inside and outside. What happens to the files in the image that would fall on the outside?
Docker places those files into their own filesystem as well. If the container is created without specifying an external volume to mount there, this default filesystem is mounted. The VOLUME directive defines a place where files can be imported or exported.
So what happens if you just start a container with that image, but don't specify an external mount?
Defaulted Volumes
To continue with the flawed metaphor, every window has two sides. The VOLUME directive only specifies the boundary. It says "some filesystem may be provided to mount here". But if I don't provide a file tree to mount there (using the -v option) Docker mounts the file tree that was inside the image when it was built. I can run the pulp-content image with a shell and inspect the contents. I'll look at it both from the inside and the outside.
I'm going to start an interactive pulp-content container with a shell so I can inspect the contents.
I'm going to start an interactive pulp-content container with a shell so I can inspect the contents.
docker run -it --name volume-demo markllama/pulp-content /bin/sh
sh-4.2# mount
/dev/mapper/docker-8:4-2758071-77b5c9ba618358600e5b59c3657256d1a748aac1c14e2be3d9c505adddc92ce3 on / type ext4 (rw,relatime,context="system_u:object_r:svirt_sandbox_file_t:s0:c585,c908",discard,stripe=16,data=ordered)
proc on /proc type proc (rw,nosuid,nodev,noexec,relatime)
tmpfs on /dev type tmpfs (rw,nosuid,context="system_u:object_r:svirt_sandbox_file_t:s0:c585,c908",mode=755)
shm on /dev/shm type tmpfs (rw,nosuid,nodev,noexec,relatime,context="system_u:object_r:svirt_sandbox_file_t:s0:c585,c908",size=65536k)
devpts on /dev/pts type devpts (rw,nosuid,noexec,relatime,context="system_u:object_r:svirt_sandbox_file_t:s0:c585,c908",gid=5,mode=620,ptmxmode=666)
sysfs on /sys type sysfs (ro,nosuid,nodev,noexec,relatime,seclabel)
/dev/sda4 on /etc/resolv.conf type ext4 (rw,relatime,seclabel,data=ordered)
/dev/sda4 on /etc/hostname type ext4 (rw,relatime,seclabel,data=ordered)
/dev/sda4 on /etc/hosts type ext4 (rw,relatime,seclabel,data=ordered)
/dev/sda4 on /var/lib/pulp type ext4 (rw,relatime,seclabel,data=ordered)
/dev/sda4 on /var/www type ext4 (rw,relatime,seclabel,data=ordered)
devpts on /dev/console type devpts (rw,nosuid,noexec,relatime,seclabel,gid=5,mode=620,ptmxmode=000)
proc on /proc/sys type proc (ro,nosuid,nodev,noexec,relatime)
proc on /proc/sysrq-trigger type proc (ro,nosuid,nodev,noexec,relatime)
proc on /proc/irq type proc (ro,nosuid,nodev,noexec,relatime)
proc on /proc/bus type proc (ro,nosuid,nodev,noexec,relatime)
tmpfs on /proc/kcore type tmpfs (rw,nosuid,context="system_u:object_r:svirt_sandbox_file_t:s0:c585,c908",mode=755)
So there is a filesystem mounted on those two mount points. But what's in them?
sh-4.2# find /var/www
/var/www
/var/www/pub
/var/www/html
/var/www/cgi-bin

sh-4.2# find /var/lib/pulp
/var/lib/pulp
/var/lib/pulp/published
/var/lib/pulp/published/yum
/var/lib/pulp/published/yum/https
/var/lib/pulp/published/yum/http
/var/lib/pulp/published/puppet
/var/lib/pulp/published/puppet/https
/var/lib/pulp/published/puppet/http
/var/lib/pulp/uploads
/var/lib/pulp/celery
/var/lib/pulp/static
/var/lib/pulp/static/rsa_pub.key
That's what it looks like on the inside. But what's the view from outside? I can find out using docker inspect.
docker inspect --format '{{.Config.Volumes}}' volume-demo
map[/var/lib/pulp:map[] /var/www:map[]]
First I ask what the volume configuration is for the container. That result tells me that I didn't provide any mapping for the two volumes. Next I check what volumes are actually provided.
docker inspect --format '{{.Volumes}}' volume-demo
map[
   /var/lib/pulp:/var/lib/docker/vfs/dir/3a11750bd3c31a8025f0cba8b825e568dafff39638fa1a45a17487df545b0f6a
   /var/www:/var/lib/docker/vfs/dir/0a86bd1085468f04feaeb47cc32cfdb0c05fd10e5c7b470790042107d9c02b70
]
These are the volumes that are actually mounted on the container. I can see that /var/lib/pulp and /var/www have something mounted on them and that the volumes are actually stored in the host filesystem under /var/lib/docker/vfs/dir. Graphically, here's what that looks like:
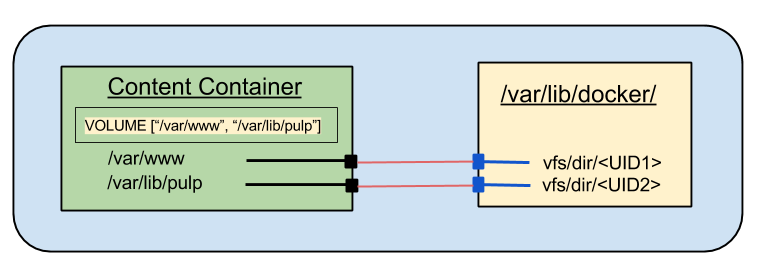.png) |
| Default mounts with VOLUME directive |
So now I have a container running with some storage that is, in a sense "outside" the container. I need to mount that same storage into another container. This is where the Docker --volumes-from option picks up.
Shared Volumes in Docker
Once a container exists with marked volumes it is possible to mount those volumes into other containers. Docker provides an option which allows all of the volumes from an existing container to be mounted one-to-one into another container.
For this demonstration I'm going to just create another container from the pulp-content image, but this time I'm going to tell it to mount the volumes from the existing container:
If you're following along you can use mount to show the internal mount points, and observe that they match those of the original container. From the outside I can use docker inspect to show that both containers are sharing the same volumes.
For this demonstration I'm going to just create another container from the pulp-content image, but this time I'm going to tell it to mount the volumes from the existing container:
docker run -it --name volumes-from-demo --volumes-from volume-demo markllama/pulp-content /bin/sh
If you're following along you can use mount to show the internal mount points, and observe that they match those of the original container. From the outside I can use docker inspect to show that both containers are sharing the same volumes.
docker inspect --format '{{.Volumes}}' volume-demo
map[
 /var/lib/pulp:/var/lib/docker/vfs/dir/3a11750bd3c31a8025f0cba8b825e568dafff39638fa1a45a17487df545b0f6a
 /var/www:/var/lib/docker/vfs/dir/0a86bd1085468f04feaeb47cc32cfdb0c05fd10e5c7b470790042107d9c02b70
]

docker inspect --format '{{.Volumes}}' volumes-from-demo
map[
 /var/lib/pulp:/var/lib/docker/vfs/dir/3a11750bd3c31a8025f0cba8b825e568dafff39638fa1a45a17487df545b0f6a
 /var/www:/var/lib/docker/vfs/dir/0a86bd1085468f04feaeb47cc32cfdb0c05fd10e5c7b470790042107d9c02b70
]
These two containers have the same filesystems mounted on their declared volume mount points.
Shared Storage and Pulp
The next two images I need to create for a Pulp service are going to require shared storage. The Pulp worker process places files in /var/lib/pulp and symlinks them into /var/www to make them available to the web server. The Apache server needs to be able to read both the web repository in /var/www and the Pulp content in /var/lib/pulp so that it can resolve the symlinks and serve the content to clients. I can build the images using the VOLUME directive to create the "windows" I need and then use a content image to hold the files. Both the worker and apache containers will use the --volumes-from directive to mount the storage from the content container.
Here's what that will looks like in Docker:
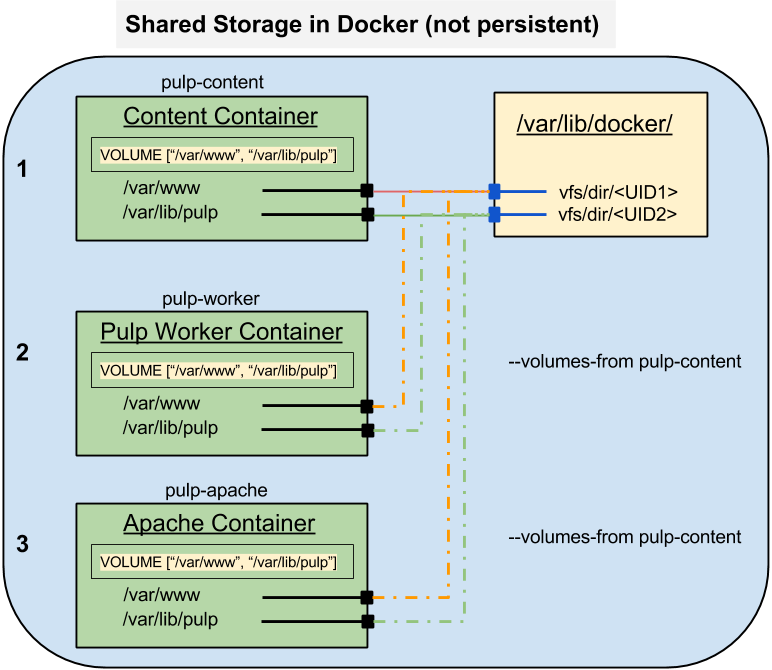.png) |
| Pulp Content Storage (Docker) |
Summary
In this post I learned what Docker does with a VOLUME directive if no external volume is provided for the container at runtime. I also learned how to share storage between two or more running containers.
In the next post I'll show how to mount (persistent) host storage into a container.
In the final post before going back to building a Pulp service I'll demonstrate how to create a pod with storage shared between the containers and if there's space, how to mount host storage into the pod as well.
References
- Docker
- Dockerfile VOLUME directive
- Docker CLI run command (see --volume and --volumes-from options)
- Docker CLI inspect command
- Pulp
Monday, September 29, 2014
Docker: Re-using a custom base image - Pulp Resource Manager image.
Here's the next step in the ongoing saga of containerizing the Pulp service in Docker for use with Kubernetes.
In the last post I spent a bunch of effort creating a base image for a set of Pulp service components. Then I only implemented one, the Celery beat server. In this (hopefully much shorter) post I'll create a second image from that base. This one is going to be the Pulp Resource Manager service.
A couple of recap pieces to start.
The Pulp service is made up of several independent processes that communicate using AMQP messaging (through a QPID message bus) and by access to a MongoDB database. The QPID services and the MongoDB services are entirely independent of the Pulp service processes and communicate only over TCP/IP. There are also a couple of processes that are tightly coupled, both requiring access to shared data. These will come later. What's left is the Pulp Resource Manager process and the Pulp Admin REST service.
I'm going to take these in two separate posts to make them a bit more digestible than the last one was.
Extending the Base - Again
As in the case with the Pulp Beat service, the Resource Manager process is a singleton. Each pulp service has exactly one. (Discussions of HA and SPOF will be held for later). The Resource Manager process communicates with the other components solely through the QPID message broker and the MongoDB over TCP. There is no need for persistent storage.
In fact the only difference between the Beat service and the Resource Manager is the invocation of the Celery service. This means that the only difference between the Docker specifications is the name and two sections of the run.sh file.
The Dockerfile is in fact identical in content to that for the Pulp Beat container:
Now to the run.sh script.
The first difference in the run.sh is simple. The Beat service is used to initialize the database. The Resource Manager doesn't have to do that.
The first difference in the run.sh is simple. The Beat service is used to initialize the database. The Resource Manager doesn't have to do that.
The second is also pretty simple: The exec line at the end starts the Celery service use the resource_manager entry point instead of the beat service.
I do have one other note to myself. It appears that the wait_for_database() function will be needed in every derivative of the pulp-base image. I should probably refactor that but I'm not going to do it yet.
One Image or Many?
So, if I hadn't been using shell functions, this really would come down to two lines different between the two. Does it really make sense to create two images? It is possible to pass a mode argument to the container on startup. Wouldn't that be simpler?
It actually might be. It is possible to use the same image and pass an argument. The example from which mine are derived used that method.
I have three reasons for using separate images. One is for teaching and the other two are development choices. Since one of my goals is to show how to create custom base images and then use derived images to create customizations I used this opportunity to show that.
The deeper reasons have to do with human nature and the software development life cycle.
People expect to be able to compose service by grabbing images off the shelf and plugging them together. Adding modal switches to the images means that they are not strongly differentiated by function. You can't just say "Oh, I need 5 functional parts, let me check the bins". You have to know more about each image than just how it connects to others. You have to know that this particular image can take more than one role within the service. I'd like to avoid that if I can. Creating images with so little difference feels like inefficiency, but only when viewed from the standpoint of the person producing the images. To the consumer it maintains the usage paradigm. Breaks in the paradigm can lead to mistakes or confusion.
The other reason to use distinct images has to do with what I expect and hope will be a change in the habits of software developers.
Developers of complex services currently feel a tension, when they are creating and packaging their software, between putting all of the code, binaries and configuration templates into a single package. You only create a new package if the function is strongly different. This makes it simpler to install the software and configure it once. On traditional systems where all of the process components would be running on the same host there was no good reason to separate the code for distinct processes based on their function. There are clear cases where the separation does happen in host software packaging, notably in client and server software. These clearly will run on different hosts. Other cases though are not clear cut.
The case of the Pulp service is in a gray area. Much of the code is common to all four Celery based components (beat, resource manager, worker and admin REST service). It is likely possible to refactor the unique code into separate packages for the components, though the value is questionable at this point.
I want to create distinct images because it's not very expensive, and it allows for easy refactoring should the Pulp packaging ever be decomposed to match the actual service components. Any changes would happen when the new images are built, but the consumer would not need to see any change. This is a consideration to keep in mind when ever I create a new service with different components from the same service RPM.
All I need to do using Docker directly is to verify that the container will start and run. The visibility in Kubernetes still isn't up to general dev and debugging.
Once it's running I can check the logs to verify that everything has started as needed and that the primary process has been executed at the end.
If you fail to see it start especially with "file not found" or "no access" errors, check the /dev/log volume mount and the SERVICE_HOST value.
I also want to check that the QPID queues have been created.
Line 8 looks like the Celery Beat service queue and lines 11, 12, and 13 are clearly associated with the resource manager. So far, so good.
One line 15 I requested the information for that pod by name using the get command, rather than listing them all. This time it shows running. as it should.
When you use get all you get by default is a one line summary. If you want details you have to consume them as JSON and they're complete. In fact they use the same schema as the JSON used to create the pods in the first place (with a bit more detail filled in). While this could be hard for humans to swallow, it makes it AWESOME to write programs and scripts to process the output. Every command should offer some form of structured data output. Meanwhile, I wish Kubernetes would offer a --verbose option with nicely formatted plaintext. It will come (or I'll write it if I get frustrated enough).
Get ready... Here it comes.
So there you go.
I won't repeat the QPID queue check here because if everything's going well it looks the same.
It actually might be. It is possible to use the same image and pass an argument. The example from which mine are derived used that method.
I have three reasons for using separate images. One is for teaching and the other two are development choices. Since one of my goals is to show how to create custom base images and then use derived images to create customizations I used this opportunity to show that.
The deeper reasons have to do with human nature and the software development life cycle.
People expect to be able to compose service by grabbing images off the shelf and plugging them together. Adding modal switches to the images means that they are not strongly differentiated by function. You can't just say "Oh, I need 5 functional parts, let me check the bins". You have to know more about each image than just how it connects to others. You have to know that this particular image can take more than one role within the service. I'd like to avoid that if I can. Creating images with so little difference feels like inefficiency, but only when viewed from the standpoint of the person producing the images. To the consumer it maintains the usage paradigm. Breaks in the paradigm can lead to mistakes or confusion.
The other reason to use distinct images has to do with what I expect and hope will be a change in the habits of software developers.
Developers of complex services currently feel a tension, when they are creating and packaging their software, between putting all of the code, binaries and configuration templates into a single package. You only create a new package if the function is strongly different. This makes it simpler to install the software and configure it once. On traditional systems where all of the process components would be running on the same host there was no good reason to separate the code for distinct processes based on their function. There are clear cases where the separation does happen in host software packaging, notably in client and server software. These clearly will run on different hosts. Other cases though are not clear cut.
The case of the Pulp service is in a gray area. Much of the code is common to all four Celery based components (beat, resource manager, worker and admin REST service). It is likely possible to refactor the unique code into separate packages for the components, though the value is questionable at this point.
I want to create distinct images because it's not very expensive, and it allows for easy refactoring should the Pulp packaging ever be decomposed to match the actual service components. Any changes would happen when the new images are built, but the consumer would not need to see any change. This is a consideration to keep in mind when ever I create a new service with different components from the same service RPM.
Running and Verifying the Resource Manager Image
The Pulp Resource Manager process makes the same connections that the Pulp Beat process does. It's a little harder to detect the Resource Manager access to the database since the startup doesn't make radical changes like the DB initialization. I'm going to see if I can find some indications that the resource manager is running though. The QPID connection will be much easier to detect. The Resource Manager creates its own set of queues which will be easy to see.
The resource manager requires the database service and an initialized database. Testing this part will start where the previous post left off, with running QPID and MongoDB and with the Pulp Beat service active.
NOTE: there's currently (20140929) a bug in Kubernetes where, during the period between waiting for the image to download and when it actually starts, kubecfg list pods will indicate that the pods have terminated. If you see this, give it another minute for the pods to actually start and transfer to the running state.
Testing in Docker
All I need to do using Docker directly is to verify that the container will start and run. The visibility in Kubernetes still isn't up to general dev and debugging.
docker run -d --name pulp-resource-manager \
  -v /dev/log:/dev/log \
  -e PULP_SERVER_NAME=pulp.example.com \
  -e SERVICE_HOST=10.245.2.2 \
  markllama/pulp-resource-manager
0e8cbc4606cf8894f8be515709c8cd6a23f37b3a58fd84fecf0d8fca46c64eed

 docker ps
CONTAINER ID        IMAGE                                    COMMAND             CREATED             STATUS              PORTS               NAMES
0e8cbc4606cf        markllama/pulp-resource-manager:latest   "/run.sh"           9 minutes ago       Up 9 minutes                            pulp-resource-manager
Once it's running I can check the logs to verify that everything has started as needed and that the primary process has been executed at the end.
docker logs pulp-resource-manager
+ '[' '!' -x /configure_pulp_server.sh ']'
+ . /configure_pulp_server.sh
++ set -x
++ PULP_SERVER_CONF=/etc/pulp/server.conf
++ export PULP_SERVER_CONF
++ PULP_SERVER_NAME=pulp.example.com
++ export PULP_SERVER_NAME
++ SERVICE_HOST=10.245.2.2
++ export SERVICE_HOST
++ DB_SERVICE_HOST=10.245.2.2
++ DB_SERVICE_PORT=27017
++ export DB_SERVICE_HOST DB_SERVICE_PORT
++ MSG_SERVICE_HOST=10.245.2.2
++ MSG_SERVICE_PORT=5672
++ MSG_SERVICE_USER=guest
++ export MSG_SERVICE_HOST MSG_SERVICE_PORT MSG_SERVICE_NAME
++ check_config_target
++ '[' '!' -f /etc/pulp/server.conf ']'
++ configure_server_name
++ augtool -s set '/files/etc/pulp/server.conf/target[. = '\''server'\'']/server_name' pulp.example.com
Saved 1 file(s)
++ configure_database
++ augtool -s set '/files/etc/pulp/server.conf/target[. = '\''database'\'']/seeds' 10.245.2.2:27017
Saved 1 file(s)
++ configure_messaging
++ augtool -s set '/files/etc/pulp/server.conf/target[. = '\''messaging'\'']/url' tcp://10.245.2.2:5672
Saved 1 file(s)
++ augtool -s set '/files/etc/pulp/server.conf/target[. = '\''tasks'\'']/broker_url' qpid://guest@10.245.2.2:5672
Saved 1 file(s)
+ '[' '!' -x /test_db_available.py ']'
+ wait_for_database
+ DB_TEST_TRIES=12
+ DB_TEST_POLLRATE=5
+ TRY=0
+ '[' 0 -lt 12 ']'
+ /test_db_available.py
Testing connection to MongoDB on 10.245.2.2, 27017
+ '[' 0 -ge 12 ']'
+ start_resource_manager
+ exec runuser apache -s /bin/bash -c '/usr/bin/celery worker -c 1 -n resource_manager@pulp.example.com --events --app=pulp.server.async.app --umask=18 --loglevel=INFO -Q resource_manager --logfile=/var/log/pulp/resource_manager.log'
If you fail to see it start especially with "file not found" or "no access" errors, check the /dev/log volume mount and the SERVICE_HOST value.
I also want to check that the QPID queues have been created.
qpid-config queues -b guest@10.245.2.4
Queue Name                                       Attributes
======================================================================
04f58686-35a6-49ca-b98e-376371cfaaf7:1.0         auto-del excl
06fa019e-a419-46af-a555-a820dd86e66b:1.0         auto-del excl
06fa019e-a419-46af-a555-a820dd86e66b:2.0         auto-del excl
0c72a9c9-e1bf-4515-ba4b-0d0f86e9d30a:1.0         auto-del excl
celeryev.ed1a92fd-7ad0-4ab1-935f-6bc6a215f7d3    auto-del --limit-policy=ring --argument passive=False --argument exclusive=False --argument arguments={}
e70d72aa-7b9a-4083-a88a-f9cc3c568e5c:0.0         auto-del excl
e7e53097-ae06-47ca-87d7-808f7042d173:1.0         auto-del excl
resource_manager                                 --durable --argument passive=False --argument exclusive=False --argument arguments=None
resource_manager@pulp.example.com.celery.pidbox  auto-del --limit-policy=ring --argument passive=False --argument exclusive=False --argument arguments=None
resource_manager@pulp.example.com.dq             --durable auto-del --argument passive=False --argument exclusive=False --argument arguments=None
Line 8 looks like the Celery Beat service queue and lines 11, 12, and 13 are clearly associated with the resource manager. So far, so good.
Testing in Kubernetes
I had to reset the database between starts to test the Pulp Beat container. This image doesn't change the database structure, so I don't need to reset. I can just create a new pod definition and try it out.
Again, the differences from the Pulp Beat pod definition are pretty trivial.
So here's what it looks like when I start the pod:Again, the differences from the Pulp Beat pod definition are pretty trivial.
kubecfg -c pods/pulp-resource-manager.json create pods
I0930 00:00:24.581712 16159 request.go:292] Waiting for completion of /operations/14
ID                      Image(s)                          Host                Labels                       Status
----------              ----------                        ----------          ----------                   ----------
pulp-resource-manager   markllama/pulp-resource-manager   /                   name=pulp-resource-manager   Waiting

kubecfg list pods
ID                      Image(s)                          Host                    Labels                       Status
----------              ----------                        ----------              ----------                   ----------
pulpdb                  markllama/mongodb                 10.245.2.2/10.245.2.2   name=db                      Running
pulpmsg                 markllama/qpid                    10.245.2.2/10.245.2.2   name=msg                     Running
pulp-beat               markllama/pulp-beat               10.245.2.4/10.245.2.4   name=pulp-beat               Terminated
pulp-resource-manager   markllama/pulp-resource-manager   10.245.2.4/10.245.2.4   name=pulp-resource-manager   Terminated

kubecfg get pods/pulp-resource-manager
ID                      Image(s)                          Host                    Labels                       Status
----------              ----------                        ----------              ----------                   ----------
pulp-resource-manager   markllama/pulp-resource-manager   10.245.2.4/10.245.2.4   name=pulp-resource-manager   Running
There are two things of note here. Line 13 shows the pulp-resource-manager pod as terminated. Remember the bug note from above. The pod isn't terminated, it's between the pause container which downloads the image for a new container and the execution.
One line 15 I requested the information for that pod by name using the get command, rather than listing them all. This time it shows running. as it should.
When you use get all you get by default is a one line summary. If you want details you have to consume them as JSON and they're complete. In fact they use the same schema as the JSON used to create the pods in the first place (with a bit more detail filled in). While this could be hard for humans to swallow, it makes it AWESOME to write programs and scripts to process the output. Every command should offer some form of structured data output. Meanwhile, I wish Kubernetes would offer a --verbose option with nicely formatted plaintext. It will come (or I'll write it if I get frustrated enough).
Get ready... Here it comes.
kubecfg --json get pods/pulp-resource-manager | python -m json.tool
{
    "apiVersion": "v1beta1",
    "creationTimestamp": "2014-09-30T00:00:24Z",
    "currentState": {
        "host": "10.245.2.4",
        "hostIP": "10.245.2.4",
        "info": {
            "net": {
                "detailInfo": {
                    "Args": null,
                    "Config": null,
                    "Created": "0001-01-01T00:00:00Z",
                    "Driver": "",
                    "HostConfig": null,
                    "HostnamePath": "",
                    "HostsPath": "",
                    "ID": "",
                    "Image": "",
                    "Name": "",
                    "NetworkSettings": null,
                    "Path": "",
                    "ResolvConfPath": "",
                    "State": {
                        "ExitCode": 0,
                        "FinishedAt": "0001-01-01T00:00:00Z",
                        "Paused": false,
                        "Pid": 0,
                        "Running": false,
                        "StartedAt": "0001-01-01T00:00:00Z"
                    },
                    "SysInitPath": "",
                    "Volumes": null,
                    "VolumesRW": null
                },
                "restartCount": 0,
                "state": {
                    "running": {}
                }
            },
            "pulp-resource-manager": {
                "detailInfo": {
                    "Args": null,
                    "Config": null,
                    "Created": "0001-01-01T00:00:00Z",
                    "Driver": "",
                    "HostConfig": null,
                    "HostnamePath": "",
                    "HostsPath": "",
                    "ID": "",
                    "Image": "",
                    "Name": "",
                    "NetworkSettings": null,
                    "Path": "",
                    "ResolvConfPath": "",
                    "State": {
                        "ExitCode": 0,
                        "FinishedAt": "0001-01-01T00:00:00Z",
                        "Paused": false,
                        "Pid": 0,
                        "Running": false,
                        "StartedAt": "0001-01-01T00:00:00Z"
                    },
                    "SysInitPath": "",
                    "Volumes": null,
                    "VolumesRW": null
                },
                "restartCount": 0,
                "state": {
                    "running": {}
                }
            }
        },
        "manifest": {
            "containers": null,
            "id": "",
            "restartPolicy": {},
            "version": "",
            "volumes": null
        },
        "podIP": "10.244.3.4",
        "status": "Running"
    },
    "desiredState": {
        "host": "10.245.2.4",
        "manifest": {
            "containers": [
                {
                    "env": [
                        {
                            "key": "PULP_SERVER_NAME",
                            "name": "PULP_SERVER_NAME",
                            "value": "pulp.example.com"
                        }
                    ],
                    "image": "markllama/pulp-resource-manager",
                    "name": "pulp-resource-manager",
                    "volumeMounts": [
                        {
                            "mountPath": "/dev/log",
                            "name": "devlog",
                            "path": "/dev/log"
                        }
                    ]
                }
            ],
            "id": "pulp-resource-manager",
            "restartPolicy": {
                "always": {}
            },
            "uuid": "c73a89c0-4834-11e4-aba7-0800279696e1",
            "version": "v1beta1",
            "volumes": [
                {
                    "name": "devlog",
                    "source": {
                        "emptyDir": null,
                        "hostDir": {
                            "path": "/dev/log"
                        }
                    }
                }
            ]
        },
        "status": "Running"
    },
    "id": "pulp-resource-manager",
    "kind": "Pod",
    "labels": {
        "name": "pulp-resource-manager"
    },
    "resourceVersion": 20,
    "selfLink": "/api/v1beta1/pods/pulp-resource-manager"
}
So there you go.
I won't repeat the QPID queue check here because if everything's going well it looks the same.
Summary
As designed there isn't really much to say. The only real changes were to remove the DB setup and change the exec line to start the resource manager process. That's the idea of cookie cutters.
The next one won't be as simple. It uses the Pulp software package, but it doesn't run a Celery service. Instead it runs an Apache daemon and a WSGI web service to offer the Pulp Admin REST protocol. It connects to the database and the messaging service. It also needs SSL and a pair of external public TCP connections.
The next one won't be as simple. It uses the Pulp software package, but it doesn't run a Celery service. Instead it runs an Apache daemon and a WSGI web service to offer the Pulp Admin REST protocol. It connects to the database and the messaging service. It also needs SSL and a pair of external public TCP connections.
References
Friday, September 26, 2014
Docker: Building and using a base image for Pulp services in Kubernetes
My stated goal in this series of posts is to create a working containerized Pulp service running in a Kubernetes cluster. After, what is it, 5 posts, I'm finally actually ready to do something with pulp itself.
The Pulp service proper is made up of a single Celery beat process, a single resource manager process, and some number of pulp worker processes. These together do the work of Pulp, mirroring and managing the content that is Pulp's payload. The service also requires at least one Apache HTTP server to deliver the payload but that comes later.
All of the Pulp processes are actually built on Celery. They all require the the same set of packages and much of the same configuration information. They all need use the MongoDB and the QPID services. The worker processes all need access to some shared storage, but the beat and resource manager do not.
To build the Docker images for these different containers, rather than duplicating the common parts, the best practice is to put those parts into a base image and then add one last layer to create each of the variations.
In this post I'll demonstrate creating a shared base image for Pulp services and then I'll create the first image that will consume the base to create the Pulp beat service.
The real trick is to figure out what the common parts are. Some are easy though so I'll start there.
Given that start, here's what I get for the Dockerfile
Lines 1 and 2 should be familiar already. There are no new directives here but a couple of things need explaining.
Augeas is an attempt to wrangle the flat file databases that make up the foundation of most *NIX application configuration. It offers a way to access individual key/value pairs within well known configuration files without resorting to tools like sed or perl and regular expressions. With augeas each key/value pair is assigned a path and can be queried and updated using that path. It offers both API and CLI interfaces though it's not nearly as commonly used as it should be.
The down side of Augeas is that it doesn't include a description (lens in Augeas terminology) for Pulp config files. Pulp is too new. The upside is that the Pulp config files are fairly standard INI format, and it's easy to adapt the stock IniFile lens for Pulp.
I won't include the lens text inline here, but I put it in a gist if you want to look at it.
The ADD directive on line 20 of the Dockerfile places the lens file in the Augeas library where it will be found automatically.
All of the containers that use this base image will need to set a few configuration values for Pulp. These reside in /etc/pulp/server.conf which is an INI formatted text file. These settings indicate the identity of the pulp service itself and how the pulp processes communicate with the database and message bus.
If you are starting a Docker container by hand you could either pass these values in as environment variables using the -e (--env) option or by accepting additional positional arguments through the CMD. You'd have to establish the MongoDB and QPID services then get their IP addresses from Docker and feed the values into the Pulp server containers.
Since Kubernetes is controlling the database and messaging pods and has the Service objects defined, it knows how to tell the Pulp containers where to find these services. It sets a few environment variables for every new container that starts after the service object is created. A new container can use these values to reach the external services it needs.
Line 23 of the Dockerfile adds a short shell script which can accept the values from the environment variables that Kubernetes provides and configure them into the Pulp configuration.
The script gathers the set of values it needs from the variables (or sets reasonable defaults) and then, using augtool (The CLI tool for Augeas) it updates the values in the pulp.conf file.
This is the snippet from the beginning of the configure_pulp_server.sh script which sets the environment variables.
These are the values that the rest of the script will set into /etc/pulp/server.conf
UPDATE: As of the middle of October 2014 the SERVICE_HOST variable has been removed. Now each service gets its own IP address, so the generic SERVICE_HOST variable no longer makes sense. Each service variable must be provided explicitly when testing. Also, for testing the master host will provide a proxy to the service. However, as of this update the mechanism isn't working yet. I'll update this post when is working properly. If you are building from git source you can use a commit prior to 10/14/2014 and you can still use SERVICE_HOST test against the minions.
The real meat is in the run script, though even that is pretty anemic
The main section starts at line 44 and it's really just four steps. Two are defined in the base image scripts and two more are defined here.
Pulp uses the python logging mechanism and that in turn by default requires the syslog service. On Fedora 20, syslog is no longer a separate process. It's been absorbed into the systemd suite of low level services and is known now as journald. (cat flamewars/systemd/{pro,con} >/dev/null).
For me this means that for Pulp to run properly it needs the ability to write syslog messages. In Fedora 20 this amounts to being able to write to a special file /dev/log. This file isn't available in containers without some special magic. For Docker that magic is -v /dev/log:/dev/log. This imports the host's /dev/log into the container at the same location. For Kubernetes this is a little bit more involved.
The Kubernetes pod construct has some interesting side-effects. The purpose of pods is to allow the creation of sets of containers that share resources. The JSON reflects this in how the shared resources are declared.
In the pod spec, lines 14-20 are inside the container hash for the container named pulp-beat. They indicate that a volume named "devlog" (line 15) will be mounted read/write (line 16) on /dev/log inside the container (line 17).
Note that this section does not define the named volume or indicate where it will come from. That's defined at the pod level not the container.
Now look at lines 20-23. these are at the pod level (the list of containers has been closed on line 19). The volumes array contains a set of volume definitions. I only define one, named "devlog" (line 21) and indicate that it comes from the host and that the source path is /dev/log.
All that to replace the docker argument -v /dev/log:/dev/log.
Right now this seems like a lot of work for a trivial action. Later this distinction will become very important. The final pod for Pulp will be made up of at least two containers. The pod will import two different storage locations from the host and both containers will mount them.
One last time for clarity: the volumes list is at the pod level. It defines a set of external resources that will be made available to the containers in the pod. The volumeMounts list is at the container level. It maps entries from the volumes section in the pod to mount points inside the container using the value of the name as the connecting handle.
To start the pulp beat pod we go back to kubecfg (remember, I aliased kubecfg=~/kubernetes/cluster/kubecfg.sh).
Now I know that the pod has been assigned to 10.245.2.2 (minion-1) I can log in there directly and examine the docker container.
If this is the first time running the image it may take a while for Kubernetes/Docker to pull it from the Docker hub. There may be a delay as the kubernetes pause container does the pull.
I can now run the same tests I did earlier on the MongoDB and QPID services to reassure myself that the pulp beat service is connected.
After all that thought and planning the end result is actually kinda boring. Just the way I like it.
The pulp-beat service is just the first real pulp component. It runs in isolation from the other components, communicating only through the messaging and database. There is another component like that, the pulp-resource-manager. This is another Celery process and the it is created, started and tested just like the pulp-beat service. I'm going to do one much-shorter post on that for completeness before tackling the next level of complexity.
The two remaining different components are the content pods, which require shared storage and which will have two cooperating containers running inside the pod. One will manage the content mirroring and the other will serve the content out to clients.
I think before that though I will tackle the Pulp Admin service. This is a public facing REST service which accepts pulp admin commands to create and manage the content repositories.
Both of these will require the establishment of encryption, which means placing x509 certificates within the containers. These are the upcoming challenges.
The Pulp service proper is made up of a single Celery beat process, a single resource manager process, and some number of pulp worker processes. These together do the work of Pulp, mirroring and managing the content that is Pulp's payload. The service also requires at least one Apache HTTP server to deliver the payload but that comes later.
All of the Pulp processes are actually built on Celery. They all require the the same set of packages and much of the same configuration information. They all need use the MongoDB and the QPID services. The worker processes all need access to some shared storage, but the beat and resource manager do not.
To build the Docker images for these different containers, rather than duplicating the common parts, the best practice is to put those parts into a base image and then add one last layer to create each of the variations.
In this post I'll demonstrate creating a shared base image for Pulp services and then I'll create the first image that will consume the base to create the Pulp beat service.
The real trick is to figure out what the common parts are. Some are easy though so I'll start there.
Creating a Base Image
For those of you who are coders, a base image is a little like an abstract class. It defines some important characteristics that are meant to be re-used, but it leaves others to be resolved later. The Docker community already provides a set of base images like the Fedora:20 image which have been hand-crafted to provide a minimal OS. Docker makes it easy to use the same mechanism for building our own images.
The list below enumerates the things that all of the Pulp service images will share. When I create the final images I'll add the final tweaks. Some of these will essentially be stubs to be used later.
- Pulp Repo file
Pulp is not yet standard in the RHEL, CentOS or Fedora distributions - Pulp Server software
- Communications Software (MongoDB and QPID client libraries)
- Configuration tools: Augeas
There is also some configuration scripting that will be required by all the pulp service containers:
- A script to apply the customization/configuration for the execution environment
- A test script to ensure that the database is available before starting the celery services
- A test script to ensure that the message service is available
Lines 1 and 2 should be familiar already. There are no new directives here but a couple of things need explaining.
- Line 1: The base image
- Line 2: Contact information
- Line 4: A usage comment
Pulp uses syslog. For a process inside a container to write to syslog you either have to have a syslogd running or you have to have write access to the host's /dev/log file. I'll show this gets done when
I create a real app image from this base and run it. - Line 6: Create a yum repo for the Pulp package content.
You can add files using a URL for the source. - Lines 9-12: Install the Pulp packages, QPID client software and Augeas to help configuration.
- Lines 15-17: COMMENTED: Install and connect the Docker content plugin
This is commented out at the moment. It hasn't been packaged yet and there are some issues with dependency resolution. I left it here to remind me to put it back when the problems are resolved. - Line 20: Add an Augeas lens definition to manage the Pulp server.conf file
Augeas is suitet for managing config values, when a lens exists. More detail below - Line 23: Add a script to execute the configuration
This will be used by the derived images, but it works the same for all of them - Line 27: Add a script which can test for access to the MongoDB
Pulp will just blindly try to connect, but will just hang if the DB is unavailable. This script allows me to decide to wait or quit if the database isn't ready. If I quit, Kubernetes will re-spawn a new container to try again.
The Pulp Repo
The Pulp server software is not yet in the standard Fedora or EPEL repositories. The packages are available from the contributed repositories on the Fedora project. The repo file is also there, accessible through a URL.
The docker RUN directive can take a URL as well as a local relative file path.
Line 4 pulls the Pulp repo file down and places it so that it can be used in the next step.
Pulp Packages (dependencies and tools)
The Pulp software is easiest installed as a YUM group. I use a Dockerfile RUN directive to install the Pulp packages into the base image. This will install most of the packages needed for the service, but there are a couple of additional packages that aren't part of the package group.
Pulp can serve different types of repository mirrors. These are controlled by content plugins. I add the RPM plugin, python-pulp-rpm-common. I also add a couple of Python QPID libraries. However you can't run both groupinstall and the normal package install command in the same invocation so the additional Python QPID libaries are installed in a second command.
I also want to install Augeas. This is a tool that enables configuration editing using a structured API or CLI command.
Augeas Lens for Pulp INI files
Augeas is an attempt to wrangle the flat file databases that make up the foundation of most *NIX application configuration. It offers a way to access individual key/value pairs within well known configuration files without resorting to tools like sed or perl and regular expressions. With augeas each key/value pair is assigned a path and can be queried and updated using that path. It offers both API and CLI interfaces though it's not nearly as commonly used as it should be.
The down side of Augeas is that it doesn't include a description (lens in Augeas terminology) for Pulp config files. Pulp is too new. The upside is that the Pulp config files are fairly standard INI format, and it's easy to adapt the stock IniFile lens for Pulp.
I won't include the lens text inline here, but I put it in a gist if you want to look at it.
The ADD directive on line 20 of the Dockerfile places the lens file in the Augeas library where it will be found automatically.
Pulp Server Configuration Script
All of the containers that use this base image will need to set a few configuration values for Pulp. These reside in /etc/pulp/server.conf which is an INI formatted text file. These settings indicate the identity of the pulp service itself and how the pulp processes communicate with the database and message bus.
If you are starting a Docker container by hand you could either pass these values in as environment variables using the -e (--env) option or by accepting additional positional arguments through the CMD. You'd have to establish the MongoDB and QPID services then get their IP addresses from Docker and feed the values into the Pulp server containers.
Since Kubernetes is controlling the database and messaging pods and has the Service objects defined, it knows how to tell the Pulp containers where to find these services. It sets a few environment variables for every new container that starts after the service object is created. A new container can use these values to reach the external services it needs.
Line 23 of the Dockerfile adds a short shell script which can accept the values from the environment variables that Kubernetes provides and configure them into the Pulp configuration.
The script gathers the set of values it needs from the variables (or sets reasonable defaults) and then, using augtool (The CLI tool for Augeas) it updates the values in the pulp.conf file.
This is the snippet from the beginning of the configure_pulp_server.sh script which sets the environment variables.
# Take settings from Kubernetes service environment unless they are explicitly
# provided
PULP_SERVER_CONF=${PULP_SERVER_CONF:=/etc/pulp/server.conf}
export PULP_SERVER_CONF

PULP_SERVER_NAME=${PULP_SERVER_NAME:=pulp.example.com}
export PULP_SERVER_NAME

SERVICE_HOST=${SERVICE_HOST:=127.0.0.1}
export SERVICE_HOST

DB_SERVICE_HOST=${DB_SERVICE_HOST:=${SERVICE_HOST}}
DB_SERVICE_PORT=${DB_SERVICE_PORT:=27017}
export DB_SERVICE_HOST DB_SERVICE_PORT

MSG_SERVICE_HOST=${MSG_SERVICE_HOST:=${SERVICE_HOST}}
MSG_SERVICE_PORT=${MSG_SERVICE_PORT:=5672}
MSG_SERVICE_USER=${MSG_SERVICE_USER:=guest}
export MSG_SERVICE_HOST MSG_SERVICE_PORT MSG_SERVICE_NAME
These are the values that the rest of the script will set into /etc/pulp/server.conf
UPDATE: As of the middle of October 2014 the SERVICE_HOST variable has been removed. Now each service gets its own IP address, so the generic SERVICE_HOST variable no longer makes sense. Each service variable must be provided explicitly when testing. Also, for testing the master host will provide a proxy to the service. However, as of this update the mechanism isn't working yet. I'll update this post when is working properly. If you are building from git source you can use a commit prior to 10/14/2014 and you can still use SERVICE_HOST test against the minions.
Container Startup and Remote Service Availability
When the Pulp service starts up it will attempt to connect to a MongoDB and to a QPID message broker. If the database isn't ready, the Pulp service may just hang.
Using Kubernetes it's best not to assume that the containers will arrive in any particular order. If the database service is unavailable, the pulp containers should just die. Kubernetes will notice and attempt to restart them periodically. When the database service is available the next client container will connect successfully and... not. die.
I have added a check script to the base container which can be used to test the availability (and the correct access information) for the MongoDB. It also uses the environment variables provided by Kubernetes when the container starts.
This script merely returns a shell true (return value: 0) if the database is available and false (return value: 1) if it fails to connect. This allows the startup script for the actual pulp service containers to check before attempting to start the pulp process and to cleanly report an error if the database is unavailable before exiting.
I haven't included a script to test the QPID connectivity. So far I haven't seen a pulp service fail to start because the QPID service was unavailable when the client container starts.
Scripts are not executed in the base image
The scripts listed above are provided in the base image, but the the base image has no ENTRYPOINT or CMD directives. It is not meant to be run on its own.
Each of the Pulp service images that uses this base will need to have a run script which will call these common scripts to set up the container environment before invoking the Pulp service processes. That's next.
Using a Base Image: The Pulp-Beat Component
The Pulp service is based on Celery. Celery is a framework for creating distributed task-based services. You extend the Celery framework to add the specific tasks that your application needs.
The task management is controlled by a "beat" process. Each Celery based service has to have exactly one beat server which is derived from the Celery scheduler class.
The beat server is a convenient place to do some of the service setup. Since there can only be one beat server and because it must be created first, I can use the beat service container startup to initialize the database.
The Docker development best-practices encourage image composition by layering. Creating a new layer means creating a new build space with a Dockerfile and any files that will be pulled in when the image is built.
In the case of the pulp-base image all of the content is there. The customizations for the pulp-beat service are just the run script which configures and initializes the the service before starting. The Dockerfile is trivially simple:
In the case of the pulp-base image all of the content is there. The customizations for the pulp-beat service are just the run script which configures and initializes the the service before starting. The Dockerfile is trivially simple:
The real meat is in the run script, though even that is pretty anemic
The main section starts at line 44 and it's really just four steps. Two are defined in the base image scripts and two more are defined here.
- Apply the configuration customizations from the environment
These include setting the PULP_SERVER_NAME and the access parameters for the MongoDB and QPID services - Verify that the MongoDB is up and accessable
With Kubernetes you can't be dependent on ordering of the pod startups. This check allows some time for the DB to start and become available. Kubernetes will restart the beat pod if this fails but the checks here prevent some thrashing. - Initialize the MongoDB
This should only happen once. Within a pulp service the beat server is a singleton. I put the initialization step here so that it won't be confused later. - Execute the master process
This is a celery beat process customized with the Pulp master object
Even though the script line for each operation is fairly trivial I still put them into their own functions. This makes it easier for a reader to understand the logical progression and intent before going back to the function and examining the details. It also makes it easier to comment out a single function for testing and debugging.
Testing the Beat Image (stand-alone)
Since Kubernetes currently gives so little real access debug information for the container startup process I'm going to test the Pulp beat container first as a regular Docker container. I have my Kubernetes cluster running in Vagrant and I know the IP addresses of the MongoDB and QPID services.
The other reason to test in plain Docker is that I want to manually verify the code which picks up and uses the configuration environment variables. There are four variables that will be required and two others that will likely default.
This starts the container as a daemon and mounts /dev/log so that syslog will work. It also sets the PULP_SERVER_NAME and SERVICE_HOST variables.
This shows why I set the -x at the beginning of the run script. It causes the shell to emit each line as it is executed. You can see the environment variables as they are set. Then they are used to configure the pulp server.conf values. The database is checked and then initialized. Finally it executes the celery beat process which replaces the shell and continues executing.
When this script runs it should have several side effects that I can check. As noted, it creates and initializes the pulp database. It also connects to the QPID server and creates several queues. I can check them in the same way I did when I created the MongoDB and QPID images in the first place.
The database has been initialized
And the celery beat service has added a few queues to the QPID service
The other reason to test in plain Docker is that I want to manually verify the code which picks up and uses the configuration environment variables. There are four variables that will be required and two others that will likely default.
- PULP_SERVER_NAME
- SERVICE_HOST
- DB_SERVICE_HOST
- MSG_SERVICE_HOST
The defaulted ones will be
- DB_SERVICE_PORT
- MSG_SERVICE_PORT
DB_SERVICE_HOST and MSG_SERVICE_HOST can be provided directly or can pick up the value of SERVICE_HOST. I want to test both paths.
To test this I'm going to be running the Kubernetes Vagrant cluster on Virtualbox to provide the MongoDB and QPID servers. Then I'll run the Pulp beat server in Docker on the host. I know how to tell the beat server how to reach the services in the Kubernetes cluster (on 10.245.2.{2-4]}).
I'm going to assume that both the pulp-base and pulp-beat images are already built. I'm also going to start the container the first time using /bin/sh so I can manually start the run script and observe what it does.
docker run -d --name pulp-beat -v /dev/log:/dev/log \
>   -e PULP_SERVER_NAME=pulp.example.com \
>   -e SERVICE_HOST=10.245.2.2 markllama/pulp-beat
f16a6f2278e20e0b039cb665bc5f55de39b13a1045f00e25cdab5219652f1d80
This starts the container as a daemon and mounts /dev/log so that syslog will work. It also sets the PULP_SERVER_NAME and SERVICE_HOST variables.
docker logs pulp-beat
+ '[' '!' -x /configure_pulp_server.sh ']'
+ . /configure_pulp_server.sh
++ set -x
++ PULP_SERVER_CONF=/etc/pulp/server.conf
++ export PULP_SERVER_CONF
++ PULP_SERVER_NAME=pulp.example.com
++ export PULP_SERVER_NAME
++ SERVICE_HOST=10.245.2.2
++ export SERVICE_HOST
++ DB_SERVICE_HOST=10.245.2.2
++ DB_SERVICE_PORT=27017
++ export DB_SERVICE_HOST DB_SERVICE_PORT
++ MSG_SERVICE_HOST=10.245.2.2
++ MSG_SERVICE_PORT=5672
++ MSG_SERVICE_USER=guest
++ export MSG_SERVICE_HOST MSG_SERVICE_PORT MSG_SERVICE_NAME
++ check_config_target
++ '[' '!' -f /etc/pulp/server.conf ']'
++ configure_server_name
++ augtool -s set '/files/etc/pulp/server.conf/target[. = '\''server'\'']/server_name' pulp.example.com
Saved 1 file(s)
++ configure_database
++ augtool -s set '/files/etc/pulp/server.conf/target[. = '\''database'\'']/seeds' 10.245.2.2:27017
Saved 1 file(s)
++ configure_messaging
++ augtool -s set '/files/etc/pulp/server.conf/target[. = '\''messaging'\'']/url' tcp://10.245.2.2:5672
Saved 1 file(s)
++ augtool -s set '/files/etc/pulp/server.conf/target[. = '\''tasks'\'']/broker_url' qpid://guest@10.245.2.2:5672
Saved 1 file(s)
+ '[' '!' -x /test_db_available.py ']'
+ wait_for_database
+ DB_TEST_TRIES=12
+ DB_TEST_POLLRATE=5
+ TRY=0
+ '[' 0 -lt 12 ']'
+ /test_db_available.py
Testing connection to MongoDB on 10.245.2.2, 27017
+ '[' 0 -ge 12 ']'
+ initialize_database
+ runuser apache -s /bin/bash /bin/bash -c /usr/bin/pulp-manage-db
Loading content types.
Content types loaded.
Ensuring the admin role and user are in place.
Admin role and user are in place.
Beginning database migrations.
Applying pulp.server.db.migrations version 1
Migration to pulp.server.db.migrations version 1 complete.
...
Applying pulp_rpm.plugins.migrations version 16
Migration to pulp_rpm.plugins.migrations version 16 complete.
Database migrations complete.
+ run_celerybeat
+ exec runuser apache -s /bin/bash -c '/usr/bin/celery beat --workdir=/var/lib/pulp/celery --scheduler=pulp.server.async.scheduler.Scheduler -f /var/log/pulp/celerybeat.log -l INFO'
This shows why I set the -x at the beginning of the run script. It causes the shell to emit each line as it is executed. You can see the environment variables as they are set. Then they are used to configure the pulp server.conf values. The database is checked and then initialized. Finally it executes the celery beat process which replaces the shell and continues executing.
When this script runs it should have several side effects that I can check. As noted, it creates and initializes the pulp database. It also connects to the QPID server and creates several queues. I can check them in the same way I did when I created the MongoDB and QPID images in the first place.
The database has been initialized
echo show dbs | mongo 10.245.2.2
MongoDB shell version: 2.4.6
connecting to: 10.245.2.2/test
local 0.03125GB
pulp_database 0.03125GB
bye
And the celery beat service has added a few queues to the QPID service
qpid-config queues -b guest@10.245.2.4
Queue Name                                     Attributes
======================================================================
0b78268e-256f-4832-bbcc-50c7777a8908:1.0       auto-del excl
411cc98f-eed3-45f9-b455-8d2e5d333262:0.0       auto-del excl
aaf61614-919e-49ea-843f-d83420e9232f:1.0       auto-del excl
celeryev.de500902-4c88-4d5c-90f4-1b4db366613d  auto-del --limit-policy=ring --argument passive=False --argument exclusive=False --argument arguments={}
But what if I do it wrong?
You can see that the output from a correct startup is pretty lengthy. When I'm happy that the image is stable I'll remove the shell -x setting (and make it either an argument or environment switch for later). There are several other paths to test.- Fail to provide Environment Variables
- PULP_SERVER_NAME
- SERVICE_HOST
- DB_SERVICE_HOST
- MSG_SERVICE_HOST
- Fail to import /dev/log volume
Each of these will have slightly different failure modes. I suggest you try each of them and observe how it fails. Think of others, I'm sure I've missed some.
For the purposes of this post I'm going to treat these as exercises for the reader and move on.
Testing the Beat Image (Kubernetes)
Now things get interesting. I have to craft a Kubernetes pod description that creates the pulp-beat container, gives it access to logging and connects it to the database and messaging services.
Because of the way I crafted the base image and run scripts, this isn't actually as difficult or as complicated as you might think. It turns out that the only environment variable I have to actually pass in is the PULP_SERVER_NAME. The rest of the environment values are going to be provided by the kubelet as defined by the Kubernetes service objects (and served by the MongoDB and QPID containers behind them).
The only really significant thing here is the volume imports.Defining the Pulp Beat pod
Pulp uses the python logging mechanism and that in turn by default requires the syslog service. On Fedora 20, syslog is no longer a separate process. It's been absorbed into the systemd suite of low level services and is known now as journald. (cat flamewars/systemd/{pro,con} >/dev/null).
For me this means that for Pulp to run properly it needs the ability to write syslog messages. In Fedora 20 this amounts to being able to write to a special file /dev/log. This file isn't available in containers without some special magic. For Docker that magic is -v /dev/log:/dev/log. This imports the host's /dev/log into the container at the same location. For Kubernetes this is a little bit more involved.
The Kubernetes pod construct has some interesting side-effects. The purpose of pods is to allow the creation of sets of containers that share resources. The JSON reflects this in how the shared resources are declared.
In the pod spec, lines 14-20 are inside the container hash for the container named pulp-beat. They indicate that a volume named "devlog" (line 15) will be mounted read/write (line 16) on /dev/log inside the container (line 17).
Note that this section does not define the named volume or indicate where it will come from. That's defined at the pod level not the container.
Now look at lines 20-23. these are at the pod level (the list of containers has been closed on line 19). The volumes array contains a set of volume definitions. I only define one, named "devlog" (line 21) and indicate that it comes from the host and that the source path is /dev/log.
All that to replace the docker argument -v /dev/log:/dev/log.
Right now this seems like a lot of work for a trivial action. Later this distinction will become very important. The final pod for Pulp will be made up of at least two containers. The pod will import two different storage locations from the host and both containers will mount them.
One last time for clarity: the volumes list is at the pod level. It defines a set of external resources that will be made available to the containers in the pod. The volumeMounts list is at the container level. It maps entries from the volumes section in the pod to mount points inside the container using the value of the name as the connecting handle.
Starting the Pulp Beat Pod
Starting the pulp beat pod is just like starting the MongoDB and QPID pods was. At this point it does require that the Service objects have been created and that the service containers are running, so if you're following along and haven't done that, go do it. Since I'd run my pulp beat container manually and it had modified the mongodb, I also removed the pulp_database before proceeding.
echo 'db.dropDatabase()' | mongo 10.245.2.2/pulp_database
MongoDB shell version: 2.4.6
connecting to: 10.245.2.2/pulp_database
{ "dropped" : "pulp_database", "ok" : 1 }
bye
echo show dbs | mongo 10.245.2.2
MongoDB shell version: 2.4.6
connecting to: 10.245.2.2/test
local 0.03125GB
bye
To start the pulp beat pod we go back to kubecfg (remember, I aliased kubecfg=~/kubernetes/cluster/kubecfg.sh).
kubecfg -c pods/pulp-beat.json create pods
ID                  Image(s)              Host                Labels              Status
----------          ----------            ----------          ----------          ----------
pulp-beat           markllama/pulp-beat   /                   name=pulp-beat      Waiting

kubecfg get pods/pulp-beat
ID                  Image(s)              Host                    Labels              Status
----------          ----------            ----------              ----------          ----------
pulp-beat           markllama/pulp-beat   10.245.2.2/10.245.2.2   name=pulp-beat      Waiting
Now I know that the pod has been assigned to 10.245.2.2 (minion-1) I can log in there directly and examine the docker container.
vagrant ssh minion-1
Last login: Fri Dec 20 18:02:34 2013 from 10.0.2.2
sudo docker ps | grep pulp-beat
2515129f2c7e        markllama/pulp-beat:latest   "/run.sh"              54 seconds ago      Up 53 seconds                                k8s--pulp_-_beat.a6ba93e9--pulp_-_beat.etcd--d2a60369_-_458d_-_11e4_-_b682_-_0800279696e1--0b799f3d
sudo docker logs 2515129f2c7e
+ '[' '!' -x /configure_pulp_server.sh ']'
+ . /configure_pulp_server.sh
++ set -x
++ PULP_SERVER_CONF=/etc/pulp/server.conf
++ export PULP_SERVER_CONF
++ PULP_SERVER_NAME=pulp.example.com
++ export PULP_SERVER_NAME
++ SERVICE_HOST=10.245.2.2
++ export SERVICE_HOST
++ DB_SERVICE_HOST=10.245.2.2
++ DB_SERVICE_PORT=27017
++ export DB_SERVICE_HOST DB_SERVICE_PORT
++ MSG_SERVICE_HOST=10.245.2.2
++ MSG_SERVICE_PORT=5672
++ MSG_SERVICE_USER=guest
++ export MSG_SERVICE_HOST MSG_SERVICE_PORT MSG_SERVICE_NAME
++ check_config_target
++ '[' '!' -f /etc/pulp/server.conf ']'
++ configure_server_name
++ augtool -s set '/files/etc/pulp/server.conf/target[. = '\''server'\'']/server_name' pulp.example.com
Saved 1 file(s)
++ configure_database
++ augtool -s set '/files/etc/pulp/server.conf/target[. = '\''database'\'']/seeds' 10.245.2.2:27017
Saved 1 file(s)
++ configure_messaging
++ augtool -s set '/files/etc/pulp/server.conf/target[. = '\''messaging'\'']/url' tcp://10.245.2.2:5672
Saved 1 file(s)
++ augtool -s set '/files/etc/pulp/server.conf/target[. = '\''tasks'\'']/broker_url' qpid://guest@10.245.2.2:5672
Saved 1 file(s)
+ '[' '!' -x /test_db_available.py ']'
+ wait_for_database
+ DB_TEST_TRIES=12
+ DB_TEST_POLLRATE=5
+ TRY=0
+ '[' 0 -lt 12 ']'
+ /test_db_available.py
Testing connection to MongoDB on 10.245.2.2, 27017
+ '[' 0 -ge 12 ']'
+ initialize_database
+ runuser apache -s /bin/bash /bin/bash -c /usr/bin/pulp-manage-db
Loading content types.
Content types loaded.
Ensuring the admin role and user are in place.
Admin role and user are in place.
Beginning database migrations.
Applying pulp.server.db.migrations version 1
Migration to pulp.server.db.migrations version 1 complete.
...
Applying pulp_rpm.plugins.migrations version 16
Migration to pulp_rpm.plugins.migrations version 16 complete.
Database migrations complete.
+ run_celerybeat
+ exec runuser apache -s /bin/bash -c '/usr/bin/celery beat --workdir=/var/lib/pulp/celery --scheduler=pulp.server.async.scheduler.Scheduler -f /var/log/pulp/celerybeat.log -l INFO'
If this is the first time running the image it may take a while for Kubernetes/Docker to pull it from the Docker hub. There may be a delay as the kubernetes pause container does the pull.
I can now run the same tests I did earlier on the MongoDB and QPID services to reassure myself that the pulp beat service is connected.
echo show dbs | mongo 10.245.2.2
MongoDB shell version: 2.4.6
connecting to: 10.245.2.2/test
local 0.03125GB
pulp_database 0.03125GB
bye

qpid-config queues -b guest@10.245.2.4
Queue Name                                     Attributes
======================================================================
613f4b89-e63e-4230-9620-e932f5a777e5:0.0       auto-del excl
c990ea7b-3d7f-4603-80e5-176ebc649ff1:1.0       auto-del excl
celeryev.ffbc537b-1161-4049-b425-723487135fc2  auto-del --limit-policy=ring --argument passive=False --argument exclusive=False --argument arguments={}
e0155372-12ee-4c9a-9c4d-8f4863601b3a:1.0       auto-del excl
After all that thought and planning the end result is actually kinda boring. Just the way I like it.
What's next?
The pulp-beat service is just the first real pulp component. It runs in isolation from the other components, communicating only through the messaging and database. There is another component like that, the pulp-resource-manager. This is another Celery process and the it is created, started and tested just like the pulp-beat service. I'm going to do one much-shorter post on that for completeness before tackling the next level of complexity.
The two remaining different components are the content pods, which require shared storage and which will have two cooperating containers running inside the pod. One will manage the content mirroring and the other will serve the content out to clients.
I think before that though I will tackle the Pulp Admin service. This is a public facing REST service which accepts pulp admin commands to create and manage the content repositories.
Both of these will require the establishment of encryption, which means placing x509 certificates within the containers. These are the upcoming challenges.
References
- Docker - Containerized applications
- Kubernetes - Orchestration for creating containerized services
- MongoDB - A Non-relational database
- QPID - an AMQP messaging service
Subscribe to:
Posts (Atom)