Showing posts with label openshift. Show all posts

Friday, October 11, 2013

Diversion: Kerberos (FreeIPA) in AWS EC2

One of the things many people are asking for in OpenShift is alternate ways of authenticating SSH and git interactions with the applications gears. Since I'm doing my development work in EC2, I thought that was surely the right place to try it out. Well as usual, it didn't work out quite as simple as I'd planned.

This post isn't about OpenShift directly.  It addresses what I found when I tried to implement FreeIPA in EC2 so that I could develop code to allow Kerberos authentication in OpenShift.

Kerberos in way too few words


Kerberos is an authentication protocol and service defined originally at MIT as part of Project Athena (along with things like the X Windows System and Zephyr, a predecessor to modern IM services). It is meant to provide authenticated on unencrypted and even untrusted networks. Perfect right? Well Kerberos has some quirks.

First, different people can run their own Kerberos services. To avoid conflicts, each service is given an identifier string known as a realm. By convention the realm string is the same as the enterprise DNS domain name. That is, if a company has DNS domain example.com then the Kerberos realm would be EXAMPLE.COM. Unlike DNS domain names, Kerberos realms are case sensitive.

Each participating host must be registered with the Kerberos server and each user must be added to the user list on the server as well. Hosts and users (and any other manageable entity) is identified with a principal. This is basically a name which is unique for each resource, err user, umm host.... thing. The important thing is that the host is identified by a string which is derived from its hostname.

Now wars have been fought over whether a hostname should be the Fully Qualified Domain Name (FQDN) or just the host portion. For Kerberos there is only one answer: FQDN.

The host principal for a given host is composed of the hostname, and the realm. When a client tries to log in, it needs to know the correct principal to request from the server. This is why the FQDN must be the hostname. When the user attempts to log in he must provide both his own principal and the host principal for the destination. The only way to know the destination's host principal is if it is related to the hostname as viewed from the client host.

This is where life gets interesting in AWS EC2.

You see, AWS uses RFC 1918 and something like Network Address Translation to create a private network for the virtual machines which make up the EC2 service. AWS also uses an internal DNS service to identify each virtual machine. This means that from the view of a host inside the private network, the destination host has a different IP address and a different hostname than when viewed from outside the private network. The upshot is that, to use Kerberos with EC2 I need some way to make sure that the user can determine a valid host principal to request regardless of where the user is located.

A Word about IPA and AWS


IPA (and FreeIPA) is not a single service.  It's a collection of services configured so that they work in concert to provide secure user and host access over untrusted networks.  Kerberos is only one of the services, though it is probably the core one.  LDAP, NTP and DNS are all support services which make the operation of Kerberos work.  IPA wraps these services in such a way so that mere mortals don't necessarily need to know how the bindings work merely to get the service running.

In this post I'm dealing almost entirely with the Kerberos service within IPA and I'll refer to that component by name.  Where I mention FreeIPA it will be in reference to the specific tools that FreeIPA provides to set up and manage the conglomerate service.

AWS (Amazon Web Services) is also a suite of services.  The core of that is the EC2 virtual host service. Again, all of the AWS services generally work together, but I'm only dealing with EC2 instances in this post so I'll refer to EC2 specifically unless I'm referring to the full suite.

UPDATE: 2013-11-07 - AWS TOS do not permit open DNS recursion.

One other thing to be aware of when running IPA in AWS.  Amazon terms of service do not allow users to create open recursive DNS services within AWS on the grounds that they can be abused.

When setting up your AWS security policies and the named service on your IPA hosts, be sure to disable recursion and/or limit access to appropriate IP ranges for your DNS clients or you'll get a polite nastygram from Amazon.

Kerberos, Linux and SSH


I want to use Kerberos with SSH so that I can avoid using SSH authorized_keys when pushing git updates to my applications on OpenShift. (mostly ignoring EC2 for now). To do that I need several things set up:

  • A Kerberos (FreeIPA) server - IPA installed, configured
  • A set of users configured into the FreeIPA service
  • A target host (OpenShift node)
For SSH the most important things are that the Kerberos and LDAP configurations are set up properly. This includes configuring sssd, and the /etc/nsswitch.conf settings. Luckly the FreeIPA ipa-client-install script (with the right inputs) will do all of that for me. I think there are ways to get it to tell me precisely what changes it's making but I haven't learned how yet. I do know that I can find the results in the /var/log/ipaclient-install.log.

The other thing I need to do is to make sure that the SSH client and server both will at least try to use the GSSAPI protocol for managing the authentication process. On the server this means making sure that the GSSAPIAuthentication is enabled.

On the client side, I may need to specify that I want to use the gssapi-with-mic authentication method. I may also need to specify the host principal to use to access the destination (as distinct from the hostname from the client's vantage point). More on these later.

EC2 , cloud-init and resisting dynamic naming


The network interface numbering and naming in EC2 are dynamic by design, both on the internal and external interfaces. EC2 does offer "elastic IP" which is really "static IP" for an instance and since I own a DNS zone I can assign a name to the address. Unfortunately this only offers control of the external IP address assigned to an instance. I have to find ways to manage the internal naming myself.
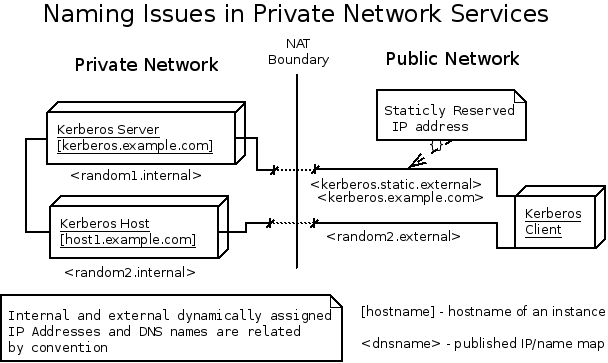


When a host registers with a Kerberos service it generally uses its own hostname as the identifier for the host principal. If this is the same as the DNS name associated with one or more if its IP addresses, this is just by convention. That is, Kerberos doesn't maintain the mapping. So if a host changes its hostname but no changes are made to the Kerberos database, the host can no longer identify itself by it's principal. Also, if the name by which it is known from the outside changes (because the IP address and/or DNS name changed) then clients will no longer know what principal to use to request an access ticket.

There are two factors here: Making sure the host knows its own name, and making sure that users coming from remote hosts can determine the (a?) valid principal (based on the hostname) to request a ticket for.

Maintaining Host Identity


For Kerberos, the hostname is the anchor for a host principal. If the hostname changes on a registered host, it will no longer be able to properly communicate with the Kerberos server and clients. Luckly the Fedora and RHEL images in EC2 use cloud-init to initialize potentially dynamic information on startup.

Cloud-init is software which, when installed on a host, can take input from the cloud environment and customize the host to integrate it into the environment. It can do things like.. oh, say, set the IP address of network interfaces and hostnames, install SSH host keys, set device mount points and the like. It will also allow me to tell it not to update the hostname on each reboot.

The main configuration for cloud-init is /etc/cloud/cloud.cfg. I just need to add a line containing 'preserve_hostname: 1' and set the hostname I want in /etc/hostname. From then on, restarts or reboots will keep the hostname I set. Given that value I have my anchor for registering the host with the kerberos server and maintaining the host/principal mapping.

The host now always knows its own name: part one solved.

The view from Inside/Outside


You do learn something every day. In talking with some of the FreeIPA developer folks I learned something I hadn't known about how the Kerberos protocol works. ;Here's the important bit.

When client wants to gain access to some resource, it sends a message to the kerberos server saying "I am this principal and I want access to that one over there, ok?" The Kerberos server sends back a signed/encrypted ticket with both names (principals) wrapped inside it. The client then sends the ticket in an authentication request to the destination host, who verifies "yep, that's me, and I can see that that's you, let me check are you allowed?" and if the answer is "yes" the client request is granted.

What this means is that the client must know the name (principal) of the destination resource before attempting to connect to the resource. It must know a name that both the kerberos server and the resource host itself will recognize. When everyone uses DNS FQDNs to identify hosts and they have the same view of DNS, this works nicely. Accessing private network resources from a public network creates some issues.

Most tools, SSH included, assume that they can compose a host principal from the hostname given by the user. So if a client was using realm EXAMPLE.COM and tried to reach a remote host with FQDN 'destination.example.com' the principal would be host/destination.example.com@EXAMPLE.COM. But since the EC2 hosts have (not one but two) random hostnames assigned when they boot, it's impossible to know from the hostname alone what the principal of the destination is.

If I happen to know the mapping (ie, what principal is associated with the destination host) then SSH allows me to specify that with -oGSSAPIServerIdentity=<principal> on the CLI or in a Host entry in my .ssh/config file. From the illustration above, to properly authenticate with the Kerberos Host I could do this:

ssh -oPreferredAuthentications=gssapi-with-mic -oGSSAPIServerIdentity=host1.example.com random2.external

(this also assumes that my local hostname and remote one are the same and that I've got a ticket-granting-ticket for the EXAMPLE.COM realm using kinit.)

What this says is to log into a host who's name (from this view) is random2.internal, and who's principal is host1.example.com. With that the local client can send a query to the Kerberos server and get the right ticket back to hand to the destination host. It can say "yep, that's me and yep you're you, and yep you're allowed"

The Many Faces of Kerberos


It's totally coincidence that Cerberos is the 3-headed dog that guards the landing in Hades on the river Styx and I'm going to add two "faces" to my kerberos clients. Totally.

I think that in the discussion above I've been careful to make it clear that a Kerberos principal is an identifier. That is, it is a handle which is used to refer to an object in the Kerberos database which corresponds to an object in reality. I have nick names. Hosts in Kerberos can have them too, and this is going to solve my identity problem with random dynamic names and IP addresses.

I've managed to give each host a fixed hostname, thanks to cloud-init. Once I know the dynamic names both public and internal I should be able to inform the Kerberos server of both of the aliases.

If this works, here's what will happen when I try to log in either from a host inside or outside the private network, my SSH client will form a principal from the (DNS) name I offer. My client will send that to the Kerberos server and request an access ticket to the remote host using the alias principal. And the Kerberos server will know which host that means. It will create an access ticket which will grant me access to the destination host, which will examine it and on finding everything in order, will allow my SSH connection.

It turns out that FreeIPA doesn't yet have a nice Web or CLI user interface to add principals to a registered host record, but the Kerberos database is stored in an LDAP server on the Kerberos master host. For now I (or a friend actually) can craft an LDAP query which will add the principals I need to the host record. This is assumed to be run on

kerberos# ldapmodify -h localhost -x -D "cn=Directory Manager" -W @lt;@lt;EOF
dn: fqdn=host1.example.com,cn=computers,cn=accounts,dc=example,dc=com
changetype: modify
add: krbprincipalname
krbprincipalname: host/random2.external@EXAMPLE.COM
krbprincipalname: host/random2.internal@EXAMPLE.COM
EOF

The invocation above will request the password of the admin user for the FreeIPA LDAP service. I'm sure there's a way to do it with Kerberos/GSSAPI, but I haven't got it yet.

What that change does is add two Kerberos principal names to the host entry for host1.example.com. The principal names match what an SSH client would construct using the DNS name (internal or external) to reach the target host. Now when the Kerberos server gets a ticket request from clients either inside or outside the private network, the principal in the ticket request will be associated with a known host.

The Devil's in the Dynamics


This is all fine so long as host1.example.com doesn't reboot. When it does, AWS will assign it a new internal and external IP address and new DNS names. It would be really nice if the host, when it boots could inform the Kerberos service what its new internal and external principal names are.

I don't currently know how to do this, but I suspect that I could add a module to cloud-init to do the job. The client is already configured to use the LDAP service on the Kerberos (FreeIPA) server. Once the server knows that all three principals refer to the same host life should be good.

Now to learn some cloud-init finagling and enough Kerberos so that I can have the host update itself on reboot.


What does this mean for OpenShift?


If you want to run an OpenShift service in AWS and you want to offer Kerberos authentication for SSH/git to the application gears, you'll have to do a little LDAP tweaking of the Kerberos principals associated with each host so that the Kerberos service will know which host you mean regardless of your view of the destination host.

The first round of Kerberos integration code is going into OpenShift Origin as I write this (the pull requst is submitted and getting commentary).  By the next release it should be possible to manage developer access to gears with Kerberos and FreeIPA.  Additional use cases will be added over time.

Summary


  • Cloud services like AWS and corporate networks often rely on private network spaces and Network Address Translation to manage dynamic hosts.
  • Cloud Init usually updates the hostname on each boot but this can be suppressed.
  • For a client trying to reach a host for SSH this poses a problem because the view of the destination from the client differs based on where the client sits in relation to the network boundary.
  • Kerberos can assign multiple principals to a single host, which allows authentication to work.

References

  • FreeIPA - A component based single-sign-on service 
  • Kerberos - The authentication component of FreeIPA and MIT Project Athena
  • GSSAPI - A standardized generic authentication and access control protocol
  • Project Athena - 1980s MIT/DEC/IBM project to design network services and protocols
  • RFC 1918 - Private non-routable IP address space reservations
  • Network Address Translation - Private network boundary system
  • AWS Elastic IP - AWS static IP addresses for dynamic hosts
  • Cloud Init - A service for customizing host configuration on reboot

Friday, September 27, 2013

Broker-Node interaction and visibility - Debugging "missing" cartridges on a node.

In the previous post I set up the end-point messaging for OpenShift. (Broker -> Messaging -> Node). I showed a simple use of the MCollective mco command and where the MCollective log files are. The last step was to send an echo message to the OpenShift agent on an OpenShift node and get the response back.

Now I have my OpenShift broker and node set up (I think) but something's not right and I have to figure out what.

DISCLAIMER: this post isn't a "how to" it's a mostly-stream-of-consciousness log of my attempt to answer a question and understand what's going on underneath.  It's messy.  It may cast light on some of the moving parts.  It may also lead me to a confrontation with The Old Man From Scene 24 and we all know how that ends. You have been warned.

In the paragraphs below I include a number of CLI invocations and their responses.  I include a prompt at the beginning of each one to indicate where (on which host) the CLI command is running.

  • broker$ - the command is running on my OpenShift broker host
  • node$ - the command is running on my OpenShift node host
  • dev$ - the command is running on my laptop

I've also got a copy of the origin-server source code checked out from the repository on Github.

I've got my rhc client already configured for my test user (cleverly named 'testuser') and my broker (using the libra_server variable). See ~/.openshift/express.conf if needed.

What's going on here?

I started trying to access the Broker with the rhc CLI command to create a user, register a namespace and then create an application. I'd like to create a python app and I've installed the openshift-origin-cartridge-python package to provide that app framework. But when I try to create my app I'm told that Python is not available:


client$ rhc create-app testapp1 python
Short Name Full name
========== =========

There are no cartridges that match 'python'.

So I figure I'll ask what cartridges ARE available:

client$ rhc cartridges

Note: Web cartridges can only be added to new applications.

Now, when I look for cartridge packages on the node I get a different answer:

node$ rpm -qa | grep cartridge
openshift-origin-cartridge-abstract-1.5.9-1.fc19.noarch
openshift-origin-cartridge-cron-1.15.2-1.git.0.aa68436.fc19.noarch
openshift-origin-cartridge-php-1.15.2-1.git.0.090a445.fc19.noarch
openshift-origin-cartridge-python-1.15.1-1.git.0.0eb3e95.fc19.noarch

Somehow, when the broker is asking the node to list its cartridges, the node isn't answering correctly. Why?

I'm going to see if I can observe the broker making the query to list the nodes and then see if I can determine where the node is (or isn't) getting its answer.

Refresher: MCollective RPC and OpenShift


MCollective is really an RPC (Remote Procedure Call) mechanism. It defines the interface for a set of functions to be called on the remote machine. The client submits a function call which is sent to the server. The server executes the function on behalf of the client and then returns the result.

The OpenShift client adds one more level of indirection and I want to get that out of the way. I can look at the logs on the broker and node to see what activity was caused when the rhc command issued the cartridge list query.

The broker writes its logs into several files in /var/log/openshift/broker. You can see the REST queries arrive and resolve in the Rails log file /var/log/openshift/broker/production.log.

broker$ sudo tail /var/log/openshift/broker/production.log
...
2013-09-26 17:54:06.445 [INFO ] Started GET "/broker/rest/api" for 127.0.0.1 at 2013-09-26 17:54:06 +0000 (pid:16730)
2013-09-26 17:54:06.447 [INFO ] Processing by ApiController#show as JSON (pid:16730)
2013-09-26 17:54:06.453 [INFO ] Completed 200 OK in 6ms (Views: 3.6ms) (pid:16730)
2013-09-26 17:54:06.469 [INFO ] Started GET "/broker/rest/api" for 127.0.0.1 at 2013-09-26 17:54:06 +0000 (pid:16730)
2013-09-26 17:54:06.470 [INFO ] Processing by ApiController#show as JSON (pid:16730)
2013-09-26 17:54:06.476 [INFO ] Completed 200 OK in 6ms (Views: 3.8ms) (pid:16730)
2013-09-26 17:54:06.504 [INFO ] Started GET "/broker/rest/cartridges" for 127.0.0.1 at 2013-09-26 17:54:06 +0000 (pid:16730)
2013-09-26 17:54:06.507 [INFO ] Processing by CartridgesController#index as JSON (pid:16730)
2013-09-26 17:54:06.509 [INFO ] Completed 200 OK in 1ms (Views: 0.4ms) (pid:16730)

From that I can see that my rhc calls are arriving and apparently the response is being returned OK.

The default settings for the MCollective client (on the OpenShift broker) don't go to a log file. I can check the OpenShift node though to see what's happened there and if it has received a query for the list of installed cartridges.

node$ sudo grep cartridge /var/log/mcollective.log | tail -3
I, [2013-09-26T17:10:23.696825 #9827]  INFO -- : openshift.rb:1217:in `cartridge_repository_action' action: cartridge_repository_action, agent=openshift, data={:action=>"list", :process_results=>true}
I, [2013-09-26T17:29:10.768487 #9827]  INFO -- : openshift.rb:1217:in `cartridge_repository_action' action: cartridge_repository_action, agent=openshift, data={:action=>"list", :process_results=>true}
I, [2013-09-26T17:29:24.957806 #9827]  INFO -- : openshift.rb:1217:in `cartridge_repository_action' action: cartridge_repository_action, agent=openshift, data={:action=>"list", :process_results=>true}

This too looks like the message has been received and processed properly and returned.

Hand Crafting An mco Message


Here's where that MCollective RPC interface definition comes in. I can look at that to see how to generate the cartridge list query using mco so that I can observe both ends and track down what's happening.

There are really two things to look for here:

  1. What message is sent (and how do I duplicate it)?
  2. What action does the agent take when it receives the message?

For part one, MCollective defines the RPC interfaces in a file with a .ddl extension.  Looking for one of those in the openshift-server Github repository finds me this: origin-server/msg-common/agent/openshift.ddl 

Of particular interest are lines 390-397. These define the cartridge_repository action and the set of operations it can perform: install, list, erase


Taking that, I can craft an mco rpc message to duplicate what the broker is doing when it queries the nodes:

mco rpc openshift cartridge_repository action=list
Discovering hosts using the mc method for 2 second(s) .... 1

 * [ ==========================================================> ] 1 / 1


ec2-54-211-74-85.compute-1.amazonaws.com 
   output:


Finished processing 1 / 1 hosts in 32.15 ms

Yep, it still says "none".  When I go back and look at the logs, it shows the same query I was looking at, so I think I got that right.

But What Does It DO?


Now that I can send the query message, I need to find out what happens on the other end to generate the response.  My search begins in the node messaging plugin for MCollective, particularly in the agent module code (in plugins/msg-node/mcollective/src/openshift.rb).  This defines a function cartridge_repository_action which... doesn't actually do the work, but points me to the next piece of code which actually does implent the function.

It appears that the OpenShift node implements a class ::OpenShift::Runtime::CartridgeRepository which is a factory for an object that actually produces the answer. A quick look in the source repository shows me the file that defines the CartridgeRepository class.

dev$ cd ~/origin-server
dev$ find . -name \*.rb | xargs grep 'class CartridgeRepository' 
./node/test/functional/cartridge_repository_func_test.rb:  class CartridgeRepositoryFunctionalTest < NodeTestCase
./node/test/functional/cartridge_repository_web_func_test.rb:class CartridgeRepositoryWebFunctionalTest < OpenShift::NodeTestCase
./node/test/unit/cartridge_repository_test.rb:class CartridgeRepositoryTest < OpenShift::NodeTestCase
./node/lib/openshift-origin-node/model/cartridge_repository.rb:    class CartridgeRepository


So, on the node, when a query is received for the list of cartridges that is present, the MCollective agent for OpenShift creates one of the CartridgeRepository objects and then asks it for the list.

A quick look at the cartridge_repository.rb file on Github is enlightening. First, the file has 60 lines of excellent commentary before the code starts. Line 86 indicates that the CartridgeRepository object will look for cartridges in /var/lib/openshift/.cartridge_repository (while noting that this location should be configurable in the /etc/openshift/node.conf someday). And lines 170-189 define the install method which seems to populate the cartridge_repository from some directory which is provided as an argument.

But when does CartridgeRepository.install get invoked? Well, since CartridgeRespository is a factory and a Singleton (which provides the instance() method for initialization) I can look for where it's instantiated:

dev$ find . -type f | xargs grep -l OpenShift::Runtime::CartridgeRepository.instance | grep -v /test/
./plugins/msg-node/mcollective/src/openshift.rb
./node-util/bin/oo-admin-cartridge
./node/lib/openshift-origin-node/model/upgrade.rb

Note that I remove all of the files in the test directories using grep -v /test/. What remains are the working files which actually instantiate a CartridgeRepository object.  If I also check for a call to the install() method, the list is reduced to one file:

find . -type f | xargs grep  OpenShift::Runtime::CartridgeRepository.instance | grep -v /test/  | grep install
./plugins/msg-node/mcollective/src/openshift.rb:              ::OpenShift::Runtime::CartridgeRepository.instance.install(path)

So, it looks like the node messaging module is what populates the OpenShift cartridge repository.  When I looked earlier though, it didn't seem to have done that.  Messaging is running and I've installed cartridge RPMs and I can successfully query for (what turns out to be) an empty database of cartridge information.

Finally! When I look at plugins/msg-node/mcollective/src/openshift.rb lines 26-45 I find what I'm looking for. CartridgeRepository.install is called when the MCollective openshift agent is loaded. That is: when the MCollective service starts.

It turns out that I'd started and began testing the MCollective service before installing any of the OpenShift cartridge packages. Restarting MCollective populates the .cartridge_repository directory and now my mco rpc queries indicate the cartridges I've installed.

Verifying the Change

So, I think, based on the code I've found, that when I restart the mcollective daemon on my OpenShift node, it will look in /usr/libexec/openshift/cartridges and it will use the contents to populate /var/lib/openshift/.cartridge_repository (not sure why that's hidden, but..).

node$ ls /var/lib/openshift/.cartridge_repository
redhat-cron  redhat-php  redhat-python

DING!

Now when I query with mco, I should see those.  And I do:

broker$ mco rpc openshift cartridge_repository action=list
Discovering hosts using the mc method for 2 second(s) .... 1

 * [ ==========================================================> ] 1 / 1


ec2-54-211-74-85.compute-1.amazonaws.com 
   output: (redhat, php, 5.5, 0.0.5)
           (redhat, python, 2.7, 0.0.5)
           (redhat, python, 3.3, 0.0.5)
           (redhat, cron, 1.4, 0.0.6)


Finished processing 1 / 1 hosts in 29.41 ms

I suspect that the OpenShift broker also caches these values, so I might have to restart the openshift-broker service on the broker host as well.  Then I can use rhc in my development environment to see what cartridges I can use to create an application.

dev$ rhc cartridges
php-5.5    PHP 5.5    web
python-2.7 Python 2.7 web
python-3.3 Python 3.3 web
cron-1.4   Cron 1.4   addon

Note: Web cartridges can only be added to new applications.

And when I try to create a new application:

$ rhc app-create testapp1 python-2.7

Application Options
-------------------
  Namespace:  testns1
  Cartridges: python-2.7
  Gear Size:  default
  Scaling:    no

Creating application 'testapp1' ... done


Waiting for your DNS name to be available ...


Well, that's better than before!

What I learned:

  • rhc is configured using ~/.openshift/express.conf
  • look at the logs
    • OpenShift broker: /var/log/openshift/broker/production.log
    • mcollective server: /var/log/mcollective.log
  • the mcollective client mco can be used to simulate broker activity
    • mco plugin doc - list all plugins available
    • mco plugin doc openshift - list OpenShift RPC actions and parameters
    • mco rpc openshift cartridge_repository action=list
      query all nodes for their cartridge repository contents
  • source code is useful
    • OpenShift source repository: https://github.com/openshift/origin-server
    • judicious use of find and grep can narrow problem searches
  • cartridge RPMs are installed in /usr/libexec/openshift/cartridges
  • cartridges are "installed" in /var/lib/openshift/.cartridge_repository
  • adding cartridges to a node requires a restart for the mcollective service

Monday, September 23, 2013

OpenShift Support Services: Messaging Part 2 (MCollective)

About a year ago I did a series of posts on verifying the plugin operations for OpenShift Origin support services. I showed how to check the datastore (mongodb) and DNS updates and how to set up an ActiveMQ message broker , but I when I got to actually sending and receiving messages I got stuck.

The Datastore and DNS services use a single point-to-point connection between the broker and the update server. The messaging services use an intermediate message broker (ActiveMQ, not to be confused with the OpenShift broker). This means that I need to configure and check not just one points, but three:

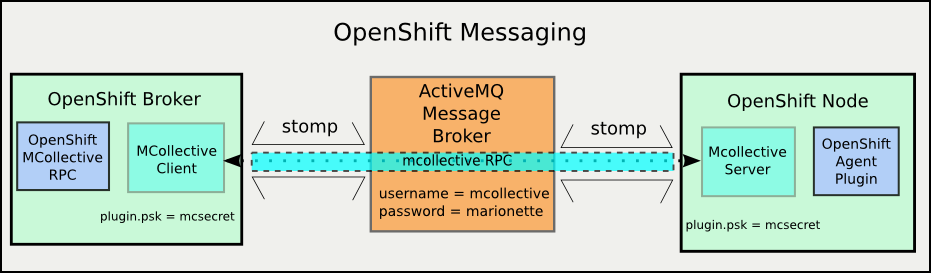
  • Mcollective client to (message) broker (on OpenShift broker)
  • Mcollective server to (message) broker (on OpenShift node)
  • End to End

I'm using the ActiveMQ message broker to carry MCollective RPC messages. The message broker is interchangeable. MCollective can be carried over any one of several messaging protocols. I'm using the Stomp protocol for now, though MCollective is deprecating Stomp in favor of a native ActiveMQ (AMQP?) messaging protocol.

OpenShift Messaging Components


In a previous post I set up an ActiveMQ message broker to be used for communication between the OpenShift broker and nodes. In this one I'm going to connect the OpenShift components to the messaging service, verify both connections and then verify that I can send messages end-to-end.

Hold on for the ride, it's a long one (even for me)

Mea Culpa: I'm referring to what MCollective does as "messaging" but that's not strictly true. ActiveMQ, RabbitMQ, QPID are message broker services. MCollective uses those, but actually, MCollective is an RPC (Remote Procedure Call) system. Proper messaging is capable of much more than MCollective requires, but to avoid a lot of verbal knitting I'm being lazy and calling MCollective "messaging".

The Plan

Since this is a longer process than any of my previous posts, I'm going to give a little road-map up front so you know you're not getting lost on the way. Here are the landmarks between here and a working OpenShift messaging system:
  1. Ingredients: Gather configuration information for messaging setup.
  2. Mcollective Client -
    Establish communications between the Mcollective client  and the ActiveMQ server
    (OpenShift broker host to message broker host)
  3. MCollective Server -
    Establish communications beween the MCollective server and the ActiveMQ server
    (OpenShift node host to message broker host)
  4. MCollective End-To-End -
    Verify MCollective communication from client to server
  5. OpenShift Messaging and Agent -
    Install OpenShift messaging interface definition and agent packages on both OpenShift broker and node

Ingredients

VariableValue
ActiveMQ Servermsg1.infra.example.com
Message Bus
topic usernamemcollective
topic passwordmarionette
admin passwordmsgadminsecret
Message End
passwordmcsecret
  • A running ActiveMQ service
  • A host to be the MCollective client (and after that an OpenShift broker)
  • A host to run the MCollective service (and after that an OpenShfit node)
On the Mcollective client host, install these RPMs
  • mcollective-client
  • rubygem-openshift-origin-msg-broker-mcollective
On the MCollective server (OpenShift node) host, install these RPMs
  • mcollective
  • openshift-origin-msg-node-mcollective

Secrets and more Secrets


As with all secure network services, messaging requires authentication. Messaging has a twist though. You need two sets of authentication information, because, underneath, you're actually using two services. When you send a message to an end-point, the end point has to be assured that you are someone who is allowed to send messages. Like with a letter, having some secret code or signature so that you can be sure the letter isn't forged.

Now imagine a special private mail system. Before the mail carrier will accept a letter, you have to give them the secret handshake so that they know you're allowed to send letters. On the delivery end, the mail carrier requires not just a signature but a password before handing over the letter.

That's how authentication works for messaging systems.

When I set up the ActiveMQ service I didn't create a separate user for writing to the queue (sending a letter) and for reading (receiving) but I probably should have. As it is, getting a message from the OpenShift broker to an OpenShift node through MCollective and ActiveMQ requires two passwords and one username.

  • mcollective endpoint secret
  • ActiveMQ username
  • ActiveMQ password

The ActiveMQ values will have to match those I set on the ActiveMQ message broker in the previous post. The MCollective end point secret is only placed in the MCollective configuration files. You'll see those soon.

MCollective Client (OpenShift Broker)


The OpenShift broker service sends messages to the OpenShift nodes. All of the messages (currently) originate at the broker. This means that the nodes need to have a process running which connects to the message broker and registers to receive MColletive messages.

Client configuration: client.cfg


The MCollective client is (predictably) configured using the /etc/mcollective/client.cfg file. For the purpose of connecting to the message broker, only the connector plugin values are interesting, and for end-to-end communications I need the securityprovider plugin as well. The values related to logging are useful debugging too.


# Basic stuff
topicprefix     = /topic/
main_collective = mcollective
collectives     = mcollective
libdir          = /usr/libexec/mcollective
loglevel        = log   # just for testing, normally 'info'

# Plugins
securityprovider = psk
plugin.psk       = mcsecret

# Middleware
connector         = stomp
plugin.stomp.host = msg1.infra.example.com
plugin.stomp.port = 61613
plugin.stomp.user = mcollective
plugin.stomp.user = marionette

NOTE:if you're running on RHEL6 or CentOS 6 instead of Fedora you're going to be using the SCL version of Ruby and hence MCollective. The file is then at the SCL location:

/opt/rh/ruby193/root/etc/mcollective/client.cfg

Now I can test connections to the ActiveMQ message broker, though without any servers connected, it won't be very exciting (I hope).

Testing client connections


MCollective provides a command line tool for sending messages: mco . mco is capable of several other 'meta' operations as well. The one I'm interested in first is 'mco ping'. With mco ping I can verify the connection to the ActiveMQ service (via the Stomp protocol) .

The default configuration file is owned by root and is not readable by ordinary users. This is because it contains plain-text passwords (There are ways to avoid this, but that's for another time). This means I have to either run mco commands as root, or create a config file that is readable. I'm going to use sudo to run my commands as root.

The mco ping command connects to the messaging service and asks all available MCollective servers to respond. Since I haven't connected any yet, I won't get any answers, but I can at least see that I'm able to connect to the message broker, send queries. If all goes well I should get a nice message saying "no one answered".


sudo mco ping


---- ping statistics ----
No responses received

If that's what you got, feel free to skip down to the MCollective Server section.

Debugging client-side configuration errors


There are a couple of obvious possible errors:
  1. Incorrect broker host
  2. broker service not answering
  3. Incorrect messaging username/password
The first two will appear the same to the MCollective client. Check the simple stuff first. If I'm sure that the host is correct then I'll have to diagnose the problem on the other (and write another blog post). Here's how that looks:

sudo mco ping
connect to localhost failed: Connection refused - connect(2) will retry(#0) in 5
connect to localhost failed: Connection refused - connect(2) will retry(#1) in 5
connect to localhost failed: Connection refused - connect(2) will retry(#2) in 5
^C
The ping application failed to run, use -v for full error details: Could not connect to Stomp Server: 

Note the message Could not connect to the Stomp Server.

If you get this message, check these on the OpenShift broker host:

  1. The plugin.stomp.host value is correct
  2. The plugin.stomp.port value is correct
  3. The host value resolves to an IP address in DNS
  4. The ActiveMQ host can be reached from the OpenShift Broker host (by ping or SSH)
  5. You can connect to Stomp port on the ActiveMQ broker host
    telnet msg1.example.com 61613 (yes, telnet is a useful tool) 

If all of these are correct, then look on the ActiveMQ message broker host:

  1. The ActiveMQ service is running
  2. The Stomp transport TCP ports match the plugin.stomp.port value
  3. The host firewall is allowing inbound connections on the Stomp port

The third possibility indicates an information or configuration mismatch between the MCollective client configuration and the ActiveMQ server.  That will look like this:

sudo mco ping
transmit to msg1.infra.example.com failed: Broken pipe
connection.receive returning EOF as nil - resetting connection.
connect to localhost failed: Broken pipe will retry(#0) in 5

The ping application failed to run, use -v for full error details: Stomp::Error::NoCurrentConnection

You can get even more gory details by changing the client.cfg to set the log level to debug and send the log output to the console:

...
loglevel = debug # instead of 'log' or 'info'
logger_type = console # instead of 'file', or 'syslog' or unset (no logging)
...

I'll spare you what that looks like here.

MCollective Server (OpenShift Node)


The mcollective server is a process that connects to a message broker, subscribes to (registers to receive messages from) one or more topics and then listens for incoming messages. When it accepts a message, the mcollective server passes it to a plugin module for execution and then returns any response.  All OpenShift node hosts run an MCollective server which connects to one or more of the ActiveMQ message brokers.

Configure the MCollective service daemon: server.cfg 


I bet you have already guessed that the MCollective server configuration file is /etc/mcollective/server.cfg

# Basic stuff
topicprefix     = /topic/
main_collective = mcollective
collectives     = mcollective
libdir          = /usr/libexec/mcollective
logfile         = /var/log/mcollective.log
loglevel        = debug # just for setup, normally 'info'
daemonize       = 1
classesfile     = /var/lib/puppet/state/classes.txt

# Plugins
securityprovider = psk
plugin.psk       = mcsecret

# Registration
registerinterval = 300
registration     = Meta

# Middleware
connector         = stomp
plugin.stomp.host = msg1.infra.example.com
plugin.stomp.port = 61613
plugin.stomp.user = mcollective
plugin.stomp.password = marionette


# NRPE
plugin.nrpe.conf_dir  = /etc/nrpe.d

# Facts
factsource = yaml
plugin.yaml = /etc/mcollective/facts.yaml

NOTE: again the mcollective config files will be in /opt/rh/ruby193/root/etc/mcollective/ if you are running on RHEL or CentOS.

The server configuration looks pretty similar to the client.cfg. The securityprovider plugin must have the same values, because that's how the server knows that it can accept a message from the clients. The plugin.stomp.* values are the same as well, allowing the MCollective server to connect to the ActiveMQ service on the message broker host. It's really a good idea for the logfile value to be set so that you can observe the incoming messages and their responses. The loglevel is set to debug to start so that I can see all the details of the connection process. Finally the daemonize value is set to 1 so that the mcollectived will run as a service.

The mcollectived will complain if the YAML file does not exist or if the Meta registration plugin is not installed and selected. Comment those out for now. They're out of scope for this post.

Running the MCollective service


When you're satisfied with the configuration, start the mcollective service and verify that it is running:


sudo service mcollective start
Redirecting to /bin/systemctl start  mcollective.service
ps -ef | grep mcollective
root     13897     1  5 19:37 ?        00:00:00 /usr/bin/ruby-mri /usr/sbin/mcollectived --config=/etc/mcollective/server.cfg --pidfile=/var/run/mcollective.pid

You should be able to confirm the connection to the ActiveMQ server in the log.

sudo tail /var/log/mcollective.log 
I, [2013-09-19T19:53:21.317197 #16544]  INFO -- : mcollectived:31:in `
' The Marionette Collective 2.2.3 started logging at info level I, [2013-09-19T19:53:21.349798 #16551] INFO -- : stomp.rb:124:in `initialize' MCollective 2.2.x will be the last to fully support the 'stomp' connector, please migrate to the 'activemq' or 'rabbitmq' connector I, [2013-09-19T19:53:21.357215 #16551] INFO -- : stomp.rb:82:in `on_connecting' Connection attempt 0 to stomp://mcollective@msg1.infra.example.com:61613 I, [2013-09-19T19:53:21.418225 #16551] INFO -- : stomp.rb:87:in `on_connected' Conncted to stomp://mcollective@msg1.infra.example.com:61613 ...

If you see that, you can skip down again to the next section, MCollective End-to-End

Debugging MCollective Server Connection Errors


Again the two most likely problems are that the host or the stomp plugin are mis-configured.


sudo tail /var/log/mcollective.log
I, [2013-09-19T20:05:50.943144 #18600]  INFO -- : stomp.rb:82:in `on_connecting' Connection attempt 1 to stomp://mcollective@msg1.infra.example.com:61613
I, [2013-09-19T20:05:50.944172 #18600]  INFO -- : stomp.rb:97:in `on_connectfail' Connection to stomp://mcollective@msg1.infra.example.com:61613 failed on attempt 1
I, [2013-09-19T20:05:51.264456 #18600]  INFO -- : stomp.rb:82:in `on_connecting' Connection attempt 2 to stomp://mcollective@msg1.infra.example.com:61613
...

If I see this, I need to check the same things I would have for the client connection. On the MCollective server host:

  • plugin.stomp.host is correct
  • plugin.stomp.port matches Stomp transport TCP port on the ActiveMQ service
  • Hostname resolves to an IP address
  • ActiveMQ host can be reached from the MCollective client host (ping or SSH)

On the ActiveMQ message broker:

  • ActiveMQ service is running
  • Any firewall rules allow inbound connections to the Stomp TCP port
The other likely error is username/password mismatch. If you see this in your mcollective logs, check the ActiveMQ user configuration and compare it to your mcollective server plugin.stomp.user and plugin.stomp.password values.

...
I, [2013-09-19T20:15:13.655366 #20240]  INFO -- : stomp.rb:82:in `on_connecting'
 Connection attempt 0 to stomp://mcollective@msg1.infra.example.com:61613
I, [2013-09-19T20:15:13.700844 #20240]  INFO -- : stomp.rb:87:in `on_connected' 
Conncted to stomp://mcollective@msg1.infra.example.com:61613
E, [2013-09-19T20:15:13.729497 #20240] ERROR -- : stomp.rb:102:in `on_miscerr' U
nexpected error on connection stomp://mcollective@msg1.infra.example.com:61613: es_trans: transmit
 to msg1.infra.example.com failed: Broken pipe
...

MCollective End-to-End

Now that I have both the MCollective client and server configured to connect to the ActiveMQ message broker I can confirm the connection end to end. Remember that 'mco ping' command I used earlier? When there are connected servers, they should answer the ping request.

 sudo mco ping
node1.infra.example.com time=138.60 ms


---- ping statistics ----
1 replies max: 138.60 min: 138.60 avg: 138.60 

OpenShift Node 'plugin' agent

Now I'm sure that both MCollective and ActiveMQ are working end-to-end between the OpenShift broker and node. But there's no "OpenShift" in there yet.  I'm going to add that now.

There are three packages that specifically deal with MCollective and interaction with OpenShift:

  • openshift-origin-msg-common.noarch (misnamed, specifically mcollective)
  • rubygem-openshift-origin-msg-broker-mcollective
  • openshift-origin-msg-node-mcollective.noarch

The first package defines the messaging protocol for OpenShift.  It includes interface specifications for all of the messages, their arguments and expected outputs.  This is used on both the MCollective client and server side to produce and validate the OpenShift messages. The broker package defines the interface that the OpenShift broker (a Rails application) uses to generate messages to the nodes and process the returns. The node package defines how the node will respond when it receives each message.

The OpenShift node also requires several plugins that, while not required for messaging per-se, will cause the OpenShift agent to fail if they are not present
  • rubygem-openshift-origin-frontend-nodejs-websocket
  • rubygem-openshift-origin-frontend-apache-mod-rewrite
  • rubygem-openshift-origin-container-selinux
When these packages are installed on the OpenShift broker and node, mco will have a new set of messages available. MCollective calls added sets of messages... (OVERLOAD!) 'plugins'.  So, to see the available message plugins, use mco plugin doc.  To see the messages in the openshift plugin, use mco plugin doc openshift.

Mcollective client: mco


I've used mco previously just to send a ping message from a client to the servers.  This just collects a list of the MCollective servers listening. The mco command can also send complete messages to remote agents.  Now I need to learn how to determine what agents and messages are available and how to send them a message.  Specifically, the OpenShift agent has an echo message which simply returns a string which was sent in the message.  Now that all of the required OpenShift messaging components are installed, I should be able to tickle the OpenShift agent on the node from the broker.  This is what it looks like when it works properly:

sudo mco rpc openshift echo msg=foo
Discovering hosts using the mc method for 2 second(s) .... 1

 * [ ========================================================> ] 1 / 1


node1.infra.example.com 
   Message: foo
      Time: nil


Finished processing 1 / 1 hosts in 25.49 ms

As you might expect, this has more than its fair share of interesting failure modes.  The most likely thing you'll see from the mco command is this:

sudo mco rpc openshift echo msg=foo
Discovering hosts using the mc method for 2 second(s) .... 0

No request sent, we did not discover any nodes.


This isn't very informative, but it does at least indicate that the message was sent and nothing answered. Now I have to look at the MCollective server logs to see what happened. After setting the loglevel to 'debug' in /etc/mcollective/server.cfg, restarting the mcollective service and re-trying the mco rpc command, I can find this in the log file:


sudo grep openshift /var/log/mcollective.log 
D, [2013-09-20T14:18:05.864489 #31618] DEBUG -- : agents.rb:104:in `block in findagentfile' Found openshift at /usr/libexec/mcollective/mcollective/agent/openshift.rb
D, [2013-09-20T14:18:05.864637 #31618] DEBUG -- : pluginmanager.rb:167:in `loadclass' Loading MCollective::Agent::Openshift from mcollective/agent/openshift.rb
E, [2013-09-20T14:18:06.360415 #31618] ERROR -- : pluginmanager.rb:171:in `rescue in loadclass' Failed to load MCollective::Agent::Openshift: error loading openshift-origin-container-selinux: cannot load such file -- openshift-origin-container-selinux
E, [2013-09-20T14:18:06.360633 #31618] ERROR -- : agents.rb:71:in `rescue in loadagent' Loading agent openshift failed: error loading openshift-origin-container-selinux: cannot load such file -- openshift-origin-container-selinux
D, [2013-09-20T14:18:13.741055 #31618] DEBUG -- : base.rb:120:in `block (2 levels) in validate_filter?' Failing based on agent openshift
D, [2013-09-20T14:18:13.741175 #31618] DEBUG -- : base.rb:120:in `block (2 levels) in validate_filter?' Failing based on agent openshift

It turns out that the reason those three additional packages are requires is that they provide facters to MCollective. Facter is a tool which gathers a raft of information about a system and makes it quickly available to MCollective. The rubygem-openshift-origin-node package adds some facter code, but those facters will fail if the additional packages aren't present. If you do the "install everything" these resolve automatically, but if you install and test things piecemeal as I am they show up as missing requirements.

After I add those packages I can send an echo message and get a successful reply.  If you can discover the MCollective servers from the client with mco ping, but can't get a response to an mco rpc openshift echo message, then the most likely problem is that the OpenShift node packages are missing or misconfigured. Check the logs and address what you find.

Finally! (sort of)

At this point, I'm confident that the Stomp and MCollective services are working and that the OpenShift agent is installed on the node and will at least respond to the echo message.  I was going to also include testing through the Rails console, but this has gone on long enough.  That's next.

References

Thursday, July 25, 2013

Installing OpenShift using Puppet, Part 1: Divide and Conquer

It's been quite a while since I posted last.  I got stuck on three things

  1. I didn't (don't?) know Puppet
  2. The layers of service and configuration were (are?) muddy.
  3. There are several competing significant installation use cases to be considered.
It would be very Agile to just leap in and start coding things until I got a set of boxes that worked.  But it would also likely lead to something which was difficult to adapt to new uses because it didn't respect the working boundaries between different layers and compartments which make up the OpenShift service.

So I  learned Puppet, and started coding some top down samples and some bottom up samples, while at the same time writing philosophical tracts trying to justify the direction(s) I was going.

I'm not nearly done (having thrown out several attempts and restarted each time) but I think I've reached a point where I can express clearly *how* I want to go about developing a CMS reference implementation for OpenShift installation and configuration.

OK, you're not going to get away without some philosophy.  Rather a lot actually this time.

Where do Configuration Management Services (CMS) fit...

Up until now I've concentrated on reaching a point where I can start installing OpenShift.  And I'm finally there.  No.  Wait.  I'm at the point where I can start installing the parts that make up OpenShift.  After that I have to configure each of the parts to run in their own way and then I have to configure the settings that OpenShift cares about.

See what happened there? It's layers.

Host and Service Configuration Management Layers


See where the CMS fits in? Between the running OS and all those configured hosts/services.  That's where I am now.

Look at the top layer.  Those vertical slices are individual hosts or services that have to be created. Only the ones in the middle are OpenShift. The others are operations support (for a running service) or development and testing stuff which isn't really OpenShift but is needed to create OpenShift.

... and what do they need to do.


I need to show you another complicated looking picture:

Draft OpenShift CMS Module Layout

As you can see, I need to learn Inkscape more, because Dia graphics just don't look as cool.

I'm a fan of big complicated looking graphics to help describe big complicated concepts. This is a very rough incomplete draft of a module breakdown for installing OpenShift using a CM system (Puppet, by name, though this should be applicable to any modular CM system). The three columns in the diagram represent different class uses.

The first column contains classes that are just used to hold information that will be used to instantiate other classes on the target hosts.  None of these classes will be instantiated directly on any host.  The second column shows an OpenShift Broker and an OpenShift Node.  Each includes a class which describes the function of that host within the OpenShift service.  Each also includes any support services which run on the same host.  The third column contains the definitions of the hosts which run support services.  They include a module for the support service itself, and then one which applies the OpenShift customizations to the service.

OpenShift uses plugin modules for several support services.  In the diagram, the plugins for each support service are grouped together. Only one would be instantiated for a given OpenShift installation.  Which one is selected as a parameter of the Master Configuration class ::openshift

There is one lonely class at the bottom of the middle column:  ::openshift::host.  This is currently a catch-all class which provides a single point of control for configuring common host settings such as SSH firewall rules, the presence (or absence) of special YUM repositories and the like.  It will be instantiated on every host which participates in the OpenShift service (for now) but can be customized using class parameters. This class could be broken up or other features added depending on how (in)coherent it becomes.

I showed you that diagram to show you this one.


Now if you look back to the top diagram, in the top row there are a bunch of vertical items that are peers of a sort.  Each blob represents a component service of OpenShift or a supporting service or task.  In a fully distributed service configuration each one would represent an individual host.

Keep that in mind as you look at the middle and right side of the second diagram.  Those (UML/Puppet) nodes there map to the blobs ad the top of the first diagram.  They show the internal structure of those blobs when installing OpenShift and support components.  Each one contains at least one module which installs a support service or component and which doesn't have the word openshift in it.  Each one also contains (at least) one OpenShift customization class.  This latter uses the information classes from the first column to customize the software on the node and integrate it with the OpenShift service.

This is the key point:

There are layers here too.

The configuration management tools should be designed so so that you can plug them together in a way that gets you the service you want to have, building up from the base to the completed service.  But: you should also be able to understand how the service is put together by looking at the configuration files.

By creating each (Puppet) node from the (Puppet) parts that define what a host does, you can see what the host does by looking at the Puppet node definition.  Knowledge is maintained both ways.

Outside-In Development


Since I'm still learning specific CMS implementations (Puppet now, and Ansible soon) and trying to understand how best to express a configuration for OpenShift using these CMS, I'm working from the top alot. At the same time, I'm trying to actually implement (or steal implementations of) modules to do things like set up the YUM repositories and install the packages.   I like this kind of Outside-In development model because (if I'm careful not to thrash too much) it helps me keep both perspectives in mind and hopefully meet in the middle.

In the next installment I'll try putting some meat on the bones of this skeleton: Actually creating the empty class definitions in their hierarchical structure and then creating a set of node definitions that import and use the classes to at least pretend to install an OpenShift service.  Hopefully it won't take me another couple of months.

References

CMS Software

Drawing Software


Thursday, May 30, 2013

OpenShift on AWS EC2, Part 4 - The First Machine

There's enough infrastructure in place now that I should be able to create the first instance for my OpenShift service.  I'm going to be managing the configuration with a Puppet master, so that will be the first instance I create.

The puppet master must have a public name and a fixed IP address.  I need to be able to reach it via SSH, and the puppet agents need to be able to find it by name (oversimplification, go with me on this).

With Route53 and EC2 configured, I can request a static (elastic) IP and associate it with a hostname in my domain.  I can also associate it with a new instance after the instance is launched. I can specify the network filtering rules so I can access the host over the network.

I actually have a task that does all this in one go, but I'm going to walk through the steps once so it's not magic.

NOTE: if you haven't pulled down the origin-setup tools from github and you want to follow along, you should go back to the first post in this series and do so.

This is not the only way to accomplish the goals set here.  You can use the AWS web console, CloudFormation or even tools like the control plugins for Vagrant.

Instances and Images in EC2


First, a little terminology.  EC2 has a number of terms to disambiguate... things.

An image is a static piece of storage which contains an OS.  It is the "gold copy" that we used to make when we still cloned hard disks to copy systems.  An image cannot run an OS.  It's storage.  An image does have some metadata though.  It has an associated machine architecture.  It has instructions for how it is to be mounted when it is used to create an instance.

(actually, this is a lie, an image is the metadata, the storage is really in a snapshot with a volume but that's too much and not really important right now.)

An instance is a runnable copy of an image.  It has a copy of the disk, but it also has the ability to start and stop.  It is assigned an IP address when it starts.  A copy of your RSA security key is installed when it starts so that you can log in.

When you want a new machine, you create an instance from an image.  You select an image which uses the architecture and contains the OS that you want.  You give the instance a name, and comment, and its security groups.  There are other things you can specify as well, but they don't come into play here.

Finding the Right Image


People like their three letter abbreviations.  On the web interface you'll see the term "AMI", which, I think stands for "Amazon Machine Image".  Otherwise known as "an image" in this context.  While the image ID's all begin with ami- I'm going to continue to refer to them as "images".

For OpenShift I want to start with either a Fedora or a RHEL (or CentOS) image.  I can't think of a reason anymore not to use a 64 bit OS and VM, so I'll specify that.   You can easily find official RHEL images on the AWS web console or using the AWS Marketplace.  You can find CentOS in the Marketplace.  There are "official" Fedora images there too, though they're not publicized.

What I do is use the web interface to find a recommended image and then make a note of the owner ID of the image.  From then on I can use the owner ID to find images using the CLI tools. It doesn't look like you can look up an owner's information from their owner ID.

New instances (running machines) are created from images.  Conversely new images can be created from an instance.  People can create and register and publish their images, so there can be lots of things that look like they're "official" which may have been altered.   It takes a little sleuthing to find the images that come from the source you want. 

Using the AWS console, I narrowed the Fedora x86_64 images down to this:


I made a note of the owner ID, and the pattern for the names and I can search for them on the CLI like this:

thor ec2:image list --owner 125523088429 --name 'Fedora*' --arch x86_64
ami-2509664c 125523088429 x86_64 Fedora-x86_64-17-1-sda 
ami-6f3b5006 125523088429 x86_64 Fedora-x86_64-19-Beta-20130523-sda 
ami-b71078de 125523088429 x86_64 Fedora-x86_64-18-20130521-sda 

Note that the --name search allows for globbing using the asterisk (*) character.

Launching the First Instance


I think I have enough information now to fire up the first instance for my OpenShift service.  The first one will be the puppet master, as that will control the configuration of the rest.

What I know:

  • hostname - puppet.infra.example.com
  • base image - ami-b71078de
  • securitygroup(s) - default, allow SSH
  • SSH key pair name

Later, I will also need a static (ElasticIP) address and a DNS A record.  Both of those can be set after the instance is running.

There is one last thing to decide.  When you create an EC2 instance, you must specify the instance type which is a kind of sizing for the machine resources.  AWS has a table of EC2 instance types that you can use to help you size your instances to your needs.  Since I'm only building a demo, I'm going to use the t1.micro type.  This has 7GB instance storage a single virtual core and enough memory for this purpose.  The CPU usage is also free (Storage and unused elastic IPs still cost).

  • size: t1.micro

So, here we go, with the CLI tools:

thor ec2:instance create --name puppet --type t1.micro --image ami-b71078de --key <mykeyname> --securitygroup default 
task: ec2:instance:create --image ami-b71078de --name puppet
  id = i-d8c912bb

That's actually pretty.... anti-climactic. I've got a convention that each task echos the required arguments back as it is invoked. That way as the tasks are composed into bigger tasks, you can see what's going on inside while it runs.

All this one seemed to do was to return an image id. To see what's going on, I can request the status of the instance:

thor ec2:instance status --id i-d8c912bb
pending

Since I'm impatient, I do that a few more times and after about 30 seconds it changes to this:

thor ec2:instance status --id i-d8c912bb
running

I want to log in, but so far all I know is the instance ID. I can ask for the hostname.

thor ec2:instance hostname --id i-d8c912bb
ec2-23-22-234-113.compute-1.amazonaws.com

And with that I should be able to log in via SSH using my private key:

ssh -i ~/.ssh/<mykeyfile;>.pem ec2-user@ec2-23-22-234-113.compute-1.amazonaws.com
The authenticity of host 'ec2-23-22-234-113.compute-1.amazonaws.com (23.22.234.113)' can't be established.
RSA key fingerprint is 64:ec:6d:7d:af:ae:9a:70:78:0d:02:28:f1:c3:45:50.
Are you sure you want to continue connecting (yes/no)? yes
Warning: Permanently added 'ec2-23-22-234-113.compute-1.amazonaws.com,23.22.234.113' (RSA) to the list of known hosts.

It looks like I generated and saved my key pair right, and specified it correctly when creating the instance.

The Fedora instances don't use the root user as the primary remote login. Instead, there's an ec2-user account which has ssh ALL:ALL permissions.  That is, the ec2-user account can use sudo without providing a password. This really just gives you a little separation and forces you to think before you take some action as root.

Getting a Static IP Address


Now I have a host running and I can get into it, but the hostname is some long abstract string in the EC2 amazonaws.com  domain.  I want MY name on it.  I also want to be able to reboot the host and have it get the same IP address and name. Well, it's not quite that simple.

Amazon EC2 has a curious and wonderful feature.  Each running instance actually has two IP addresses associated with it.  One is the internal IP address (the one configured in eth0).  But that's in an RFC 1918 private network space.  You can't route it.  You can't reach it.  You could even have a duplicate inside your corporate or home network.

The second address is an external IP address and this is the one you can see and can route to.  Amazon works some router table magic at the network border to establish the connection between the internal and external addresses.  What this means is that EC2 can change your external IP address without doing a thing to the host behind it.  This is where Elastic IP addresses come in.

As with all of these things, you can do it from the web interface, but since I'm trying to automate things, I've made a set of tasks to manipulate the elastic IPs.  I'm lazy and there's no other kind of IP in EC2 that I can change, so the tasks are in the ec2:ip namespace.

Creating a new IP is pretty much what you'd expect. You're not allowed to specify anything about it so it's as simple as can be:

thor ec2:ip create
task: ec2:ip:create
184.72.228.220

Once again, not very exciting. Since each IP must be unique, the address itself serves as an ID. An address isn't very useful until it's associated with a running instance. The ipaddress task can retrieve the IP address of an instance. It can also set the external IP address (the address must be an allocated Elastic IP)

thor ec2:instance ipaddress 184.72.228.220 --id i-d8c912bb
task:  ec2:instance:ipaddress 184.72.228.220

You can get the status and more information about an instance. You can also request the status using the instance name rather than the ID. For objects which have an ID and a name, you can query using either one, but you must specify it with an argument. For objects like the IP address which do not have a name, the id is the first argument f any query.

thor ec2:instance info --name puppet --verbose
EC2 Instance: i-d8c912bb (puppet)
  DNS Name: ec2-184-72-228-220.compute-1.amazonaws.com
  IP Address: 184.72.228.220
  Status: running
  Image: ami-b71078de
  Platform: 
  Private IP: 10.212.234.234
  Private Hostname: ip-10-212-234-234.ec2.internal

And now for something completely different: Route53 and DNS

I now have a a running host with the operating system and architecture I want. It has a fixed address. But it has a really funny domain name.

When I created my Route53 zones, I split them in two. infra.example.org will contain my service hosts. app.example.com will contain the application CNAME records. The broker will only have permission to change the application zone. It won't be able to damage the infrastructure either through a compromise or a bug.

I'm going to call the puppet master puppet.infra.example.org. It will have the IP address I was granted above.

All of the previous tasks were in the ec2: namespace. Route53 is actually a different service within AWS, so it gets its own namespace.

An IP address record has four components:

  • type
  • name
  • value
  • ttl (time to live, in seconds)

All of the infrastructure records will be A (address) records. The TTL has a regular default and there's no reason generally to override it. The value of an A record is IP address.

The name in an A record is a Fully Qualified Domain Name (FQDN). It has both the domain suffix and and the hostname and any sub-domain parts. To save some trouble parsing, the route53:record:create task expects the zone first, and the host part next as a separate argument. The last two arguments are the type and value.

thor route53:record create infra.example.org puppet a 184.72.228.220
task: route53:record:create infra.example.org puppet a 184.72.228.220

Also pretty anti-climactic. This time though there will be an external effect.

First, I can list the contents of the infra.example.org zone from Route53. Then I can also query the A record from DNS, though this may take some time to be available.

thor route53:record:get infra.example.org puppet A 
task: route53:record:get infra.example.org puppet A
puppet.infra.example.org. A
  184.72.228.220

And the same when viewed with host:

host puppet.infra.example.org
puppet.infra.example.org has address 184.72.228.220

The SOA records for AWS Route53 have a TTL of 900 seconds (15 minutes).  When you add or remove a record from a zone, you also cause an update to the SOA record serial number. Between you and Amazon there are almost certainly one or more caching nameservers and they will only refresh their cache when the SOA TTL expires. So you could experience a delay of up to 15 minutes from the time that you create a new record in a zone and when it resolves. I'm hoping this doesn't hold true for individual records, because it's going to cause problems for OpenShift.

You can check the TTL of the SOA record by requesting the record directly using dig:


dig infra.example.org soa

; <<>> DiG 9.9.2-rl.028.23-P2-RedHat-9.9.2-10.P2.fc18 <<>> infra.example.org soa
;; global options: +cmd
;; Got answer:
;; ->>HEADER<<- opcode: QUERY, status: NOERROR, id: 60006
;; flags: qr rd ra; QUERY: 1, ANSWER: 1, AUTHORITY: 0, ADDITIONAL: 1

;; OPT PSEUDOSECTION:
; EDNS: version: 0, flags:; udp: 4096
;; QUESTION SECTION:
;infra.example.org.  IN SOA

;; ANSWER SECTION:
infra.example.org. 900 IN SOA ns-1450.awsdns-53.org. awsdns-hostmaster.amazon.com. 1 7200 900 1209600 86400

;; Query time: 222 msec
;; SERVER: 172.30.42.65#53(172.30.42.65)
;; WHEN: Wed May 29 18:46:46 2013
;; MSG SIZE  rcvd: 130

The '900' on the first line of the answer section is the record TTL.

Wrapping it all up.


The beauty of Thor is that you can take each of the tasks defined above and compose them into more complex tasks.  You can invoke each task individually from the command line or you can invoke the composed task and observe the process.

Because this task uses several others from both EC2 and Route53, I put it under a different namespace. All of the specific composed tasks will go in the origin: namespace.

The composed task is called origin:baseinstance. At the top I know the fully qualified domain name of the host, the image and securitygroups that I want to use to create the instance. Since I already have the puppet master this one will be the broker.

  • hosthame: broker.infra.example.org
  • image: ami-b71078de
  • instance type: t1.micro
  • securitygroups: default, broker
  • key pair name: <mykeypair>

thor origin:baseinstance broker --hostname broker.infra.example.org --image ami-b71078de --type t1.micro --keypair <mykeypair> --securitygroup default broker 
task: origin:baseinstance broker
task: ec2:ip:create
184.73.182.10
task: route53:zone:contains broker.infra.example.org
Z1PLM62Y00LCIN infra.example.org.
task: route53:record:create infra.example.org. broker A 184.73.182.10
- image id: ami-b71078de
task: ec2:instance:create ami-b71078de broker
  id = i-19b1f576
task: remote:available ec2-54-226-116-229.compute-1.amazonaws.com
task: ec2:ip:associate 184.73.182.10 i-19b1f576

This process takes about two minutes. If you add --verbose you can see more of what is happening. There is a delay waiting for the A record creation to sync so that you don't accidentally create negative cache records which can slow propagation. Also you can see the remote:available task which polls a host for SSH login access. This allows time for the instance to be created, start running and reach multi-user network state.

ssh ec2-user@broker.infra.example.org
The authenticity of host 'broker.infra.example.org (184.73.182.10)' can't be established.
RSA key fingerprint is 8f:db:46:25:bf:19:2e:47:f5:f4:4a:23:a5:98:e3:5c.
Are you sure you want to continue connecting (yes/no)? yes
Warning: Permanently added 'broker.infra.example.org,184.73.182.10' (RSA) to the list of known hosts.
Last login: Thu May 30 11:37:08 2013 from 66.187.233.206

I will duplicate this process for the data and message servers, and for one node to begin.
My tier of AWS only allows 5 Elastic IP addresses, so I'm at my limit.   For a real production setup, only the broker, nodes and possibly the puppet master require fixed IP addresses and public DNS.  The datastore and message servers could use dynamic addresses, but then they will require some tweaking on restart.  I'm sure Amazon will give you more IP addresses for money, but I haven't looked into it.

Summary


There's a lot packed into this post:
  • Select an image to use as a base
  • Manage IP addresses
  • Bind IP addresses to running instances
  • Create a running instance.
All of this can be done with the AWS console. The ec2, route53 tasks just make it a little easier and the origin:baseinstance task wraps it all up so that creating new bare hosts is a single step.

In the next post I'll establish the puppet master service on the puppet server and install a puppet agent on each of the other infrastructure hosts.  From then all of the service management will happen in puppet and we can let EC2 fade into the background.

References

Tuesday, May 28, 2013

OpenShift on AWS EC2, Part 3: Getting In and Out (securitygroups)

In the previous two posts, I talked about tools to manage AWS EC2 with a CLI toolset, and preparing AWS Route53 so that the OpenShift broker will be able to publish new applications.  There is one more facet of EC2 that needs to be addressed before trying to start the instances which will host the OpenShift service components.

AWS EC2 provides (enforces?) network port filtering.  The filter rule sets are called securitygroups. AWS also offers two forms of EC2, "classic", and "VPC" (virtual private cloud).  Managing securitygroups for classic and VPC are a little different.  I'm going to present securitygroups in EC2-Classic.  If you're going to use EC2-VPC, you'll need to read the Amazon documentation and adapt your processes to the VPC behaviors.  Also note that securitygroups have a scope.  They can be applied only in the region in which they are defined.

In EC2-Classic you must associate all of the securitygroups with a new instance when you launch it (create it from an image).  You cannot change the set of securitygroups associated with an instances later.  You can change the rulesets in the securitygroups and the new rules will be applied immediately to all of the members of the securitygroup.

Amazon provides a default securitygroup which basically restricts all network traffic to the members (but not *between* members).  To make OpenShift work we will need a set of security groups which allow communications between the OpenShift Broker and the back-end services, and between the broker and nodes (through some form of messaging).  We will also need to allow external access to the OpenShift broker (for control) and to the nodes (for user access to the applications).

The creation of the securitygroups probably does not need to be automated.  The securitygroups will be created and the rulesets defined only once for a given OpenShift service.  The web interface is probably appropriate for this.

Since we'll be creating the instances with the CLI, it will be necessary to be able to list, examine to apply the securitygroups to new instances there as well.

NOTE: These are not the security settings you are looking for.

The securitygroups and rulesets shown here are designed to demonstrate the securitygroup features and the user interface used to manage them.  They are not designed with an eye to the best possible function and security for your service. You must look at your service design and requirements to create the best group and rulesets for your service.

Most people focus on the inbound (ingress) filtering rules.  I'm going to go with that.  I won't be defining any outbound (egress) rule sets.

I expect to need a different group for each type of host:

  • OpenShift broker
  • OpenShift node
  • datastore
  • message broker
  • puppetmaster

In addition I'm going to manage the service hosts with Puppet using a puppetmaster host.  Each of the service hosts will be a puppet client.  I don't think the puppet agent needs any special rules so I only have one additional securitygroup.

If I also planned to use an external authentication service on the broker, I would need a securitygroup for that.  I could also extend this set to include build and test servers for development of OpenShift itself.

Defining Securitygroups

Each of the groups below has only a single rule.  To be rigorous I could add the SSH (22/TCP) rule to the node securitygroup.  It is actually required for the operation of the node, not just for administrative remote access.

securitygroup service port/proto source comments
default SSH 22/TCP OpenShift Ops remote access and control
puppetmaster puppetmaster 8140/TCP all managed hosts configuration management
datastore mongodb 27017/TCP OpenShift Broker Hosts NoSQL DB
messagebroker activemq/stomp 61613/TCP OpenShift broke and node hosts carries MCollective
broker httpd (apache2) 80/TCP, 443/TCP OpenShift Ops and Users (unrestricted) Ruby on Rails and Passenger
node httpd (apache2) 80/TCP, 443/TCP OpenShift Application Users (unrestricted) HTTP routing
Web Sockets 8000/TCP, 8443/TCP OpenShift App user web sockets
SSH 22/TCP OpenShift App Users (unrestricted) shell and app control


Populating each securitygroup is a two step process.  First create the empty security group.  Then add the rules to the group.  At that point, the group is ready to be applied to new instances.

Creating a Securitygroup

Each security group starts with a name and an option description string.  The restrictions on the names are different from EC2-Classic and EC2-VPC securitygroups.  See the Amazon documentation for the differences. Simple upper/lower case strings with no white space are allowed in both.  The descriptions are more freeform.

You can add new securitygroups on the AWS EC2 console page.  Select the "Security Groups" tab on the left side and click "Create Security Group".  Fill in the name and description fields, make sure that the VPC selector indicates "No VPC" and click "Yes, Create".


Adding Rulesets

Securitygroup rulesets are one of the more complex elements in EC2. When using the web interface, Amazon provides a set of pre-defined rules for things like HTTP and SSH and common database connections. You should use them when they're appropriate.  The web interface also allows you to create custom rulesets.


There are several things to note about this display.  The default group has three mandatory rules (blue and white bars in the lower right).  These allow all of the members of the group unrestricted access to each other.

I'm adding the SSH rule which allows inbound port 22 connections.  I'm leaving the source as the default 0.0.0.0/0.   This is the IPv4 notation for "everything", so there will be no restrictions on the source of inbound SSH connections.  If you want to restrict SSH access so that connections come only from your corporate network, you can set the exit address space for your company there.

Since the members of the default group have unrestricted access to each other and since I'm going to apply the default group to all of my instances, it turns out that I only need special rules for access to hosts from the outside.  I need to add the SSH rule above, and I need to allow web access to the broker and node hosts. I am going to create these as distinct groups because I can't change the assigned groups for an instance after it is launched.  I'd like the ability to restrict access to the broker later.


If I were to apply rigorous security to this setup, I would avoid using the default group.  Instead I would create a distinct group for each service component.  Then I would add rulesets which allow only the required communications.  This would decrease the risk that a compromise of one host would grant access to the rest of the service hosts.

Since it's a one-time task, I created both of my securitygroups and rulesets using the web interface. I have written Thor tasks to create and populate securitygroups:

 thor help ec2:securitygroup
Tasks:
  thor ec2:securitygroup:create NAME                        # create a new se...
  thor ec2:securitygroup:delete                             # delete the secu...
  thor ec2:securitygroup:help [TASK]                        # Describe availa...
  thor ec2:securitygroup:info                               # retrieve and re...
  thor ec2:securitygroup:list                               # list the availa...
  thor ec2:securitygroup:rule:add PROTOCOL PORTS [SOURCES]  # add a permissio...
  thor ec2:securitygroup:rules                              # list the rules ...

Options:
  [--verbose]  


The list of tasks is incomplete, as I have not needed to change or delete rulesets.  If I find that I need those tasks, I'll add them.

Next Up

This is everything that must be done before beginning to create running instances for my OpenShift service. In the next post I'll select a base image to use for my host instances and begin creating running machines.

References