Showing posts with label openshift origin. Show all posts

Sunday, May 26, 2013

OpenShift on AWS EC2, Part 2: Being Seen (DNS)

OpenShift is, at least in part, a publication system.  Developers create applications and OpenShift tells the world about them.  This means that the very first thing you need to think about when you're considering creating an OpenShift service is "what do I call it?"

I actually created two zones when setting up the DNS for OpenShift.  The servers reside in one zone, and the user applications in another.  The broker service will be making updates to the application zone.  It doesn't seem like a good idea to have the server hostnames in the same zone where a bug or intrusion could alter or delete them. Something like this will do.

  • infra.example.org - contains the server hostnames
  • app.example.org - contains the application records

Picking a Domain Name (and a Registrar)


In most cases your choice is going to be constrained by what domains you own or have access too. You may need (as I did) to purchase a domain from a domain registrar. Or you will have to have your corporate IT department delegate a domain for you (whether they run it or you do).

When you register or delegate a domain your domain registrar will request a list of name servers which will be serving the content of your domain. Route53 won't tell you the nameservers until you tell them what domain they'll be serving for you. That means that creating a domain, if you don't have one, is a 3 step exchange:

  1. Request domain from a registrar
  2. Tell Route53 to serve the domain for you
  3. Tell your registrar which Route53 nameservers will be providing your domain

These steps will happen so rarely that I haven't bothered to script them.  I just use the web interface for each step.

NOTE: there are technical differences between a zone and a domain but I'm going to treat them as synonyms for this process. When you're registering, it's called a domain. When you're going to change the contents it's called a zone.

Each registrar will have a different means for you to set your domain's nameserver records. You'll have to look them up yourself. If you're getting a domain delegated from your corporate IT department you'll have to give them the list of Route53 nameservers so that they can install the "glue records" into their service.

So, pick your Registrar, search for an available domain, request, register, and pay. Then head over to the AWS Route53 console.

Adding a zone to Route53


On the web interface, click "Create Hosted Zone" in the top tool bar. You'll see this dialog on the right side.


Fill in the values for your new domain and a comment, if you wish. Then click "Create Hosted Zone" at the bottom of the dialog and Route53 will create your zone and assign a set of nameservers.


Make a note of the "Delegation Set". This is the set of nameservers which you need to provide to your domain registrar. The registrar will provide some place to enter the nameserver list and then they will add the glue records to the top-level domain.

Make a note as well of the "Hosted Zone ID". That's what you will use to select the zone to update when you send requests to AWS Route53.

When the domain registrar completes adding the Route53 nameservers it's time to come back to the thor CLI tools installed in part one.

Viewing the Route53 DNS information


You certainly can view the DNS information on the Route53 console. If you've set up the AWS CLI tools indicated in the previous post you can also view them on the CLI.

NOTE: If you haven't followed the previous post, you should before you continue here.

First list the zones you have registered.

thor route53:zone:list
task: route53:zone:list
id: <YOURZONEID> name: app.example.org. records: 3

Now you can list the records in the zone (indicating the zone by name)

thor route53:record:list app.example.org
task: route53:record:list app.example.org
looking for zone id <YOURZONEID>
example.org. NS
  ns-131.awsdns-16.com.
  ns-860.awsdns-43.net.
  ns-2023.awsdns-60.co.uk.
  ns-1076.awsdns-06.org.
app.example.org. SOA
  ns-131.awsdns-16.com. awsdns-hostmaster.amazon.com. 1 7200 900 1209600 86400

Adding a DNS Record


The real goal in all of this is that the OpenShift broker must be able to add and remove records for applications. OpenShift uses the aws-sdk rubygem.  The Thor tasks also use that gem.  You can call them from the command line or use them to compose more complex operations.

OpenShift currently uses CNAME records to publish applications rather than A records. This is largely to allow for rapid re-naming or re-numbering of nodes within AWS. The use of CNAME records (which are aliases to another FQDN or fully qualified domain name means that the node which hosts the applications can be renumbered without the need to update every DNS record for every application.  If bulk updates of DNS are not expensive, I believe that OpenShift could use A records, though it could require significant recoding.

To verify your DNS domain has been properly configured, add a CNAME record.  Thor provides a standard help option for each query.


thor help route53:record:create
Usage:
  thor route53:record:create ZONE NAME TYPE VALUE

Options:
  [--ttl=N]    
               # Default: 300
  [--verbose]  
  [--wait]     

create a new resource record

From this you can craft a command.  This example includes the --wait and --verbose options so that you can observe the process.  Without the --wait option, the task will complete and return, but there will be a propagation delay before the name will resolve.  With the --wait option, the task polls the Route53 service until it reports that the DNS services have synched.

thor route53:record create app.example.org test1 CNAME test2.app.example.org --verbose --wait
task: route53:record:create app.example.org test1 CNAME test2.infra.example.org
update record = {:comment=>"add CNAME record test1.app.example.org", :changes=>[{:action=>"CREATE", :resource_record_set=>{:name=>"test1.app.example.org", :type=>"CNAME", :ttl=>300, :resource_records=>[{:value=>"test2.infra.example.org"}]}}]}
response = {:change_info=>{:id=>"/change/C2VQAFRSE6OXMY", :status=>"PENDING", :submitted_at=>2013-05-27 00:24:19 UTC, :comment=>"add CNAME record test1.app.example.org"}}
1) change id: /change/C2VQAFRSE6OXMY, status: UNKNOWN - sleeping 5
2) change id: /change/C2VQAFRSE6OXMY, status: PENDING - sleeping 5
3) change id: /change/C2VQAFRSE6OXMY, status: PENDING - sleeping 5
4) change id: /change/C2VQAFRSE6OXMY, status: PENDING - sleeping 5
5) change id: /change/C2VQAFRSE6OXMY, status: PENDING - sleeping 5


When this command completes the new record should resolve:

host -t cname test1.app.example.org 
test1.app.example.org is an alias for test2.infra.example.org.
Also, now if you list the zone records with thor route53:record list app.example.org you'll see the new CNAME record.

Deleting a DNS record


Deleting a DNS record is nearly identical to adding one.  To insure that you are deleting the correct record the delete task requires the same complete inputs as the create task.

thor route53:record delete app.example.org test1 CNAME test2.infra.example.org --verbose --wait
task: route53:record:delete app.example.org CNAME test1
update record = {:comment=>"delete CNAME record test1.app.example.org", :changes=>[{:action=>"DELETE", :resource_record_set=>{:name=>"test1.app.example.org", :type=>"CNAME", :ttl=>300, :resource_records=>[{:value=>"test2.infra.example.org"}]}}]}
response = {:change_info=>{:id=>"/change/C3ORAEV7FTLPBJ", :status=>"PENDING", :submitted_at=>2013-05-27 00:58:25 UTC, :comment=>"delete CNAME record test1.app.example.org"}}
1) change id: /change/C3ORAEV7FTLPBJ, status: UNKNOWN - sleeping 5
2) change id: /change/C3ORAEV7FTLPBJ, status: PENDING - sleeping 5
3) change id: /change/C3ORAEV7FTLPBJ, status: PENDING - sleeping 5
4) change id: /change/C3ORAEV7FTLPBJ, status: PENDING - sleeping 5
5) change id: /change/C3ORAEV7FTLPBJ, status: PENDING - sleeping 5

Again, with the --verbose and --wait options, the task will not complete until the DNS change has propagated. When it completes, the name will no longer resolve.

host -t cname test1.app.example.org
Host test1.app.example.org not found: 3(NXDOMAIN)

Summary

Now that we've registered a domain, and arranged to have it served by Route53, we can add and remove names.  When we configure OpenShift, it will be able to publish new application records.

Next Time

We still have to create hosts to run the OpenShift service.  On AWS that means creating instances , virtual machines in Amazon's cloud.  Amazon applies some fairly restrictive nework level packet filtering.  They use a feature called a securitygroup to define the filtering rules.  In the next post, I'll discuss how to create and manage new securitygroups, and what groups we'll need to allow OpenShift to operate.

Resources

Thursday, May 23, 2013

OpenShift on AWS EC2, Part 1: From the wheels up

Someone asked me recently how to build an  OpenShift Origin service on Amazon Web Services EC2.  My first thought was "easy, we do this all the time".  I started going through what exists for our own testing, development and deployment.  It clearly works, it's clearly the place to start, right?  Just fire up a few instances, tweak the existing puppet configs and zoom! right?

Then I started trying to figure out how to describe it and adapt it to general use, and I found myself adding more and more caveats and limitations and internal assumptions.  It's grown organically to do what is needed but what I have available isn't really designed for general use.   Some of it I couldn't understand just from reading and observing (since I'm kind of a hands on break-it-to-understand-it kind of guy).  Time to start taking it apart so I can put it back together.  When I can do that and it starts up when I turn the key, then I can claim to understand it.

So I decided to go back to the fundamentals not of OpenShift, but of AWS EC2 itself.

Defining a Goal: Machines Ready To Eat


An OpenShift service consists of a number of component services.  Ideally each component would have multiple instances for availability and scaling, but that's not required for initial setup.  Only the OpenShift broker, console and nodes need to be exposed to the users.

The host configuration is complex enough that even for a small service it is best to use a Configuration Management System (CMS) to configure and manage the system, but the CMS can't start work until the hosts exist and have network communications.  The CMS itself must be installed and configured.  Once the hosts exist and are bound together then the CMS can do the rest of the work and a clean boundary of control and access is established. This will later allow the bottom layer (establishing hosts and installing/configuring the CMS) to be replaced without affecting the actual service installation above.

So the goal here is: create and connect hosts with a CMS installed using EC2.  That's the base on which the OpenShift service will be built. If you run each of the component services on its own host using external DNS and authentication services, OpenShift requires a minimum of four hosts:

  • OpenShift Broker
  • Data Store (mongodb)
  • Message Broker (activemq)
  • OpenShift Node

Each of these can (theoretically, at least) be duplicated to provide high availability, but for now I'll start there.   The goal of this series of posts is to create the hosts on which these services will be installed.  We won't come back to OpenShift itself until that's done.

AWS EC2: Getting the lay of the land


If you're not familiar with AWS EC2, go check out https://aws.amazon.com . EC2 is the part of AWS which provides "virtual" hosts (for a fee, of course).  There are free-to-try levels, but you are required to give a credit card to sign up and you're very likely to start incurring charges for storage even if you stick to the "free" tier.  Read, be informed, decide for yourself.

AWS without the "W"


AWS presents a modern single-page web interface for all interactions, but I'm interested in command line or scripted interaction.  Amazon does provide a REST protocol and has implemented libraries for a wide number of scripting languages.  I'm using the rubygem-aws-sdk library (which is, surprisingly enough, written in Ruby) because I also want to use another Ruby tool called Thor. 

Tasks and the Command Line Interface


Thor is a ruby library which helps create really nice command line "tasks". The beauty of Thor is that you can use it both to define individual tasks and to compose those tasks into more complex task sequences.  This allows you to test each step as a distinct CLI operation and also to debug only the step that fails when one inevitably does.

I'm going to use Thor and the aws-sdk to create a CLI interface to the AWS low level operations, and then compose them to create higher level tasks which, in the end, will leave me with a set of hosts ready to receive an OpenShift service.

I'm not going to try to create a comprehensive CLI interface to AWS.  I'm only going to create the steps that I need to get this job done.  A number of the steps will encapsulate operations which may seem trivial, but this will allow for better consistency and visibility of the operations.  A primary goal is to have as little magic as possible. At the same time, I want to avoid overwhelming the user (me) with unnecessary detail when things are working as planned.

I'm not going to make you sit through the entire development process (which isn't complete).  Instead I mean to show the tools that I've developed and use them to cleanly define the base on which an OpenShift service would sit.

AWS Setup


To work with AWS, you must have an established account.  To use the the REST API you need to have generated a set of access keys.  To log into your EC2 instances you need to have generated a set of SSH key pairs and placed them so your SSH client can find them. (Usually in $HOME/.ssh) and configure your ssh client to use those keys when logging into EC2 instances (in $HOME/.ssh/config).


  • AWS Access Keys
  • AWS SSH Key Pairs
  • SSH client configuration

You can learn about and generate both sets of keys on the AWS Security Credentials page


Origin-Setup (really EC2 and SSH tools)


The tool set is currently called origin-setup and it resides in a repository on Github.  The name is a misnomer, there's not actually any OpenShift in most of it.

Requirements


The tasks are written in Ruby using the Thor library.  They also require several other rubygems.  All of them are available on Fedora 18 as RPMs.

  • ruby
  • rubygems
  • rubygem-thor
  • rubygem-aws-sdk
  • rubygem-parseconfig
  • rubygem-net-ssh
  • rubygem-net-scp

Getting (and setting) the Bits


Thor can be used to create stand-alone CLI commands, but I have not done that yet for these tasks. To use them you need to cd into the origin-setup directory and call thor directly.  You will also need to set the RUBYLIB path to find a small helper library which manages the AWS authentication.

git clone https://github.com/markllama/origin-setup
cd origin-setup
export RUBYLIB=`pwd`/lib
thor list --all

AWS Again: configuring the toolset


The final step is to give the origin-setup toolset the information needed to communicate with the AWS REST interface.

AWSAccessKeyId=YOURKEYIDHERE
AWSSecretKey=YOURSECRETKEYHERE
AWSKeyPairName=YOURKEYPAIRNAMEHERE
RemoteUser=ec2-user
AWSEC2Type=t1.micro

This file contains what is essentially the passwords to your AWS account.  You should set the permissions on this file so that only you can read it and protect the contents as you would your credit card.

The RemoteUser is the default user for SSH logins (F18+).  For RHEL6 it would be root.  The AWSEC2Type value defines the default instance "type" to be created when you create a new instance.  The t1.micro instance type is small and it is in the free tier.  You will need to choose a larger type for real use.

Turn the Key

You should be able to use the thor command to explore the list of available tasks.  Thor allows the creation of namespaces to contain related tasks.  Most of the important tasks to begin with are in the ec2 namespace.

You can see the available tasks with the thor list command:

thor list ec2 --all
ec2
---
thor ec2:image:create                                     # Create a new imag...
thor ec2:image:delete                                     # Delete an existin...
thor ec2:image:find TAGNAME                               # find the id of im...
thor ec2:image:info                                       # retrieve informat...
thor ec2:image:list                                       # list the availabl...
thor ec2:image:tag --tag=TAG                              # set or retrieve i...
thor ec2:instance:create --image=IMAGE --name=NAME        # create a new EC2 ...
thor ec2:instance:delete                                  # delete an EC2 ins...
thor ec2:instance:hostname                                # print the hostnam...
thor ec2:instance:info                                    # get information a...
thor ec2:instance:ipaddress [IPADDR]                      # set or get the ex...
thor ec2:instance:list                                    # list the set of r...
thor ec2:instance:private_hostname                        # print the interna...
thor ec2:instance:private_ipaddress                       # print the interna...
thor ec2:instance:rename --newname=NEWNAME                # rename an EC2 ins...
thor ec2:instance:start                                   # start an existing...
thor ec2:instance:status                                  # get status of an ...
thor ec2:instance:stop                                    # stop a running EC...
thor ec2:instance:tag --tag=TAG                           # set or retrieve i...
thor ec2:instance:wait                                    # wait until an ins...
thor ec2:ip:associate IPADDR INSTANCE                     # associate and Ela...
thor ec2:ip:create                                        # create a new elas...
thor ec2:ip:delete IPADDR                                 # delete an elastic IP
thor ec2:ip:list                                          # list the defined ...
thor ec2:securitygroup:create NAME                        # create a new secu...
thor ec2:securitygroup:delete                             # delete the securi...
thor ec2:securitygroup:info                               # retrieve and repo...
thor ec2:securitygroup:list                               # list the availabl...
thor ec2:securitygroup:rule:add PROTOCOL PORTS [SOURCES]  # add a permission ...
thor ec2:snapshot:delete SNAPSHOT                         # delete the snapshot
thor ec2:snapshot:list                                    # list the availabl...
thor ec2:volume:delete VOLUME                             # delete the volume
thor ec2:volume:list                                      # list the availabl...


It's time to see if you can talk to EC2.  This first query requests a list of images produced by the Fedora hosted team:

thor ec2:image list --name \*Fedora\* --owner 125523088429
ami-2509664c Fedora-x86_64-17-1-sda
ami-4b0b6422 Fedora-i386-17-1-sda
ami-6f640c06 Fedora-i386-18-20130521-sda
ami-b71078de Fedora-x86_64-18-20130521-sda
ami-d13758b8 Fedora-18-ec2-20130105-x86_64-sda
ami-dd3758b4 Fedora-18-ec2-20130105-i386-sda
ami-ed375884 Fedora-17-ec2-20120515-i386-sda
ami-fd375894 Fedora-17-ec2-20120515-x86_64-sda

If instead you get a really long messy ruby error, then check the permissions and contents of your ~/.awscred file.

It's probably a good idea, before experimenting too much here to go get familar with EC2 and Route53 using the web console a bit.

Next post I'll establish the DNS zone in Route53 and show how to manage DNS records to prepare for my OpenShift service.

References


  • AWS EC2 Console - managing remote virtual machines
  • AWS Route53 (DNS) Console - managing DNS
  • rubygem-aws-sdk - an implimentation of the AWS REST protocol in Ruby
  • SSH publickey - secure login without passwords
  • Thor - A ruby gem to build command line interface "tasks"
  • Puppet - A popular Configuration Management System
  • Git - a popular Source Code Management system
  • Github - a site for keeping Git repositories
  • origin-setup - a set of Thor tasks for managing AWS EC2 and Route53
    With a goal of automating the creation of an OpenShift Origin service in EC2

Wednesday, April 3, 2013

OpenShift Process Tools (for humans)

Making Sausage: It ain't for the faint of stomach

Otto von Bismark is known (among other things) for his observations on law and sausage.  The observation could apply to software as well, but there are lots of us with cast-iron stomachs needed to produce some really wonderful stuff.  If you're one undaunted, read on.

I give a lot of attention to the parts running under an OpenShift service. I want people to be able to run their own service, to understand, configure, tune and diagnose problems with it. But I REALLY want people to understand that, if there's something they want it to do, that it doesn't yet, they don't have to wait for Red Hat to do it for them.

I have a bit of a different position from most people with respect to OpenShift development.  It came about by serendipity, but it suits me well and the management seem happy with it for now.  I'm not actually in the product development hierarchy.  I work on things mostly from the outside.  I work to experience installing and configuring OpenShift as someone from the community, and I comment and report using the same channels the community members have. (I talk about that some in a blog interview with Gordon Haff)

Red Hat has a vested interest in the success of OpenShift, but it defines that interest in terms that go beyond market penetration and adoption rates.  Most of the developers currently work at Red Hat, but they are going out of their way to allow people to see not just the inner workings of the code, but of the process, and to form a community of contributors who help steer and shape what OpenShift becomes.

Building a community is itself a process and there are learning steps so it's not all there yet, but you're invited already.

Where's the Beef?


When I started at Red Hat and began coding, one of the first things I asked was "where do I put my code".  Coming from a background at proprietary software companies I was asking "where's the internal code repository?".  I got a quizzical look for a second and then a reply: "Umm.  Github?" like I'd just asked "Where's the bathroom" while standing at the mirror washing my hands. (Some people use bitbucket or sourceforge or a number of others)

OpenShift has been on Github for quite a while.  It was one of the first big moves to bring OpenShift to the community (the fact that it made life easier for our folks was a warmly anticipated beneficial side effect).  The hottest newest stuff is out there.  It's not always pretty.  If you look at the wiki and blog posts (especially from me) you'll find a number that are out of date because they contained hacks around warts and things have been changed or fixed (it's a good idea to check on the #openshift-dev channel on freenode if you're ever wondering about something).  It's embarrassing sometimes to find something's gone stale, but the alternative is waiting or hiding things, and we're not doing that. (There are people working on the Official Documentation, but that's for Official Releases.  We're talking bleeding edge here)

All of the developers (and by this, I include you) work by forking the repository, making changes on a branch and then submitting a pull request to bring those changes back into the master repository.  The pull requests get review and commentary and then get run through automated tests (discussed next), and when they're ready are merged.

Have it your way.


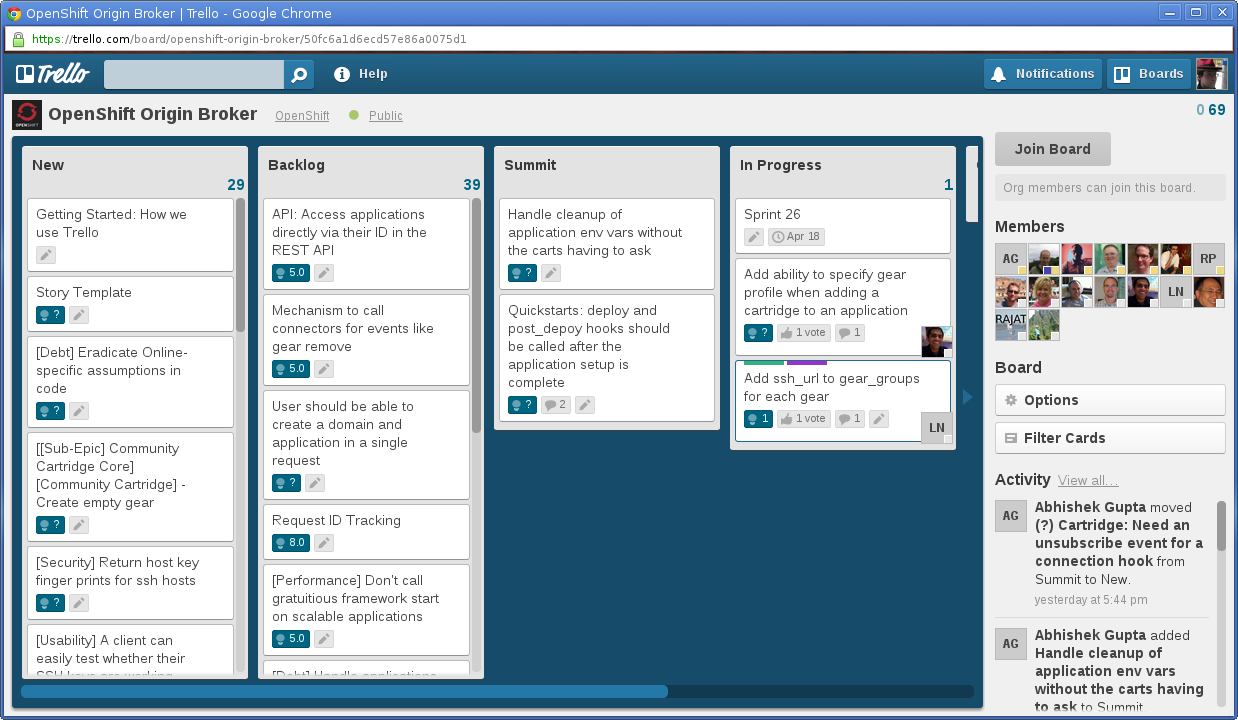
 The newest move is the switch to using Trello for planning.  OpenShift has always done development using an Agile process based on the Scrum framework.   The project is now hosted on Trello and you're invited to look and contribute.

The OpenShift Origin Broker Scrum Board


Trello is free in the same way that Github is. To contribute, get an account and join the OpenShift organization.  It's a web based scrum task board system.  New features are added to the board as "cards".  The cards are used to define and track the tasks needed to complete the feature.  They're moved along the board from inception to completion as the tasks are defined, filled in, assigned (or assumed) and completed.  All of the planning and work happen in plain sight. 

If you're new to Agile or Scrum you want to take some time to look up what they are and how they work. Scrum is known as a "framework" for a reason.  It's a set of priorities and guidelines, not rules.  Each team has it's own conventions and etiquette.  You'll get the best response from people if you observe a bit and dip your toe in slowly.

Check out Trello's Help site and take the tour for some idea of what Trello itself is and does, and how it works. Take a look too at the first card in the Broker board.  It describes how the OpenShift team is expected to use Trello. Take a look at the story template card.  It show the skeleton of the questions a card should ask (and answer).

A card, still capturing requirements.


The Trello site is a place for  contributors.  It's not a forum or question and answer session.  Those are better served on the OpenShift fora, on IRC or on the mailing lists.  Reasonable suggestions are encouraged. See this one requesting feedback on an update to the PHP cartridge as an example.

Welcome to the kitchen


Well it's hot in here.  The stainless steel doors with the windows in them so the servers don't crash into each other are flapping on their springs behind you.  The knife rack and the prep counter are in front of you.  You know your way around an industrial fridge? All of us bus dishes now and then.  You're a bit overdressed, but get to work we've got some hungry folks out there waiting.  Check that card over your head and start cooking.

Resources