Thursday, May 30, 2013

OpenShift on AWS EC2, Part 4 - The First Machine

There's enough infrastructure in place now that I should be able to create the first instance for my OpenShift service.  I'm going to be managing the configuration with a Puppet master, so that will be the first instance I create.

The puppet master must have a public name and a fixed IP address.  I need to be able to reach it via SSH, and the puppet agents need to be able to find it by name (oversimplification, go with me on this).

With Route53 and EC2 configured, I can request a static (elastic) IP and associate it with a hostname in my domain.  I can also associate it with a new instance after the instance is launched. I can specify the network filtering rules so I can access the host over the network.

I actually have a task that does all this in one go, but I'm going to walk through the steps once so it's not magic.

NOTE: if you haven't pulled down the origin-setup tools from github and you want to follow along, you should go back to the first post in this series and do so.

This is not the only way to accomplish the goals set here.  You can use the AWS web console, CloudFormation or even tools like the control plugins for Vagrant.

Instances and Images in EC2


First, a little terminology.  EC2 has a number of terms to disambiguate... things.

An image is a static piece of storage which contains an OS.  It is the "gold copy" that we used to make when we still cloned hard disks to copy systems.  An image cannot run an OS.  It's storage.  An image does have some metadata though.  It has an associated machine architecture.  It has instructions for how it is to be mounted when it is used to create an instance.

(actually, this is a lie, an image is the metadata, the storage is really in a snapshot with a volume but that's too much and not really important right now.)

An instance is a runnable copy of an image.  It has a copy of the disk, but it also has the ability to start and stop.  It is assigned an IP address when it starts.  A copy of your RSA security key is installed when it starts so that you can log in.

When you want a new machine, you create an instance from an image.  You select an image which uses the architecture and contains the OS that you want.  You give the instance a name, and comment, and its security groups.  There are other things you can specify as well, but they don't come into play here.

Finding the Right Image


People like their three letter abbreviations.  On the web interface you'll see the term "AMI", which, I think stands for "Amazon Machine Image".  Otherwise known as "an image" in this context.  While the image ID's all begin with ami- I'm going to continue to refer to them as "images".

For OpenShift I want to start with either a Fedora or a RHEL (or CentOS) image.  I can't think of a reason anymore not to use a 64 bit OS and VM, so I'll specify that.   You can easily find official RHEL images on the AWS web console or using the AWS Marketplace.  You can find CentOS in the Marketplace.  There are "official" Fedora images there too, though they're not publicized.

What I do is use the web interface to find a recommended image and then make a note of the owner ID of the image.  From then on I can use the owner ID to find images using the CLI tools. It doesn't look like you can look up an owner's information from their owner ID.

New instances (running machines) are created from images.  Conversely new images can be created from an instance.  People can create and register and publish their images, so there can be lots of things that look like they're "official" which may have been altered.   It takes a little sleuthing to find the images that come from the source you want. 

Using the AWS console, I narrowed the Fedora x86_64 images down to this:


I made a note of the owner ID, and the pattern for the names and I can search for them on the CLI like this:

thor ec2:image list --owner 125523088429 --name 'Fedora*' --arch x86_64
ami-2509664c 125523088429 x86_64 Fedora-x86_64-17-1-sda 
ami-6f3b5006 125523088429 x86_64 Fedora-x86_64-19-Beta-20130523-sda 
ami-b71078de 125523088429 x86_64 Fedora-x86_64-18-20130521-sda 

Note that the --name search allows for globbing using the asterisk (*) character.

Launching the First Instance


I think I have enough information now to fire up the first instance for my OpenShift service.  The first one will be the puppet master, as that will control the configuration of the rest.

What I know:

  • hostname - puppet.infra.example.com
  • base image - ami-b71078de
  • securitygroup(s) - default, allow SSH
  • SSH key pair name

Later, I will also need a static (ElasticIP) address and a DNS A record.  Both of those can be set after the instance is running.

There is one last thing to decide.  When you create an EC2 instance, you must specify the instance type which is a kind of sizing for the machine resources.  AWS has a table of EC2 instance types that you can use to help you size your instances to your needs.  Since I'm only building a demo, I'm going to use the t1.micro type.  This has 7GB instance storage a single virtual core and enough memory for this purpose.  The CPU usage is also free (Storage and unused elastic IPs still cost).

  • size: t1.micro

So, here we go, with the CLI tools:

thor ec2:instance create --name puppet --type t1.micro --image ami-b71078de --key <mykeyname> --securitygroup default 
task: ec2:instance:create --image ami-b71078de --name puppet
  id = i-d8c912bb

That's actually pretty.... anti-climactic. I've got a convention that each task echos the required arguments back as it is invoked. That way as the tasks are composed into bigger tasks, you can see what's going on inside while it runs.

All this one seemed to do was to return an image id. To see what's going on, I can request the status of the instance:

thor ec2:instance status --id i-d8c912bb
pending

Since I'm impatient, I do that a few more times and after about 30 seconds it changes to this:

thor ec2:instance status --id i-d8c912bb
running

I want to log in, but so far all I know is the instance ID. I can ask for the hostname.

thor ec2:instance hostname --id i-d8c912bb
ec2-23-22-234-113.compute-1.amazonaws.com

And with that I should be able to log in via SSH using my private key:

ssh -i ~/.ssh/<mykeyfile;>.pem ec2-user@ec2-23-22-234-113.compute-1.amazonaws.com
The authenticity of host 'ec2-23-22-234-113.compute-1.amazonaws.com (23.22.234.113)' can't be established.
RSA key fingerprint is 64:ec:6d:7d:af:ae:9a:70:78:0d:02:28:f1:c3:45:50.
Are you sure you want to continue connecting (yes/no)? yes
Warning: Permanently added 'ec2-23-22-234-113.compute-1.amazonaws.com,23.22.234.113' (RSA) to the list of known hosts.

It looks like I generated and saved my key pair right, and specified it correctly when creating the instance.

The Fedora instances don't use the root user as the primary remote login. Instead, there's an ec2-user account which has ssh ALL:ALL permissions.  That is, the ec2-user account can use sudo without providing a password. This really just gives you a little separation and forces you to think before you take some action as root.

Getting a Static IP Address


Now I have a host running and I can get into it, but the hostname is some long abstract string in the EC2 amazonaws.com  domain.  I want MY name on it.  I also want to be able to reboot the host and have it get the same IP address and name. Well, it's not quite that simple.

Amazon EC2 has a curious and wonderful feature.  Each running instance actually has two IP addresses associated with it.  One is the internal IP address (the one configured in eth0).  But that's in an RFC 1918 private network space.  You can't route it.  You can't reach it.  You could even have a duplicate inside your corporate or home network.

The second address is an external IP address and this is the one you can see and can route to.  Amazon works some router table magic at the network border to establish the connection between the internal and external addresses.  What this means is that EC2 can change your external IP address without doing a thing to the host behind it.  This is where Elastic IP addresses come in.

As with all of these things, you can do it from the web interface, but since I'm trying to automate things, I've made a set of tasks to manipulate the elastic IPs.  I'm lazy and there's no other kind of IP in EC2 that I can change, so the tasks are in the ec2:ip namespace.

Creating a new IP is pretty much what you'd expect. You're not allowed to specify anything about it so it's as simple as can be:

thor ec2:ip create
task: ec2:ip:create
184.72.228.220

Once again, not very exciting. Since each IP must be unique, the address itself serves as an ID. An address isn't very useful until it's associated with a running instance. The ipaddress task can retrieve the IP address of an instance. It can also set the external IP address (the address must be an allocated Elastic IP)

thor ec2:instance ipaddress 184.72.228.220 --id i-d8c912bb
task:  ec2:instance:ipaddress 184.72.228.220

You can get the status and more information about an instance. You can also request the status using the instance name rather than the ID. For objects which have an ID and a name, you can query using either one, but you must specify it with an argument. For objects like the IP address which do not have a name, the id is the first argument f any query.

thor ec2:instance info --name puppet --verbose
EC2 Instance: i-d8c912bb (puppet)
  DNS Name: ec2-184-72-228-220.compute-1.amazonaws.com
  IP Address: 184.72.228.220
  Status: running
  Image: ami-b71078de
  Platform: 
  Private IP: 10.212.234.234
  Private Hostname: ip-10-212-234-234.ec2.internal

And now for something completely different: Route53 and DNS

I now have a a running host with the operating system and architecture I want. It has a fixed address. But it has a really funny domain name.

When I created my Route53 zones, I split them in two. infra.example.org will contain my service hosts. app.example.com will contain the application CNAME records. The broker will only have permission to change the application zone. It won't be able to damage the infrastructure either through a compromise or a bug.

I'm going to call the puppet master puppet.infra.example.org. It will have the IP address I was granted above.

All of the previous tasks were in the ec2: namespace. Route53 is actually a different service within AWS, so it gets its own namespace.

An IP address record has four components:

  • type
  • name
  • value
  • ttl (time to live, in seconds)

All of the infrastructure records will be A (address) records. The TTL has a regular default and there's no reason generally to override it. The value of an A record is IP address.

The name in an A record is a Fully Qualified Domain Name (FQDN). It has both the domain suffix and and the hostname and any sub-domain parts. To save some trouble parsing, the route53:record:create task expects the zone first, and the host part next as a separate argument. The last two arguments are the type and value.

thor route53:record create infra.example.org puppet a 184.72.228.220
task: route53:record:create infra.example.org puppet a 184.72.228.220

Also pretty anti-climactic. This time though there will be an external effect.

First, I can list the contents of the infra.example.org zone from Route53. Then I can also query the A record from DNS, though this may take some time to be available.

thor route53:record:get infra.example.org puppet A 
task: route53:record:get infra.example.org puppet A
puppet.infra.example.org. A
  184.72.228.220

And the same when viewed with host:

host puppet.infra.example.org
puppet.infra.example.org has address 184.72.228.220

The SOA records for AWS Route53 have a TTL of 900 seconds (15 minutes).  When you add or remove a record from a zone, you also cause an update to the SOA record serial number. Between you and Amazon there are almost certainly one or more caching nameservers and they will only refresh their cache when the SOA TTL expires. So you could experience a delay of up to 15 minutes from the time that you create a new record in a zone and when it resolves. I'm hoping this doesn't hold true for individual records, because it's going to cause problems for OpenShift.

You can check the TTL of the SOA record by requesting the record directly using dig:


dig infra.example.org soa

; <<>> DiG 9.9.2-rl.028.23-P2-RedHat-9.9.2-10.P2.fc18 <<>> infra.example.org soa
;; global options: +cmd
;; Got answer:
;; ->>HEADER<<- opcode: QUERY, status: NOERROR, id: 60006
;; flags: qr rd ra; QUERY: 1, ANSWER: 1, AUTHORITY: 0, ADDITIONAL: 1

;; OPT PSEUDOSECTION:
; EDNS: version: 0, flags:; udp: 4096
;; QUESTION SECTION:
;infra.example.org.  IN SOA

;; ANSWER SECTION:
infra.example.org. 900 IN SOA ns-1450.awsdns-53.org. awsdns-hostmaster.amazon.com. 1 7200 900 1209600 86400

;; Query time: 222 msec
;; SERVER: 172.30.42.65#53(172.30.42.65)
;; WHEN: Wed May 29 18:46:46 2013
;; MSG SIZE  rcvd: 130

The '900' on the first line of the answer section is the record TTL.

Wrapping it all up.


The beauty of Thor is that you can take each of the tasks defined above and compose them into more complex tasks.  You can invoke each task individually from the command line or you can invoke the composed task and observe the process.

Because this task uses several others from both EC2 and Route53, I put it under a different namespace. All of the specific composed tasks will go in the origin: namespace.

The composed task is called origin:baseinstance. At the top I know the fully qualified domain name of the host, the image and securitygroups that I want to use to create the instance. Since I already have the puppet master this one will be the broker.

  • hosthame: broker.infra.example.org
  • image: ami-b71078de
  • instance type: t1.micro
  • securitygroups: default, broker
  • key pair name: <mykeypair>

thor origin:baseinstance broker --hostname broker.infra.example.org --image ami-b71078de --type t1.micro --keypair <mykeypair> --securitygroup default broker 
task: origin:baseinstance broker
task: ec2:ip:create
184.73.182.10
task: route53:zone:contains broker.infra.example.org
Z1PLM62Y00LCIN infra.example.org.
task: route53:record:create infra.example.org. broker A 184.73.182.10
- image id: ami-b71078de
task: ec2:instance:create ami-b71078de broker
  id = i-19b1f576
task: remote:available ec2-54-226-116-229.compute-1.amazonaws.com
task: ec2:ip:associate 184.73.182.10 i-19b1f576

This process takes about two minutes. If you add --verbose you can see more of what is happening. There is a delay waiting for the A record creation to sync so that you don't accidentally create negative cache records which can slow propagation. Also you can see the remote:available task which polls a host for SSH login access. This allows time for the instance to be created, start running and reach multi-user network state.

ssh ec2-user@broker.infra.example.org
The authenticity of host 'broker.infra.example.org (184.73.182.10)' can't be established.
RSA key fingerprint is 8f:db:46:25:bf:19:2e:47:f5:f4:4a:23:a5:98:e3:5c.
Are you sure you want to continue connecting (yes/no)? yes
Warning: Permanently added 'broker.infra.example.org,184.73.182.10' (RSA) to the list of known hosts.
Last login: Thu May 30 11:37:08 2013 from 66.187.233.206

I will duplicate this process for the data and message servers, and for one node to begin.
My tier of AWS only allows 5 Elastic IP addresses, so I'm at my limit.   For a real production setup, only the broker, nodes and possibly the puppet master require fixed IP addresses and public DNS.  The datastore and message servers could use dynamic addresses, but then they will require some tweaking on restart.  I'm sure Amazon will give you more IP addresses for money, but I haven't looked into it.

Summary


There's a lot packed into this post:
  • Select an image to use as a base
  • Manage IP addresses
  • Bind IP addresses to running instances
  • Create a running instance.
All of this can be done with the AWS console. The ec2, route53 tasks just make it a little easier and the origin:baseinstance task wraps it all up so that creating new bare hosts is a single step.

In the next post I'll establish the puppet master service on the puppet server and install a puppet agent on each of the other infrastructure hosts.  From then all of the service management will happen in puppet and we can let EC2 fade into the background.

References

Tuesday, May 28, 2013

OpenShift on AWS EC2, Part 3: Getting In and Out (securitygroups)

In the previous two posts, I talked about tools to manage AWS EC2 with a CLI toolset, and preparing AWS Route53 so that the OpenShift broker will be able to publish new applications.  There is one more facet of EC2 that needs to be addressed before trying to start the instances which will host the OpenShift service components.

AWS EC2 provides (enforces?) network port filtering.  The filter rule sets are called securitygroups. AWS also offers two forms of EC2, "classic", and "VPC" (virtual private cloud).  Managing securitygroups for classic and VPC are a little different.  I'm going to present securitygroups in EC2-Classic.  If you're going to use EC2-VPC, you'll need to read the Amazon documentation and adapt your processes to the VPC behaviors.  Also note that securitygroups have a scope.  They can be applied only in the region in which they are defined.

In EC2-Classic you must associate all of the securitygroups with a new instance when you launch it (create it from an image).  You cannot change the set of securitygroups associated with an instances later.  You can change the rulesets in the securitygroups and the new rules will be applied immediately to all of the members of the securitygroup.

Amazon provides a default securitygroup which basically restricts all network traffic to the members (but not *between* members).  To make OpenShift work we will need a set of security groups which allow communications between the OpenShift Broker and the back-end services, and between the broker and nodes (through some form of messaging).  We will also need to allow external access to the OpenShift broker (for control) and to the nodes (for user access to the applications).

The creation of the securitygroups probably does not need to be automated.  The securitygroups will be created and the rulesets defined only once for a given OpenShift service.  The web interface is probably appropriate for this.

Since we'll be creating the instances with the CLI, it will be necessary to be able to list, examine to apply the securitygroups to new instances there as well.

NOTE: These are not the security settings you are looking for.

The securitygroups and rulesets shown here are designed to demonstrate the securitygroup features and the user interface used to manage them.  They are not designed with an eye to the best possible function and security for your service. You must look at your service design and requirements to create the best group and rulesets for your service.

Most people focus on the inbound (ingress) filtering rules.  I'm going to go with that.  I won't be defining any outbound (egress) rule sets.

I expect to need a different group for each type of host:

  • OpenShift broker
  • OpenShift node
  • datastore
  • message broker
  • puppetmaster

In addition I'm going to manage the service hosts with Puppet using a puppetmaster host.  Each of the service hosts will be a puppet client.  I don't think the puppet agent needs any special rules so I only have one additional securitygroup.

If I also planned to use an external authentication service on the broker, I would need a securitygroup for that.  I could also extend this set to include build and test servers for development of OpenShift itself.

Defining Securitygroups

Each of the groups below has only a single rule.  To be rigorous I could add the SSH (22/TCP) rule to the node securitygroup.  It is actually required for the operation of the node, not just for administrative remote access.

securitygroup service port/proto source comments
default SSH 22/TCP OpenShift Ops remote access and control
puppetmaster puppetmaster 8140/TCP all managed hosts configuration management
datastore mongodb 27017/TCP OpenShift Broker Hosts NoSQL DB
messagebroker activemq/stomp 61613/TCP OpenShift broke and node hosts carries MCollective
broker httpd (apache2) 80/TCP, 443/TCP OpenShift Ops and Users (unrestricted) Ruby on Rails and Passenger
node httpd (apache2) 80/TCP, 443/TCP OpenShift Application Users (unrestricted) HTTP routing
Web Sockets 8000/TCP, 8443/TCP OpenShift App user web sockets
SSH 22/TCP OpenShift App Users (unrestricted) shell and app control


Populating each securitygroup is a two step process.  First create the empty security group.  Then add the rules to the group.  At that point, the group is ready to be applied to new instances.

Creating a Securitygroup

Each security group starts with a name and an option description string.  The restrictions on the names are different from EC2-Classic and EC2-VPC securitygroups.  See the Amazon documentation for the differences. Simple upper/lower case strings with no white space are allowed in both.  The descriptions are more freeform.

You can add new securitygroups on the AWS EC2 console page.  Select the "Security Groups" tab on the left side and click "Create Security Group".  Fill in the name and description fields, make sure that the VPC selector indicates "No VPC" and click "Yes, Create".


Adding Rulesets

Securitygroup rulesets are one of the more complex elements in EC2. When using the web interface, Amazon provides a set of pre-defined rules for things like HTTP and SSH and common database connections. You should use them when they're appropriate.  The web interface also allows you to create custom rulesets.


There are several things to note about this display.  The default group has three mandatory rules (blue and white bars in the lower right).  These allow all of the members of the group unrestricted access to each other.

I'm adding the SSH rule which allows inbound port 22 connections.  I'm leaving the source as the default 0.0.0.0/0.   This is the IPv4 notation for "everything", so there will be no restrictions on the source of inbound SSH connections.  If you want to restrict SSH access so that connections come only from your corporate network, you can set the exit address space for your company there.

Since the members of the default group have unrestricted access to each other and since I'm going to apply the default group to all of my instances, it turns out that I only need special rules for access to hosts from the outside.  I need to add the SSH rule above, and I need to allow web access to the broker and node hosts. I am going to create these as distinct groups because I can't change the assigned groups for an instance after it is launched.  I'd like the ability to restrict access to the broker later.


If I were to apply rigorous security to this setup, I would avoid using the default group.  Instead I would create a distinct group for each service component.  Then I would add rulesets which allow only the required communications.  This would decrease the risk that a compromise of one host would grant access to the rest of the service hosts.

Since it's a one-time task, I created both of my securitygroups and rulesets using the web interface. I have written Thor tasks to create and populate securitygroups:

 thor help ec2:securitygroup
Tasks:
  thor ec2:securitygroup:create NAME                        # create a new se...
  thor ec2:securitygroup:delete                             # delete the secu...
  thor ec2:securitygroup:help [TASK]                        # Describe availa...
  thor ec2:securitygroup:info                               # retrieve and re...
  thor ec2:securitygroup:list                               # list the availa...
  thor ec2:securitygroup:rule:add PROTOCOL PORTS [SOURCES]  # add a permissio...
  thor ec2:securitygroup:rules                              # list the rules ...

Options:
  [--verbose]  


The list of tasks is incomplete, as I have not needed to change or delete rulesets.  If I find that I need those tasks, I'll add them.

Next Up

This is everything that must be done before beginning to create running instances for my OpenShift service. In the next post I'll select a base image to use for my host instances and begin creating running machines.

References


Sunday, May 26, 2013

OpenShift on AWS EC2, Part 2: Being Seen (DNS)

OpenShift is, at least in part, a publication system.  Developers create applications and OpenShift tells the world about them.  This means that the very first thing you need to think about when you're considering creating an OpenShift service is "what do I call it?"

I actually created two zones when setting up the DNS for OpenShift.  The servers reside in one zone, and the user applications in another.  The broker service will be making updates to the application zone.  It doesn't seem like a good idea to have the server hostnames in the same zone where a bug or intrusion could alter or delete them. Something like this will do.

  • infra.example.org - contains the server hostnames
  • app.example.org - contains the application records

Picking a Domain Name (and a Registrar)


In most cases your choice is going to be constrained by what domains you own or have access too. You may need (as I did) to purchase a domain from a domain registrar. Or you will have to have your corporate IT department delegate a domain for you (whether they run it or you do).

When you register or delegate a domain your domain registrar will request a list of name servers which will be serving the content of your domain. Route53 won't tell you the nameservers until you tell them what domain they'll be serving for you. That means that creating a domain, if you don't have one, is a 3 step exchange:

  1. Request domain from a registrar
  2. Tell Route53 to serve the domain for you
  3. Tell your registrar which Route53 nameservers will be providing your domain

These steps will happen so rarely that I haven't bothered to script them.  I just use the web interface for each step.

NOTE: there are technical differences between a zone and a domain but I'm going to treat them as synonyms for this process. When you're registering, it's called a domain. When you're going to change the contents it's called a zone.

Each registrar will have a different means for you to set your domain's nameserver records. You'll have to look them up yourself. If you're getting a domain delegated from your corporate IT department you'll have to give them the list of Route53 nameservers so that they can install the "glue records" into their service.

So, pick your Registrar, search for an available domain, request, register, and pay. Then head over to the AWS Route53 console.

Adding a zone to Route53


On the web interface, click "Create Hosted Zone" in the top tool bar. You'll see this dialog on the right side.


Fill in the values for your new domain and a comment, if you wish. Then click "Create Hosted Zone" at the bottom of the dialog and Route53 will create your zone and assign a set of nameservers.


Make a note of the "Delegation Set". This is the set of nameservers which you need to provide to your domain registrar. The registrar will provide some place to enter the nameserver list and then they will add the glue records to the top-level domain.

Make a note as well of the "Hosted Zone ID". That's what you will use to select the zone to update when you send requests to AWS Route53.

When the domain registrar completes adding the Route53 nameservers it's time to come back to the thor CLI tools installed in part one.

Viewing the Route53 DNS information


You certainly can view the DNS information on the Route53 console. If you've set up the AWS CLI tools indicated in the previous post you can also view them on the CLI.

NOTE: If you haven't followed the previous post, you should before you continue here.

First list the zones you have registered.

thor route53:zone:list
task: route53:zone:list
id: <YOURZONEID> name: app.example.org. records: 3

Now you can list the records in the zone (indicating the zone by name)

thor route53:record:list app.example.org
task: route53:record:list app.example.org
looking for zone id <YOURZONEID>
example.org. NS
  ns-131.awsdns-16.com.
  ns-860.awsdns-43.net.
  ns-2023.awsdns-60.co.uk.
  ns-1076.awsdns-06.org.
app.example.org. SOA
  ns-131.awsdns-16.com. awsdns-hostmaster.amazon.com. 1 7200 900 1209600 86400

Adding a DNS Record


The real goal in all of this is that the OpenShift broker must be able to add and remove records for applications. OpenShift uses the aws-sdk rubygem.  The Thor tasks also use that gem.  You can call them from the command line or use them to compose more complex operations.

OpenShift currently uses CNAME records to publish applications rather than A records. This is largely to allow for rapid re-naming or re-numbering of nodes within AWS. The use of CNAME records (which are aliases to another FQDN or fully qualified domain name means that the node which hosts the applications can be renumbered without the need to update every DNS record for every application.  If bulk updates of DNS are not expensive, I believe that OpenShift could use A records, though it could require significant recoding.

To verify your DNS domain has been properly configured, add a CNAME record.  Thor provides a standard help option for each query.


thor help route53:record:create
Usage:
  thor route53:record:create ZONE NAME TYPE VALUE

Options:
  [--ttl=N]    
               # Default: 300
  [--verbose]  
  [--wait]     

create a new resource record

From this you can craft a command.  This example includes the --wait and --verbose options so that you can observe the process.  Without the --wait option, the task will complete and return, but there will be a propagation delay before the name will resolve.  With the --wait option, the task polls the Route53 service until it reports that the DNS services have synched.

thor route53:record create app.example.org test1 CNAME test2.app.example.org --verbose --wait
task: route53:record:create app.example.org test1 CNAME test2.infra.example.org
update record = {:comment=>"add CNAME record test1.app.example.org", :changes=>[{:action=>"CREATE", :resource_record_set=>{:name=>"test1.app.example.org", :type=>"CNAME", :ttl=>300, :resource_records=>[{:value=>"test2.infra.example.org"}]}}]}
response = {:change_info=>{:id=>"/change/C2VQAFRSE6OXMY", :status=>"PENDING", :submitted_at=>2013-05-27 00:24:19 UTC, :comment=>"add CNAME record test1.app.example.org"}}
1) change id: /change/C2VQAFRSE6OXMY, status: UNKNOWN - sleeping 5
2) change id: /change/C2VQAFRSE6OXMY, status: PENDING - sleeping 5
3) change id: /change/C2VQAFRSE6OXMY, status: PENDING - sleeping 5
4) change id: /change/C2VQAFRSE6OXMY, status: PENDING - sleeping 5
5) change id: /change/C2VQAFRSE6OXMY, status: PENDING - sleeping 5


When this command completes the new record should resolve:

host -t cname test1.app.example.org 
test1.app.example.org is an alias for test2.infra.example.org.
Also, now if you list the zone records with thor route53:record list app.example.org you'll see the new CNAME record.

Deleting a DNS record


Deleting a DNS record is nearly identical to adding one.  To insure that you are deleting the correct record the delete task requires the same complete inputs as the create task.

thor route53:record delete app.example.org test1 CNAME test2.infra.example.org --verbose --wait
task: route53:record:delete app.example.org CNAME test1
update record = {:comment=>"delete CNAME record test1.app.example.org", :changes=>[{:action=>"DELETE", :resource_record_set=>{:name=>"test1.app.example.org", :type=>"CNAME", :ttl=>300, :resource_records=>[{:value=>"test2.infra.example.org"}]}}]}
response = {:change_info=>{:id=>"/change/C3ORAEV7FTLPBJ", :status=>"PENDING", :submitted_at=>2013-05-27 00:58:25 UTC, :comment=>"delete CNAME record test1.app.example.org"}}
1) change id: /change/C3ORAEV7FTLPBJ, status: UNKNOWN - sleeping 5
2) change id: /change/C3ORAEV7FTLPBJ, status: PENDING - sleeping 5
3) change id: /change/C3ORAEV7FTLPBJ, status: PENDING - sleeping 5
4) change id: /change/C3ORAEV7FTLPBJ, status: PENDING - sleeping 5
5) change id: /change/C3ORAEV7FTLPBJ, status: PENDING - sleeping 5

Again, with the --verbose and --wait options, the task will not complete until the DNS change has propagated. When it completes, the name will no longer resolve.

host -t cname test1.app.example.org
Host test1.app.example.org not found: 3(NXDOMAIN)

Summary

Now that we've registered a domain, and arranged to have it served by Route53, we can add and remove names.  When we configure OpenShift, it will be able to publish new application records.

Next Time

We still have to create hosts to run the OpenShift service.  On AWS that means creating instances , virtual machines in Amazon's cloud.  Amazon applies some fairly restrictive nework level packet filtering.  They use a feature called a securitygroup to define the filtering rules.  In the next post, I'll discuss how to create and manage new securitygroups, and what groups we'll need to allow OpenShift to operate.

Resources

Thursday, May 23, 2013

OpenShift on AWS EC2, Part 1: From the wheels up

Someone asked me recently how to build an  OpenShift Origin service on Amazon Web Services EC2.  My first thought was "easy, we do this all the time".  I started going through what exists for our own testing, development and deployment.  It clearly works, it's clearly the place to start, right?  Just fire up a few instances, tweak the existing puppet configs and zoom! right?

Then I started trying to figure out how to describe it and adapt it to general use, and I found myself adding more and more caveats and limitations and internal assumptions.  It's grown organically to do what is needed but what I have available isn't really designed for general use.   Some of it I couldn't understand just from reading and observing (since I'm kind of a hands on break-it-to-understand-it kind of guy).  Time to start taking it apart so I can put it back together.  When I can do that and it starts up when I turn the key, then I can claim to understand it.

So I decided to go back to the fundamentals not of OpenShift, but of AWS EC2 itself.

Defining a Goal: Machines Ready To Eat


An OpenShift service consists of a number of component services.  Ideally each component would have multiple instances for availability and scaling, but that's not required for initial setup.  Only the OpenShift broker, console and nodes need to be exposed to the users.

The host configuration is complex enough that even for a small service it is best to use a Configuration Management System (CMS) to configure and manage the system, but the CMS can't start work until the hosts exist and have network communications.  The CMS itself must be installed and configured.  Once the hosts exist and are bound together then the CMS can do the rest of the work and a clean boundary of control and access is established. This will later allow the bottom layer (establishing hosts and installing/configuring the CMS) to be replaced without affecting the actual service installation above.

So the goal here is: create and connect hosts with a CMS installed using EC2.  That's the base on which the OpenShift service will be built. If you run each of the component services on its own host using external DNS and authentication services, OpenShift requires a minimum of four hosts:

  • OpenShift Broker
  • Data Store (mongodb)
  • Message Broker (activemq)
  • OpenShift Node

Each of these can (theoretically, at least) be duplicated to provide high availability, but for now I'll start there.   The goal of this series of posts is to create the hosts on which these services will be installed.  We won't come back to OpenShift itself until that's done.

AWS EC2: Getting the lay of the land


If you're not familiar with AWS EC2, go check out https://aws.amazon.com . EC2 is the part of AWS which provides "virtual" hosts (for a fee, of course).  There are free-to-try levels, but you are required to give a credit card to sign up and you're very likely to start incurring charges for storage even if you stick to the "free" tier.  Read, be informed, decide for yourself.

AWS without the "W"


AWS presents a modern single-page web interface for all interactions, but I'm interested in command line or scripted interaction.  Amazon does provide a REST protocol and has implemented libraries for a wide number of scripting languages.  I'm using the rubygem-aws-sdk library (which is, surprisingly enough, written in Ruby) because I also want to use another Ruby tool called Thor

Tasks and the Command Line Interface


Thor is a ruby library which helps create really nice command line "tasks". The beauty of Thor is that you can use it both to define individual tasks and to compose those tasks into more complex task sequences.  This allows you to test each step as a distinct CLI operation and also to debug only the step that fails when one inevitably does.

I'm going to use Thor and the aws-sdk to create a CLI interface to the AWS low level operations, and then compose them to create higher level tasks which, in the end, will leave me with a set of hosts ready to receive an OpenShift service.

I'm not going to try to create a comprehensive CLI interface to AWS.  I'm only going to create the steps that I need to get this job done.  A number of the steps will encapsulate operations which may seem trivial, but this will allow for better consistency and visibility of the operations.  A primary goal is to have as little magic as possible. At the same time, I want to avoid overwhelming the user (me) with unnecessary detail when things are working as planned.

I'm not going to make you sit through the entire development process (which isn't complete).  Instead I mean to show the tools that I've developed and use them to cleanly define the base on which an OpenShift service would sit.

AWS Setup


To work with AWS, you must have an established account.  To use the the REST API you need to have generated a set of access keys.  To log into your EC2 instances you need to have generated a set of SSH key pairs and placed them so your SSH client can find them. (Usually in $HOME/.ssh) and configure your ssh client to use those keys when logging into EC2 instances (in $HOME/.ssh/config).


  • AWS Access Keys
  • AWS SSH Key Pairs
  • SSH client configuration

You can learn about and generate both sets of keys on the AWS Security Credentials page


Origin-Setup (really EC2 and SSH tools)


The tool set is currently called origin-setup and it resides in a repository on Github.  The name is a misnomer, there's not actually any OpenShift in most of it.

Requirements


The tasks are written in Ruby using the Thor library.  They also require several other rubygems.  All of them are available on Fedora 18 as RPMs.

  • ruby
  • rubygems
  • rubygem-thor
  • rubygem-aws-sdk
  • rubygem-parseconfig
  • rubygem-net-ssh
  • rubygem-net-scp

Getting (and setting) the Bits


Thor can be used to create stand-alone CLI commands, but I have not done that yet for these tasks. To use them you need to cd into the origin-setup directory and call thor directly.  You will also need to set the RUBYLIB path to find a small helper library which manages the AWS authentication.

git clone https://github.com/markllama/origin-setup
cd origin-setup
export RUBYLIB=`pwd`/lib
thor list --all

AWS Again: configuring the toolset


The final step is to give the origin-setup toolset the information needed to communicate with the AWS REST interface.

AWSAccessKeyId=YOURKEYIDHERE
AWSSecretKey=YOURSECRETKEYHERE
AWSKeyPairName=YOURKEYPAIRNAMEHERE
RemoteUser=ec2-user
AWSEC2Type=t1.micro

This file contains what is essentially the passwords to your AWS account.  You should set the permissions on this file so that only you can read it and protect the contents as you would your credit card.

The RemoteUser is the default user for SSH logins (F18+).  For RHEL6 it would be root.  The AWSEC2Type value defines the default instance "type" to be created when you create a new instance.  The t1.micro instance type is small and it is in the free tier.  You will need to choose a larger type for real use.

Turn the Key

You should be able to use the thor command to explore the list of available tasks.  Thor allows the creation of namespaces to contain related tasks.  Most of the important tasks to begin with are in the ec2 namespace.

You can see the available tasks with the thor list command:

thor list ec2 --all
ec2
---
thor ec2:image:create                                     # Create a new imag...
thor ec2:image:delete                                     # Delete an existin...
thor ec2:image:find TAGNAME                               # find the id of im...
thor ec2:image:info                                       # retrieve informat...
thor ec2:image:list                                       # list the availabl...
thor ec2:image:tag --tag=TAG                              # set or retrieve i...
thor ec2:instance:create --image=IMAGE --name=NAME        # create a new EC2 ...
thor ec2:instance:delete                                  # delete an EC2 ins...
thor ec2:instance:hostname                                # print the hostnam...
thor ec2:instance:info                                    # get information a...
thor ec2:instance:ipaddress [IPADDR]                      # set or get the ex...
thor ec2:instance:list                                    # list the set of r...
thor ec2:instance:private_hostname                        # print the interna...
thor ec2:instance:private_ipaddress                       # print the interna...
thor ec2:instance:rename --newname=NEWNAME                # rename an EC2 ins...
thor ec2:instance:start                                   # start an existing...
thor ec2:instance:status                                  # get status of an ...
thor ec2:instance:stop                                    # stop a running EC...
thor ec2:instance:tag --tag=TAG                           # set or retrieve i...
thor ec2:instance:wait                                    # wait until an ins...
thor ec2:ip:associate IPADDR INSTANCE                     # associate and Ela...
thor ec2:ip:create                                        # create a new elas...
thor ec2:ip:delete IPADDR                                 # delete an elastic IP
thor ec2:ip:list                                          # list the defined ...
thor ec2:securitygroup:create NAME                        # create a new secu...
thor ec2:securitygroup:delete                             # delete the securi...
thor ec2:securitygroup:info                               # retrieve and repo...
thor ec2:securitygroup:list                               # list the availabl...
thor ec2:securitygroup:rule:add PROTOCOL PORTS [SOURCES]  # add a permission ...
thor ec2:snapshot:delete SNAPSHOT                         # delete the snapshot
thor ec2:snapshot:list                                    # list the availabl...
thor ec2:volume:delete VOLUME                             # delete the volume
thor ec2:volume:list                                      # list the availabl...


It's time to see if you can talk to EC2.  This first query requests a list of images produced by the Fedora hosted team:

thor ec2:image list --name \*Fedora\* --owner 125523088429
ami-2509664c Fedora-x86_64-17-1-sda
ami-4b0b6422 Fedora-i386-17-1-sda
ami-6f640c06 Fedora-i386-18-20130521-sda
ami-b71078de Fedora-x86_64-18-20130521-sda
ami-d13758b8 Fedora-18-ec2-20130105-x86_64-sda
ami-dd3758b4 Fedora-18-ec2-20130105-i386-sda
ami-ed375884 Fedora-17-ec2-20120515-i386-sda
ami-fd375894 Fedora-17-ec2-20120515-x86_64-sda

If instead you get a really long messy ruby error, then check the permissions and contents of your ~/.awscred file.

It's probably a good idea, before experimenting too much here to go get familar with EC2 and Route53 using the web console a bit.

Next post I'll establish the DNS zone in Route53 and show how to manage DNS records to prepare for my OpenShift service.

References


  • AWS EC2 Console - managing remote virtual machines
  • AWS Route53 (DNS) Console - managing DNS
  • rubygem-aws-sdk - an implimentation of the AWS REST protocol in Ruby
  • SSH publickey - secure login without passwords
  • Thor - A ruby gem to build command line interface "tasks"
  • Puppet - A popular Configuration Management System
  • Git - a popular Source Code Management system
  • Github - a site for keeping Git repositories
  • origin-setup - a set of Thor tasks for managing AWS EC2 and Route53
    With a goal of automating the creation of an OpenShift Origin service in EC2

Wednesday, April 3, 2013

OpenShift Process Tools (for humans)

Making Sausage: It ain't for the faint of stomach

Otto von Bismark is known (among other things) for his observations on law and sausage.  The observation could apply to software as well, but there are lots of us with cast-iron stomachs needed to produce some really wonderful stuff.  If you're one undaunted, read on.

I give a lot of attention to the parts running under an OpenShift service. I want people to be able to run their own service, to understand, configure, tune and diagnose problems with it. But I REALLY want people to understand that, if there's something they want it to do, that it doesn't yet, they don't have to wait for Red Hat to do it for them.

I have a bit of a different position from most people with respect to OpenShift development.  It came about by serendipity, but it suits me well and the management seem happy with it for now.  I'm not actually in the product development hierarchy.  I work on things mostly from the outside.  I work to experience installing and configuring OpenShift as someone from the community, and I comment and report using the same channels the community members have. (I talk about that some in a blog interview with Gordon Haff)

Red Hat has a vested interest in the success of OpenShift, but it defines that interest in terms that go beyond market penetration and adoption rates.  Most of the developers currently work at Red Hat, but they are going out of their way to allow people to see not just the inner workings of the code, but of the process, and to form a community of contributors who help steer and shape what OpenShift becomes.

Building a community is itself a process and there are learning steps so it's not all there yet, but you're invited already.

Where's the Beef?


When I started at Red Hat and began coding, one of the first things I asked was "where do I put my code".  Coming from a background at proprietary software companies I was asking "where's the internal code repository?".  I got a quizzical look for a second and then a reply: "Umm.  Github?" like I'd just asked "Where's the bathroom" while standing at the mirror washing my hands. (Some people use bitbucket or sourceforge or a number of others)

OpenShift has been on Github for quite a while.  It was one of the first big moves to bring OpenShift to the community (the fact that it made life easier for our folks was a warmly anticipated beneficial side effect).  The hottest newest stuff is out there.  It's not always pretty.  If you look at the wiki and blog posts (especially from me) you'll find a number that are out of date because they contained hacks around warts and things have been changed or fixed (it's a good idea to check on the #openshift-dev channel on freenode if you're ever wondering about something).  It's embarrassing sometimes to find something's gone stale, but the alternative is waiting or hiding things, and we're not doing that. (There are people working on the Official Documentation, but that's for Official Releases.  We're talking bleeding edge here)

All of the developers (and by this, I include you) work by forking the repository, making changes on a branch and then submitting a pull request to bring those changes back into the master repository.  The pull requests get review and commentary and then get run through automated tests (discussed next), and when they're ready are merged.

Have it your way.


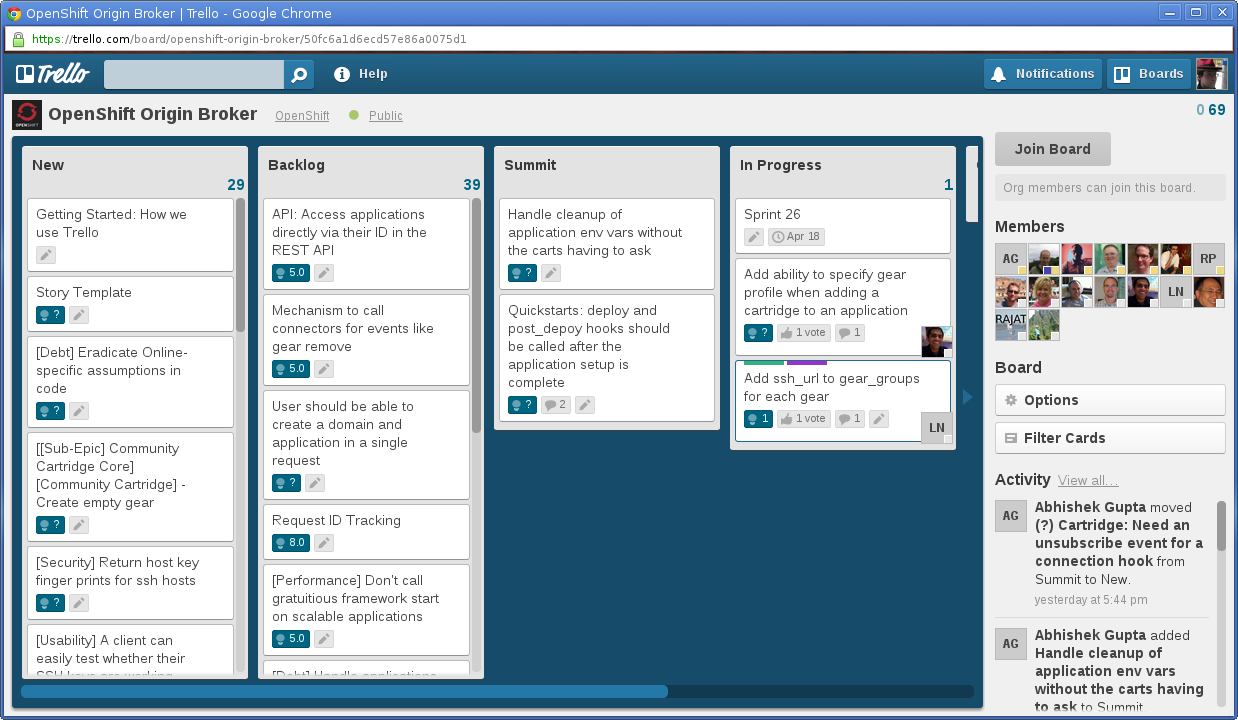
 The newest move is the switch to using Trello for planning.  OpenShift has always done development using an Agile process based on the Scrum framework.   The project is now hosted on Trello and you're invited to look and contribute.

The OpenShift Origin Broker Scrum Board


Trello is free in the same way that Github is. To contribute, get an account and join the OpenShift organization.  It's a web based scrum task board system.  New features are added to the board as "cards".  The cards are used to define and track the tasks needed to complete the feature.  They're moved along the board from inception to completion as the tasks are defined, filled in, assigned (or assumed) and completed.  All of the planning and work happen in plain sight. 

If you're new to Agile or Scrum you want to take some time to look up what they are and how they work. Scrum is known as a "framework" for a reason.  It's a set of priorities and guidelines, not rules.  Each team has it's own conventions and etiquette.  You'll get the best response from people if you observe a bit and dip your toe in slowly.

Check out Trello's Help site and take the tour for some idea of what Trello itself is and does, and how it works. Take a look too at the first card in the Broker board.  It describes how the OpenShift team is expected to use Trello. Take a look at the story template card.  It show the skeleton of the questions a card should ask (and answer).

A card, still capturing requirements.


The Trello site is a place for  contributors.  It's not a forum or question and answer session.  Those are better served on the OpenShift fora, on IRC or on the mailing lists.  Reasonable suggestions are encouraged. See this one requesting feedback on an update to the PHP cartridge as an example.

Welcome to the kitchen


Well it's hot in here.  The stainless steel doors with the windows in them so the servers don't crash into each other are flapping on their springs behind you.  The knife rack and the prep counter are in front of you.  You know your way around an industrial fridge? All of us bus dishes now and then.  You're a bit overdressed, but get to work we've got some hungry folks out there waiting.  Check that card over your head and start cooking.

Resources


Friday, March 22, 2013

Installing (but not configuring) the broker service by hand

I'm working through a totally(?) manual installation of the OpenShift Origin service on Fedora 18. The last post on this topic was about building the RPMs on your own Yum repository. This time I'm going to install the broker service and make a few tweaks that are still required.

One seriously major thing to note is that I don't recommend actually doing this. I'm doing it to shed some light on some of the things still going on in the development process and to highlight the ways in which you can get some visibility into the installation and monitoring of the service.

If you're interested in building and running your own development environment or service for real, I suggest starting by reading through Krishna Raman's article on creating a development environment using Vagrant and Puppet and the puppet script sources themselves to see what's involved.  Finally there's a comprehensive document that describes the procedure with fewer warts.


Ingredients

As usual, I start with a clean minimal install of Fedora 18.  In addition this time I also have a yum repository filled with a bleeding-edge build from source as I described previously.  Finally I have a prepared MongoDB server waiting for a connection.

I'm replacing my real URLs and access information with dummies for demonstration purposes.


  • Yum repo URL
    http://myrepo.example.com/origin-server
  • MONGO_HOST_PORT="mydbhost.example.com:27017"
  • MONGO_USER="openshift"
  • MONGO_PASSWORD="dontuseme"
  • MONGO_DB="openshift"

Preparation

Since I'm building my own packages from source and placing them in a Yum repository, I need to add that repo to the standard set. I'll add a new file to /etc/yum.repod.d referring to my yum server.

Even if you're building from your own sources, there are still some packages you need to get that aren't in either the stock Fedora repositories or in the OpenShift sources. These are generally packages with patches that are in the process of moving upstream or are in the acceptance process for Fedora. Right now a set is maintained by the OpenShift build engineers. I need to add the repo file for that too:

[origin-server]
name=OpenShift Origin Server
baseurl=http://myrepo.example.com/openshift-origin
enable=1
gpgcheck=0
[origin-extras]
name=Custom packages for OpenShift Origin Server
baseurl=https://mirror.openshift.com/pub/openshift-origin/fedora-18/x86_64/
enable=1
gpgcheck=0
At this point you can install the openshift-origin-broker package.
yum install openshift-origin-broker
...
  urw-fonts.noarch 0:2.4-14.fc18                                                
  v8.x86_64 1:3.13.7.5-1.fc18                                                   
  xorg-x11-font-utils.x86_64 1:7.5-10.fc18                                      

Complete!


There are a set of Rubygems that are not yet packaged as RPMs. I need to install these as gems for now.

gem install mongoid
Fetching: i18n-0.6.1.gem (100%)
Fetching: moped-1.4.4.gem (100%)
Fetching: origin-1.0.11.gem (100%)
Fetching: mongoid-3.1.2.gem (100%)
Successfully installed i18n-0.6.1
Successfully installed moped-1.4.4
Successfully installed origin-1.0.11
Successfully installed mongoid-3.1.2
3 gems installed
Installing ri documentation for moped-1.4.4...
Building YARD (yri) index for moped-1.4.4...
Installing ri documentation for origin-1.0.11...
Building YARD (yri) index for origin-1.0.11...
Installing ri documentation for mongoid-3.1.2...
Building YARD (yri) index for mongoid-3.1.2...
Installing RDoc documentation for moped-1.4.4...
Installing RDoc documentation for origin-1.0.11...
Installing RDoc documentation for mongoid-3.1.2...
There are a number of gem version restrictions in the broker Gemfile which are not met by the current rubygem RPMs.  I have to remove the version restrictions so that the broker application will use what is available. This risks breaking things due to interface changes, but will at least allow the broker application to start.

sed -i -f - <<EOF /var/www/openshift/broker/Gemfile
/parseconfig/s/,.*//
/minitest/s/,.*//
/rest-client/s/,.*//
/mocha/s/,.*//
/rake/s/,.*//
EOF


For some reason, even with the --without clause for :test and :development, bundle still wants the mocha rubygem.  This should not be required for production, but right now you need to install it so that the Rails application will start.

yum install rubygem-mocha
...
Installed:
 rubygem-mocha.noarch 0:0.12.1-1.fc18

Dependency Installed:
  rubygem-metaclass.noarch 0:0.0.1-6.fc18

 Verifying The Dependencies

Now that all of the software dependencies have been installed (mostly by RPM requirements through Yum, and finally through gem requirements and some version tweaking of the Gemfile) I can check that all of them resolve when I start the application. Rails will call bundler when the application starts so I'll call it explicitly before hand. I'm only interested in the production environment, so I'll explicitly exclude development and test.

cd /var/www/openshift/broker
bundle --local
Using rake (0.9.6) 
Using bigdecimal (1.1.0)
....
Using systemu (2.5.2)
Using xml-simple (1.1.2)
Your bundle is complete! Use `bundle show [gemname]` to see where a bundled gem is installed.

If I try to start the rails console now, though, I'll be sad. It won't connect to the database.

Configure MongoDB access/authentication

The OpenShift broker is (right now) tightly coupled to MongoDB. Recently it switched to using the rubygem-mongoid ODM module (which is a definite plus if you have to work on the code).

The last thing I need to do before I can fire up the Rails console with the broker application is to set the database connectivity parameters. One side effect of using an ODM is that it establishes a connection to the database the moment the application starts.

NOTE: when this is done I will not have a complete working broker server. I still need to configure the other external services: auth, dns and messaging.

Set the values listed in the Ingredients into /etc/openshift/broker.conf.

/etc/openshift/broker.conf
...
# Eg: MONGO_HOST_PORT="<host1:port1>,<host2:port2>..."
MONGO_HOST_PORT="mydbhost.example.com:27017"
MONGO_USER="openshift"
MONGO_PASSWORD="dontuseme"
MONGO_DB="openshift"
MONGO_SSL="false"
...

Now I can try starting the rails console. It should connect to the mongodb and offer an irb prompt:


To verify the database connectivity, take a look at this recent blog post.

Next up is configuring each plugin, one by one.

Gist Scripts

I'm trying something new.  Rather than including code snippets inline, I'm going to post them as Github Gist entries.

References

Thursday, March 21, 2013

Verifying the MongoDB DataStore with the Rails Console: Mongoid Edition

A few months ago I did several posts about how to verify the operation of the back end services of an OpenShift Origin broker service.   Today I discovered that this one (mongod) is obsolete.

The data store behind the broker is a MongoDB.  That one back end service isn't pluggable.  It's actually been made more tightly coupled to Mongo, but in this case that's a good thing.  What changed is that all of the Rails application model objects have been converted to use the Mongoid ODM rubygem.  All of the object persistence is now managed in the background and all of the logic can just deal with the objects as... well... objects.

There are a couple of implications for broker service verification.

  1. The broker connects to the database on startup
    This means that if the database access/auth information is wrong, the rails app will fail to start.
  2. The only simple way to test the connection is to create an object and observe the database.
    This is both simpler to do, and potentially more difficult to diagnose on failure.

I think the second point won't be as much of a downside as I would fear at first.  I suspect that if connectivity is good, the rest will be.  If it's not, it will be fairly clear why.

Configuring the Broker Data Store


Configuring the datastore access information hasn't changed.  The configuration information is still stored in /etc/openshift/broker.conf. The settings all have the MONGO_ prefix:

MONGO_HOST_PORT="data1.example.com:27017"
MONGO_USER="openshift"
MONGO_PASSWORD="dontuseme"
MONGO_DB="openshift"
MONGO_SSL="false"

Adjust these for your mongodb implementation. Remember to open the firewall for the broker on your database host.  Configure the database to listen and test the connectivity locally.

Verifying Simple Connectivity


You also want to check the connectivity from your broker host before trying to fire up the broker itself.

broker> echo "show collections" | mongo --username openshift --password dontuseme data1.example.com:27017/openshift
MongoDB shell version: 2.2.3
connecting to: data1.example.com:27017/openshift
system.indexes<
system.users
bye

You can do this repeatedly and observe the mongodb log on the database host.

Observing the Mongo Database Logs

On the database host, take a look at the mongodb logs. You should see a new entry (successful or failed) each time a client connects.

data1> tail /var/log/mongodb/mongodb.log
Thu Mar 21 20:24:26 [conn15] authenticate db: openshift { authenticate: 1, nonce: "20d6f85f33f03dee", user: "openshift", key: "60639c7ce56851a25be56bcebd98c3ed" }

Starting the Rails Console


Now that you're sure that the database is running and accessible from your broker host you can try firing up the Rails console. This assumes that you've resolved all of the gem requirements. If not, the Rails console will complain about them and exit.

broker> cd /var/www/openshift/broker
broker> rails console
Loading production environment (Rails 3.2.8)
irb(main):001:0>

If you go this far you should have seen one more authentication log record on the mongodb server. (see above)

Create a Database Object


Now we can create a CloudUser object and watch it appear in the database

irb(main):001:0> user = CloudUser.create(login: "testuser")
=> #<CloudUser _id: 514b6f6cf3da7fa491000001, created_at: 2013-03-21 20:37:00 UTC, updated_at: 2013-03-21 20:37:00 UTC, login: "testuser", capabilities: {"subaccounts"=>false, "gear_sizes"=>["small"], "max_gears"=>100}, parent_user_id: nil, plan_id: nil, pending_plan_id: nil, pending_plan_uptime: nil, usage_account_id: nil, consumed_gears: 0>

You can see that this is more than your typical Ruby object. The ID and created_at and updated_att fields are artifacts of the ODM persistence.  You won't see another log message because the database connection is persistent using the ODM.  You will find that there's now a document in the openshift.cloud_user collection.

data> echo "db.cloud_users.find()" | mongo --username openshift --password dbsecret localhost/openshift
MongoDB shell version: 2.2.3<
connecting to: localhost/openshift
{ "_id" : ObjectId("514b6f6cf3da7fa491000001"), "consumed_gears" : 0, "login" : "testuser", "capabilities" : { "subaccounts" : false, "gear_sizes" : [ "small" ], "max_gears" : 100 }, "updated_at" : ISODate("2013-03-21T20:37:00.546Z"), "created_at" : ISODate("2013-03-21T20:37:00.546Z") }
bye


Removing the Test Object


Cleaning up is just as easy

irb(main):002:0> user.delete<
=> true

And to verify that it's been removed:

echo "db.cloud_users.find()" | mongo --username openshift --password dbsecret localhost/openshift
MongoDB shell version: 2.2.3
connecting to: localhost/openshift
bye

At this point you know both that your database is running and that the broker application can connect and read and write it.

Much simpler with an ODM.

References: